- REVIEWS
Camera Reviews 
More Reviews Mobile Reviews Photography Reviews - GALLERIES
- VIDEOS
- BUYER'S GUIDES
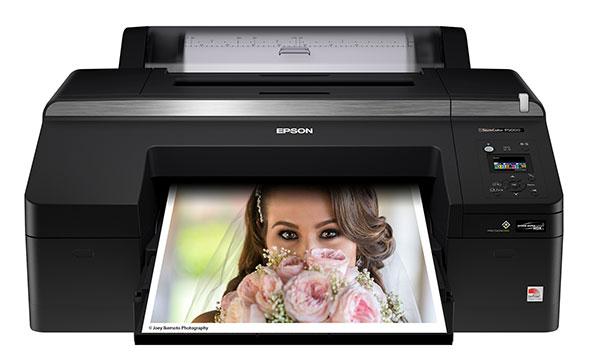
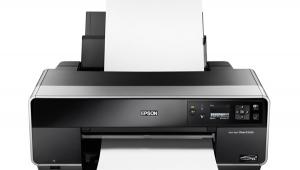
Epson P5000 Printer & Print Layout Software Review: Testing Epson’s Latest Flagship 17-Inch Inkjet
I have been using Epson’s Advanced B&W Photo printing mode for many years in a series of the company’s desktop printers but always wished the print software offered a way to see my image adjustments in real time. So, when Epson announced their new Print Layout software, which offers a “live preview” (among other controls) in Advanced B&W Photo mode, I contacted them to give it a whirl.
The bonus was that the company offered their latest flagship desktop printer, the Epson SureColor P5000, as a testing machine. So consider this a “two-for-one” review of both the Epson P5000 and the company’s new Epson Print Layout software.
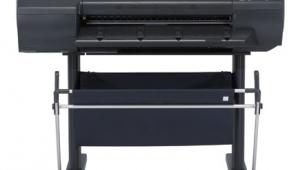
The Epson SureColor P5000
Available for just under $2,000, the massive Epson SureColor P5000 is a 17-inch desktop printer that offers both roll and cut-sheet capabilities. It contains the latest Epson technology and uses 10 colors in printing (11 inks, including either Matte or Photo Black) of UltraChrome HDX pigment ink that, given the right storage and paper, is said to deliver 200-year color and 400-year (!) black-and-white archival capability when used with Advanced B&W Photo mode.
For my tests, Epson supplied a wide variety of roll and cut-sheet papers, including their Exhibition Canvas Natural Satin roll, cut-sheet Hot Press Bright (a favorite matte surface of mine), Metallic Glossy, and Premium Luster 260 gsm: all told, just about every surface type that allowed me to check out both the Matte and Photo Black ink looks and transport capabilities of the printer. I also used a few “third-party” papers, including Red River Paper’s Palo Duro Etching and Hahnemühle’s Glossy FineArt.
Overall, I found the Epson P5000 to be a fine quality production machine with an easy-to-follow setup and a richly menued LCD/control panel. There are a number of paper paths: a cut-sheet cassette that takes a thick stack of standard photo inkjet papers; a front load for thick stock (which I did not test); a single sheet top feed slot for fine art weight papers; and a smooth and easy-to-load roll feeder (up to 17 inches) that offers individual “cut” and “uncut” at the end of the print run.
If you find yourself doing mostly production fine art printing, buy and use roll paper as the single sheet feed can get tiresome, although for one-offs and proofs it is fine. The Epson P5000’s printing speeds are impressive, even at “highest quality” at quite large image file sizes: naturally this will vary depending on how fast your computer gets the info to the starting gate. I should mention that it is a hefty beast, weighing in at about 115 pounds (though the shipped box weight is more like 135 pounds) and measuring 34x30x16 inches, so phone a friend, or two, to unpack and set it up.
The Epson P5000 is a serious printer for enthusiasts and pros alike who will find it more than meets needs and expectations. Print quality and image detail are very impressive: its smallest droplet size is 3.5 picoliters with Variable Droplet Technology that can disperse three different sizes per line; it shows deep blacks and rich color when desired (for me a hallmark of Epson printers); and while colors are rich, there is also subtle color differentiation in reds and blues throughout.
Another feature of the Epson P5000 that will appeal to experienced printers is the efficiency of paper handling via the four optional paths: you can switch back and forth between cassette and roll without unloading one to use the other. The roll printer allowed me to output very wide panoramas while the cut-sheet cassette let me print one after another image in a queue so I could start work on the next image while the sent image worked its way through the printing path.
While those with printing experience using Epson machines could basically take the P5000 out of the box and get to work, there have been numerous additions to the LCD menu options and some new wrinkles in power management. In any case do check the updates and download the full user manual online and take the tour. One other thing: Epson’s one-year limited warranty gets you in-place service and a visit by an Epson rep should something go really wrong, a good thing as you don’t want to be shipping this big boy back and forth.

Print Layout Software
Available as a free download, the Epson Print Layout (EPL) software is, for me, essentially useful as a live preview of the Advanced B&W Photo mode workspace that, as mentioned, previously had me flying blind. It can be used for color images as well: it worked fine when using Epson and other papers, since when choosing surface in the interface you are essentially feeding the ICC profile and (usually) platen height information to the printer. (Note: As of late more and more paper makers bundle the platen height into their profiles.)
The software can be used “freestanding” or you can transfer from an opened file in Photoshop by using File>Automate>Print Layout, which evokes and loads the image into Print Layout; or right-click and use “Open With” from Bridge for flattened TIFFs and JPEGs; or open any browser from within the freestanding setup and import the image.
Now don’t get me wrong: this is in no way a substitute for Photoshop, but more a simplified interface for those with Epson printers, one that has been compared to similar functionality in Canon’s Print Studio Pro. It has some spec requirements: Windows 7+ and Mac OS X 10.10.X+, and, for a plug-in, Adobe CC 2015 or higher. It is designed for use with Epson SureColor printers only, including the P400, P600, P800, and P5000 through P9000.
When you first open the software you can use “Browse” or “View” from the menu to import an image. It detects the attached printer and then you use a drop-down menu to choose paper surface and size, the paper source (where you are accessing paper), and printing quality.
The software peeks into your Profile Library and offers options of all you have loaded. You then have layout options (standard, gallery wrap, panorama, or a template you have created), then orientation (portrait or landscape), then print positioning on the paper, including inset margins. All of the above are both utilitarian (and necessary) and straightforward.
In addition, and helpfully, there’s a small readout of paper size and resolution at print size (ppi) at the bottom left that will manifest itself on the preview screen: in other words, you see how the image fills the page at the current file size/ppi resolution. If it seems too small, you can use the Layout sliders to decrease the margins and get an instant readout of the resultant ppi, a good indication of how far to take it (I’m a base 220 ppi guy myself) and whether to consider using an upsample route in Photoshop to get the image up to a good printing resolution.
Color and Advanced B&W Photo Mode Options
The Color Settings are the next and star attraction of the EPL’s menu. Under “Type” you can use Printer Managed Color (best for Epson papers), ICC profiles (sort of a Photoshop-managed color that uses the profile you input under Media Type), or Advanced B&W Photo. Choose Advanced B&W Photo and the familiar control panel appears, albeit with a live preview in the image window: overall print color bias can be neutral, warm, or sepia, and you can modify any and all via the “Tone” drop-down menu.

There are also a series of sliders for brightness, contrast, shadow and highlight tonality, optical density (which I always maxed out, as lesser settings “paled” the image too much), and something called Highlight Point Shift, mainly for suppressing “paper white” (spectral) highlights by adding a bit of Light Light Black ink to those areas in the image—my advice is to use this sparingly. As a last important feature, you can also customize print bias (warm, cool, coloration) using the familiar color wheel-type control. As you move the sliders the interactive image is quick to change, and you can really nail the look.
There are some caveats. The preview is not high res, to say the least, and when comparing it to a Photoshop preview it is sharp enough but often quite grainy, making some of the adjustments, such as contrast, hard to pin down, especially when the image has lots of fine details. In essence, it restrains you from making some (not all) adjustment decisions in that you will not fully know exactly what you will be getting in the final print. The program does not link in with Photoshop’s rendering engine.

More of a problem is that any changes you make in EPL are not added to the image processing instructions and should be thought of as more of a temporary “filter” that you place over the image prior to printing, one that goes away when you finish printing and close the program. There is no Save As in the File menu: the only way to save the changes is by going to the top of the menu, to Preset, and saving that distinct image as, say, “Tree 3,” and then opening that preset when you reload the image. In short, if you want the same look on the print you must it run through EPL again with that preset because Photoshop does not record the changes and EPL sans preset will not recognize the changes. Awkward.
Finally, there is no Help option in the top menu, something beginners or even more experienced printers would find, well, helpful, even if it steered you to an online PDF.
Conclusion
The EPL is a very good first step in finally making the Advanced B&W Photo mode a more visceral and interactive affair, as well as offering a fairly simple workflow to Epson printmakers. On the plus side, it greatly expands the simplicity of use for Epson printmakers and fosters liberal use of both Epson and third-party papers: the interface is simplicity itself and taking the tour will impress you with the software’s ease of use. The plug-in feature hands off images from Photoshop with ease. Overall, this is not just an aid to monochrome printmakers: it can be put to good use with color images as well, and in both cases can be applied to work with any paper, regardless of surface or maker, sheet or roll. On the minus side, its preview does not make use of Photoshop’s processing power, and can be troublesome with images with fine details, making some offered controls more approximations than not. The fact that changes made in the software do not attach to the image processing instructions and that there is no Save As is to me a serious omission that hopefully will be addressed in future versions.

As it stands, I feel that the software is a fine tool for those who are challenged in setting up a proper printing workflow, since it takes the user step by step through the process. It will be fun for those who, like me, always wanted to have a preview image of their work in Epson’s Advanced B&W Photo printing mode. Yet, the printers on which it works, the SureColor P series, are aimed at those who generally have a bit more experience with printmaking or who have at least made the commitment to step up in class. And while the image resolution of the preview may be an issue for some, the temporal nature of the processing is, for me, okay for one-offs and single-date editions, but otherwise a detriment. Regardless, the software is free and intriguing, and will certainly aid many printmakers in learning about and hopefully following a well-thought-out workflow. Give it a try.


![]()
Get the Latest Photo Tips, News & Reviews from Shutterbug!
| Camera Reviews Other Reviews | Mobile Reviews Photography Reviews Columns | News | Features | How-To | Resources |
 © 2025 Shutterbug
AVTech Media Americas Inc., USA
All rights reserved