- REVIEWS
Camera Reviews 
More Reviews Mobile Reviews Photography Reviews - GALLERIES
- VIDEOS
- BUYER'S GUIDES
Bubble In A Bubble: Color & Design Close Up
Previously I discussed photographing bubble solution stretched across a frame. You can get the same swirling pearlescent colors in the spherical surface of a bubble as it’s sitting on glass. When I was experimenting with this a few years ago, I discovered that you could even blow a bubble inside a bubble and then another one inside of that. Image (#1) is a picture of a bubble in a bubble in a bubble in a bubble.
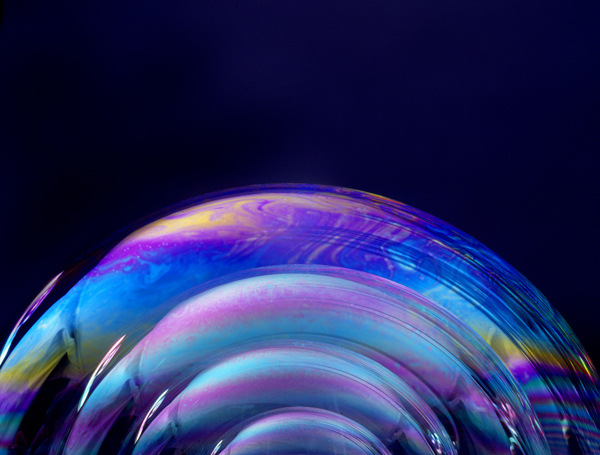
All Photos © Jim Zuckerman
The Setup
The soap solution I use to create the bubbles is the same stuff I used in a previous project. You can buy it at any large chain store. I add a few ounces of glycerin to make the bubbles last longer.
Next, you need a small piece of glass or a mirror. The piece I used is only 8x10”. If you use glass, I suggest placing it on a piece of black fabric so you can’t see any kind of pattern or color from the surface on which the glass is supported. The black fabric (I prefer velvet) is also used in the background behind the bubbles.
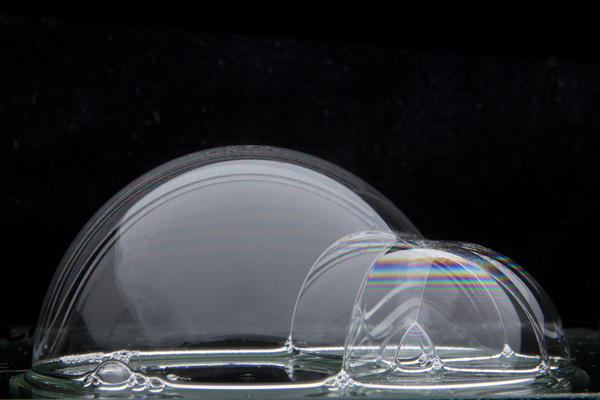
For camera equipment I suggest either a telephoto macro lens or a medium telephoto lens with an extension tube. The tube allows you to focus closer than the lens normally allows. When I first took pictures of the bubbles, I used a 50mm macro and quickly discovered a problem. The working distance was very short—just a few inches—and I could see the camera lens reflected in the surface of the bubble. In (#2) the large dark area in the middle of the bubble is the lens. At first I tried to solve the problem by taping a piece of white paper around the lens, and you can see the rough cut in the paper. This wasn’t a good approach, and I realized that a telephoto macro would take care of this because it extends the working distance.
You need a tripod for this technique, and the lens should be positioned virtually level with the plane of the table on which the glass is supported.

The Lighting
The biggest challenge is the lighting. You can’t use an on-camera flash, a photoflood or even ambient daylight. The reason these light sources won’t work is that the surface of the bubble is highly reflective and it behaves like a fisheye—it sees everything in 180˚. Normal light sources will simply reflect in the bubble’s surface and the picture will not be what you want. The goal is to show the beautiful rainbow colors of the soap solution as it swirls over the hemispherical surface. A single or multiple light setup will simply show as hot spots on the soapy surface without revealing any color.
The only way to bring out the color is to place a large white object as close to the bubble as possible. The best way to do this is with a large piece of white fabric. If the fabric has wrinkles or even creases that have been ironed, such as a bed sheet, the wrinkles will show in the reflection in the surface of the bubble almost as clearly as you can see them with your eyes.
To solve the problem, I use a studio softbox. The white fabric forms a large surface, especially when placed close to the bubbles, and it doubles as the diffused light source necessary for this technique. In figure A you can see that the softbox I was using was suspended just inches from the bubble. In fact, I had a very narrow slot through which I could take the picture. I had to lift up the edge of the softbox to allow my lens full view of the bubble.
A makeshift softbox in which you stretch white material across a frame—even a large picture frame—with a portable flash behind the fabric would also work. Just make sure that the frame of white fabric is positioned as close to the bubble as possible without breaking it and without blocking the lens. In addition to revealing the swirling rainbow colors, the close proximity of the light means you will be able to use a small lens aperture for increased depth of field.
The Photography
Since you are using flash equipment, it’s not necessary to use the Mirror Lockup feature and cable release (or self-timer) as you normally would when doing macro work. However, bubbles have depth and therefore I recommend using f/22 or f/32 to make sure as much of the hemisphere is as sharp as possible. I used f/32 for all these images, and I varied the exposure by adjusting the power on the flash unit.
Autofocus is not going to work in this situation. When there are several planes of focus, the camera doesn’t know precisely where the point of focus should be. Therefore, use Manual Focus. Also, make sure the Image Stabilization feature is turned off or else you won’t get sharp pictures when using the tripod.
Making The Bubbles
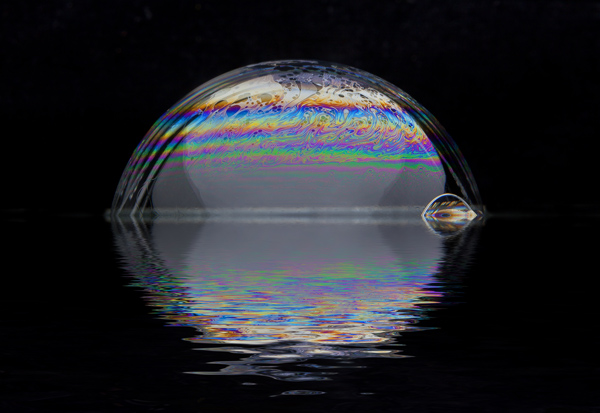
I use a plastic straw to blow the bubbles. This is important. Don’t use a paper straw. I place a small amount of soap solution on the glass or mirror and with one end of the straw inserted in it I blow a medium sized bubble. You have to wait about a minute or so for the colors to appear in the surface and then you can start shooting. If you shoot too early, you’ll get basically a white bubble, as I did in (#3). When the colors become intense, you only have about 20 seconds or so before the bubble breaks or it loses the color.

If you want to blow another bubble inside the first one, get the plastic straw wet with soap solution and then you can stick it right through the surface of the bubble. Blow the second bubble in the center so it doesn’t touch the outer surface of the first bubble. If it does, the two will merge together. This isn’t necessarily bad if you want to photograph a conglomeration of bubbles as I did in (#4). Often, when the bubbles merge together you get a mess that isn’t very artistic at all, like (#5). To prevent the second bubble from sliding into the first one, make sure that the table on which you are working is perfectly level.


The top portion of the bubble is the most colorful and attractive. You may end up cropping the bottom portion of the bubble to make the picture have a cleaner look. Another option is to use the Photoshop plug-in Flood (made by Flaming Pear Software, www.flamingpear.com) to create a realistic reflection. It is certainly appropriate, given the subject, and at the same time you solve the problem of the contact area between the bubble and the glass looking too messy. Images (#6 and #7) illustrate the potential with this. In the latter, I also used the sunshine filter in Nik Color Efex Pro (www.niksoftware.com).


![]()
Get the Latest Photo Tips, News & Reviews from Shutterbug!
| Camera Reviews Other Reviews | Mobile Reviews Photography Reviews Columns | News | Features | How-To | Resources |
 © 2025 Shutterbug
AVTech Media Americas Inc., USA
All rights reserved