- REVIEWS
Camera Reviews 
More Reviews Mobile Reviews Photography Reviews - GALLERIES
- VIDEOS
- BUYER'S GUIDES
Small Worlds: Steve Bronstein Captures Whimsical Scenes Using Miniatures & Lighting Magic
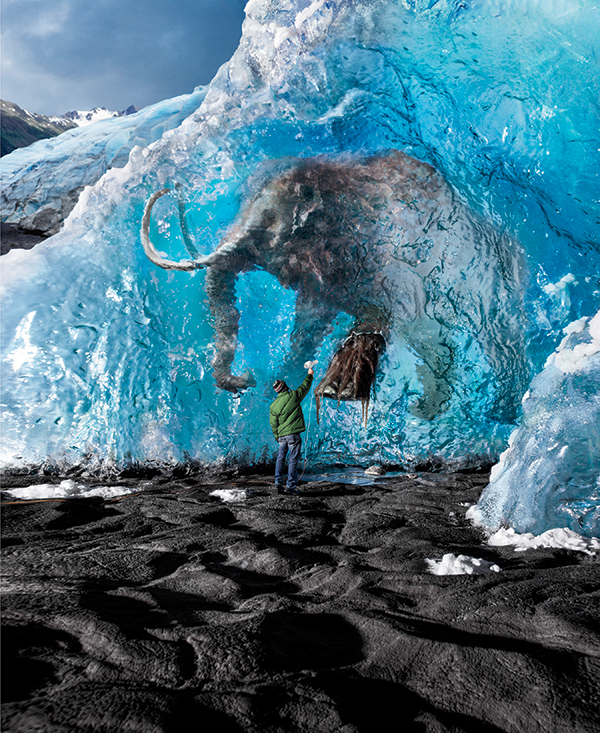
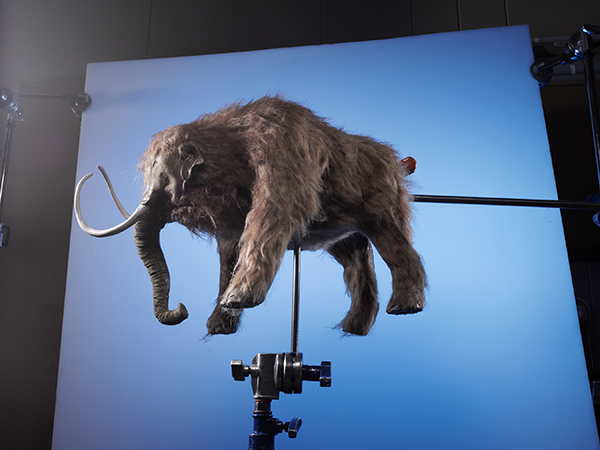
Convincingly capturing a mastodon frozen in a melting glacier was no easy task. Only a miniature set could bring this scene to life.
If we could describe Steve Bronstein’s trademark shooting style it would be: keep it real and keep it small. Bronstein is a wizard at breathing life into miniature sets and adding an air of believability to each one.
His mastery of perspective and scale is only a small part of that. He also knows how to make his lighting work for him to deliver one-of-a-kind masterpieces. And he has the most talented people working with him to ensure that each step in a project is taken on the surest footing. These artists include Mark Borow of PropArt (props/miniatures), Michael Miller (resin models), Robert Bowen (postproduction retouching/compositing), and Sandro La Ferla (backgrounds).
Bronstein got started photographing miniatures in response to solving a problem for an advertising client, Absolut Vodka. That led to a working relationship lasting 25 years, with some of the most creative and original ads imaginable, largely based around the iconic shape of the Absolut bottle.
So now let’s take an in-depth look at what makes Steve Bronstein such a genius at creating convincing miniature sets.
Mastodon In A Glacier
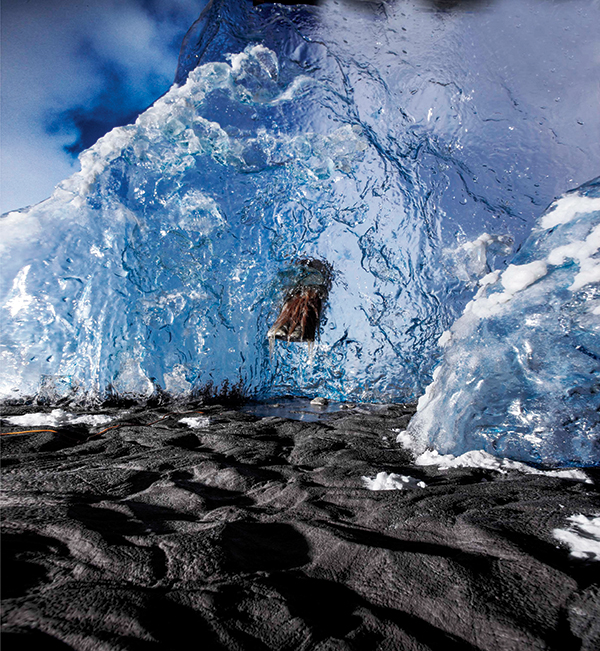
This was shot on assignment for Microsoft, promoting a video game. The challenge, as Bronstein saw it, was this: “How do you make a mastodon appear to be genuinely embedded in the ice? The reality of the situation is, if the animal were truly inside the glacier, you wouldn’t be able to see it because the ice would be too opaque. So we had to find a balance between the reality of what the glacier would look like and allowing enough transparency to show the creature.
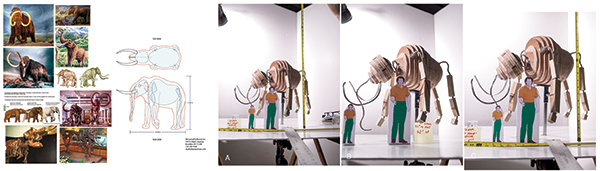
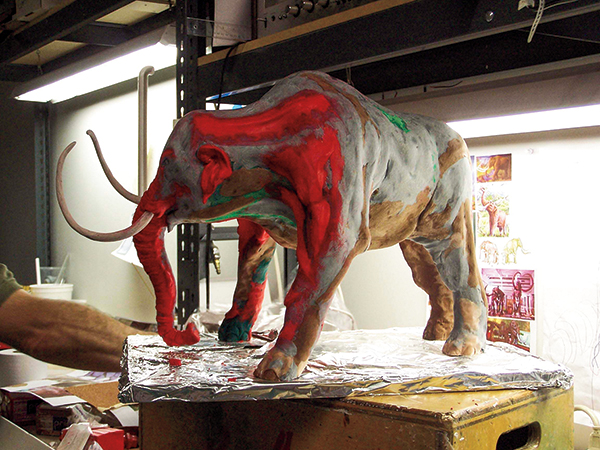
“We had one set built, which was just the wall of ice, together with a scarred, rocky debris field. The mastodon model itself was on a separate set, shot behind a clear but rippled glass façade that added distortion, with the exception of the protruding foot, which needed a different treatment since it was emerging from the ice. That foot was built from faux fur and coated in resin to appear wet. Then it became a balancing act to bring that image into the main visual of the glacier.
“The glacier was actually three feet tall—maybe 3x5 feet. The person in the picture is real, photographed separately and composited into the shot and scaled down proportionately. The scene behind the glacier is a separate shot I’d taken in Alaska and also composited into the shot.”
Bronstein added: “When we built the mastodon, we thought a lot about its posture, the shooting angle, its size relative to the hired model. This was all in an effort to make the mastodon feel credible.”
Regarding the key lighting, Bronstein noted: “The ice sculpture is partially lit from within. We tried to capture the turquoise quality that you’d normally find in a glacier by gelling the light appropriately.”
All Photos © Steve Bronstein
Steve Bronstein’s Tips on Creating Credible Miniatures
1. Look at what’s real. Try and understand the dynamics that are at play and how can you make the project look as natural as possible.
2. Think of it as a whole and understand what the issues are in solving this problem for a client. What’s the best point of view? How can I simulate it? How can I light it credibly?
3. Keep the lighting real. Essentially, if you’re simulating an outdoor setting that means it’s a single-source situation—sunlight—so the key light is a single light, often a very hard light. There are exceptions, such as Bronstein’s shot of a New Jersey diner scene, where the main light illuminating the parked cars outside came from within the diner.
4. Accentuate the strengths of the image—the things you can pull off very well—and hide the weaknesses, using various means to disguise them.
5. Light the set a little warm or a little cool, to give it the suggestion of the time of day. You frequently want the light to show form and texture, so it tends to feel like morning or dusk.
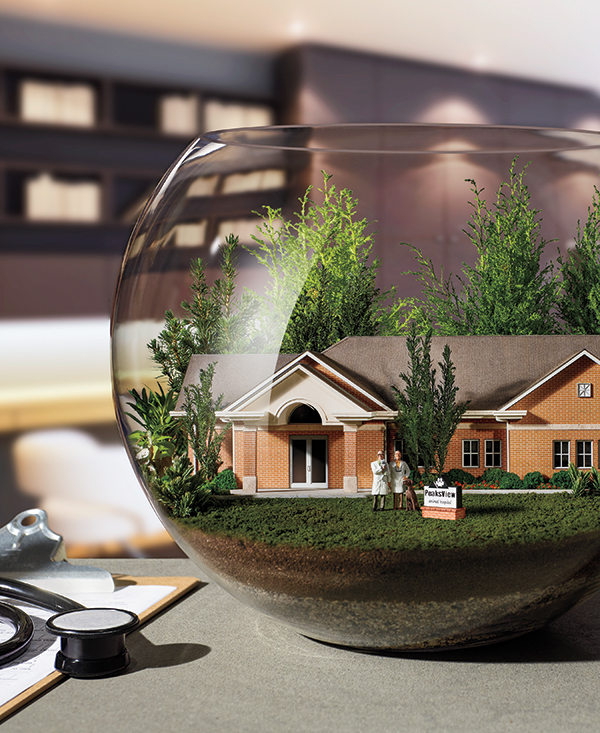
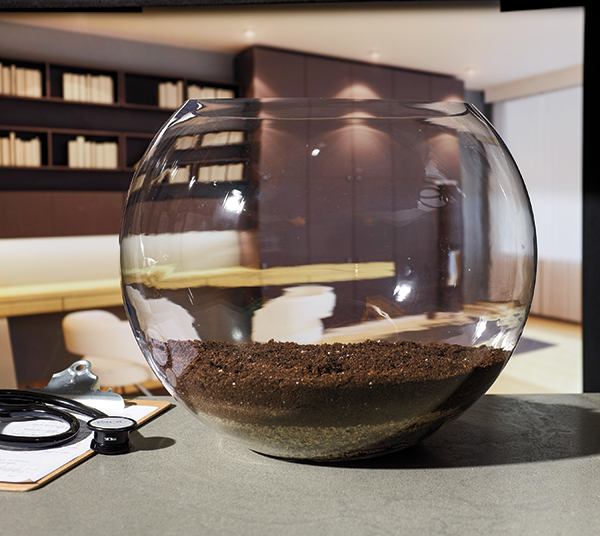
Veterinarians Under Glass
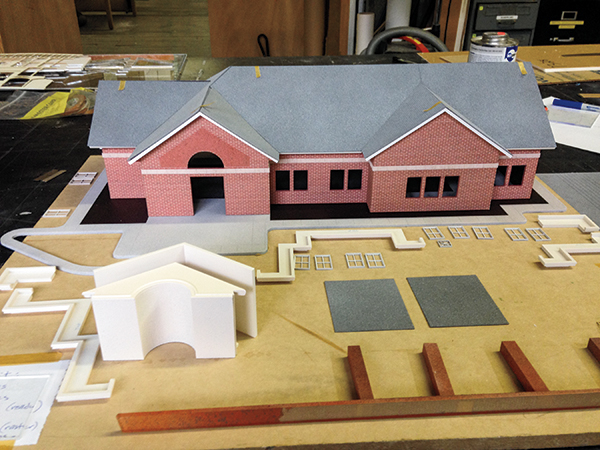
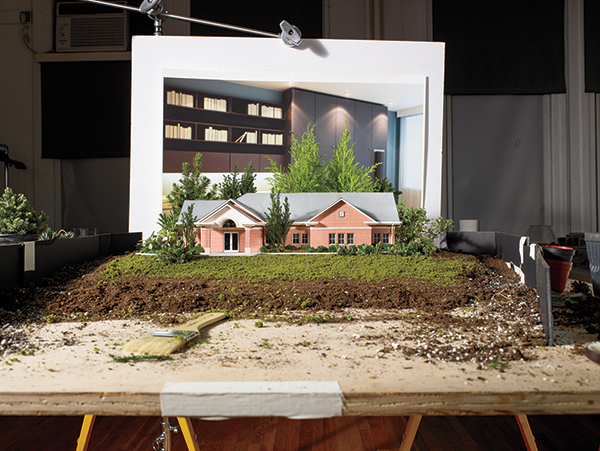
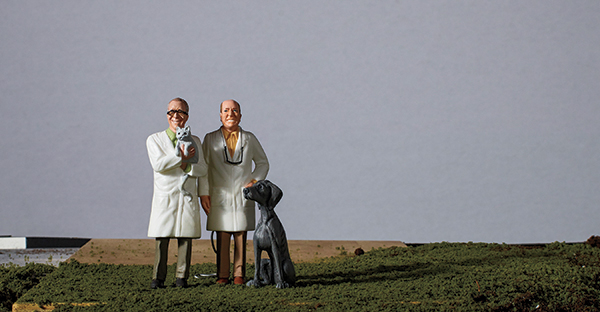
Bronstein shot this campaign promoting NVA (National Veterinary Associates), which partners with veterinary practices, several of which were featured, each in a separate ad. The ads feature models of the actual buildings housing each practice.
“Why not shoot each building and Photoshop it into the shot,” Bronstein asked, pointing out one key challenge. “Shooting the buildings would involve many obstacles (trees and cars, for example), plus you couldn’t necessarily get a good vantage point from which to shoot. What’s more, the lighting on the structures would have to match our studio lighting on the terrariums, which the reality of the situation would not necessarily allow. We instead had reference photos taken for the model maker to develop a 3D model. From that, the model maker had the structures laser cut or rendered using rapid prototyping, which is a 3D printing technique. This way we were able to achieve finer detail than in past purely mechanical techniques. We took some liberties with scale and proportion but we kept enough identifying features so the structures remained recognizable. Beyond that, the model maker retouched some elements, adding patina and aging, along with variety to the brickwork, for a more natural appearance. Each model was 18 to 24 inches wide.
“I had to consider whether I could shoot these models inside the respective terrariums or separately, outside the bowls. What we decided was to shoot them separately, because we had to make them big enough so they would look good, and at that size they simply would not fit inside the vessels we were using. If I had made the buildings small enough to fit, they would have been compromised and difficult to work with.
“We shot the terrarium vessels independently, each with a bottom layer of dirt and rocks against a background. The background is a duratran display transparency—a stock shot blown up to 4x5 feet and rendered out of focus in the transparency itself (to simulate natural depth and focus attention on the foreground elements). The reason I took this approach was to take advantage of the distortion created by the globes—distortion you’d normally see when looking through them.
“There is another twist. We built little people who actually look like the veterinarians who own each practice, and added them to the set. However, we needed to sculpt them at a larger scale than that used for the buildings to allow a more lifelike impression. The fact that they’re so small in the ads gave us license to take this approach.
“Interestingly, I shot this the way I would have done in the old analog days. It was a two-camera setup because I wanted to be able to go back and forth between one and the other to see how all the pieces fit together. The two-camera, two-computer setup was expensive, but in the long run it saved time. If I had just used one camera, lighting, and computer system, it would have been nearly impossible to properly monitor them and match the two images in a pleasing, natural manner.
“With regard to the lighting, the key light is a pronounced hard light, which works best to show the texture of the miniatures. In post, I enhanced the reflections on the vessel, to make the building sit more naturally in place.”
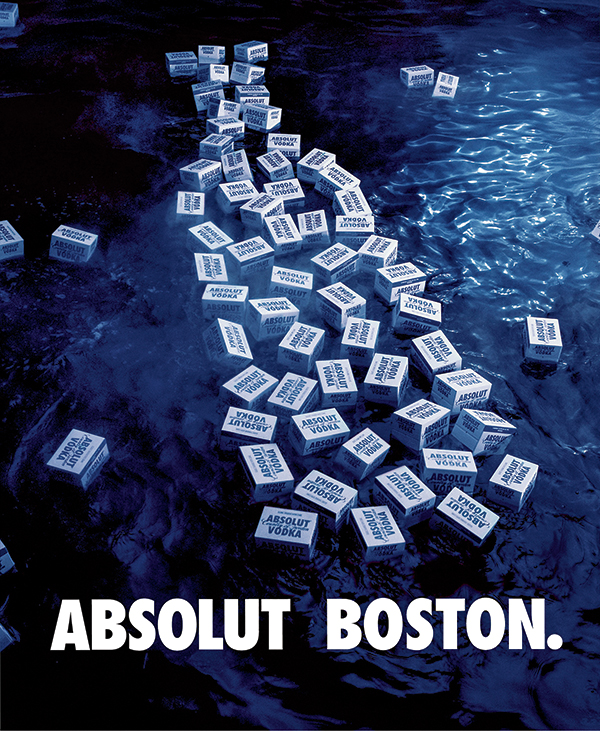
Bronstein had to first test the waters, as it were, to determine how large the pool had to be to create a realistic scene filled with floating crates in the shape of the Absolut Vodka bottle. Shooting in a theatrical stage and employing a 30-foot-square pool, he had each of the roughly six-inch styrene crates weighted down so they wouldn’t drift while assistants standing in the pool agitated the water, creating waves. There was an overhead silk with lights above it for fill, with a strong directional key light, with Bronstein shooting from an elevated viewpoint.
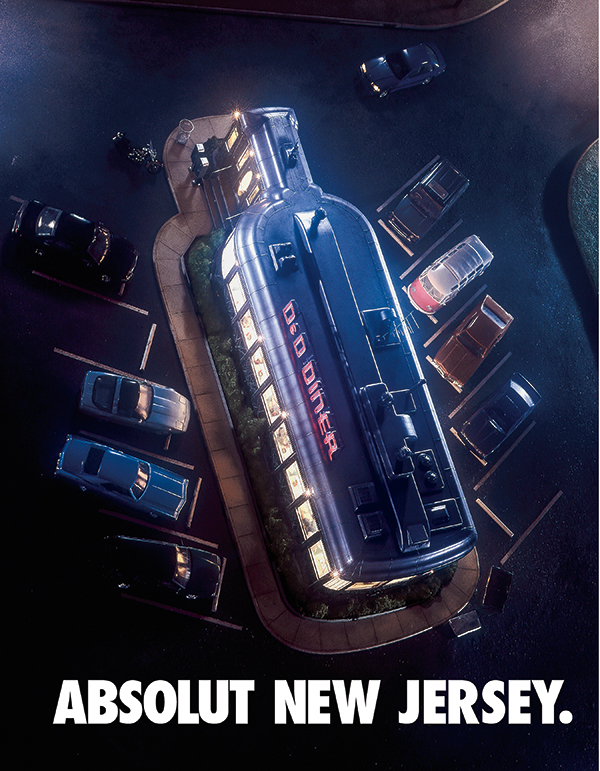
The diner was custom-built, surrounded by 1/24-scale model vintage cars to give the scene an authentic look. The light on the vehicles largely comes from inside the diner, adding to the credibility factor.
His Favorite Gear
“My Silvestri Bicam. It’s a medium format camera with a sliding back that accepts any digital system. Extremely compact, it has view camera movements, so you can get a point of view that would be impossible with many other camera systems.”
What’s in Bronstein’s Gear Bag
» Silvestri Bicam (with lenses slightly on the wide side in medium format)
» Arri Fresnel tungsten lights
» DeSisti Fresnel strobe
» Speedotron power packs
» PocketWizard radio transceivers
» Cambo nine-foot camera stand
» Hot glue gun
Steve Bronstein operates out of the New York area. To see more of his work, visit stevebronstein.com.


![]()
Get the Latest Photo Tips, News & Reviews from Shutterbug!
| Camera Reviews Other Reviews | Mobile Reviews Photography Reviews Columns | News | Features | How-To | Resources |
 © 2025 Shutterbug
AVTech Media Americas Inc., USA
All rights reserved