- REVIEWS
Camera Reviews 
More Reviews Mobile Reviews Photography Reviews - GALLERIES
- VIDEOS
- BUYER'S GUIDES
How To
Float Those Rings And Things
For those times when you
want to isolate an object with a pleasing non-competing background,
here is a system that will give you lots of options. It worked especially
well when a client asked me to photograph individual pieces of jewelry
to illustrate "care cards." That's my name for business
size cards illustrated with single pieces of jewelry accompanied by
instructions on the care and feeding of each piece. Using this system
will allow you to highlight any object from flowers to nuts and bolts.
It can also be used for any size object, limited only by the size of
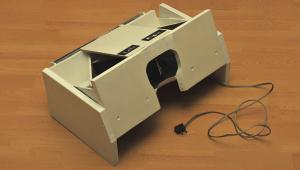
the watercolor paper, which is what I use to form the background. |
|||
Create the background by using a lightweight watercolor paper or any translucent paper that will take watercolors. Spread a wash of black watercolor paint in a cloud-like design or another pattern of your choice. A method that worked well for me was to wet the paper thoroughly, then drip the black watercolor paint while tilting the paper in different directions. The pattern doesn't have to look perfect since it will be out of focus due to the use of a shallow depth of field. Suspend this background paper over the flash head and under your object. For these photos, the paper was 15" from the bottom and the jewelry 14" above the sheet. Before putting the paper on the rod, punch a 3/16" hole in the center. Attach the background paper to a matte board with a window to keep the paper flat. Some foamcore strips can be placed across the top of the box to support the matte board. Don't try to force the paper on the rod or the paper might tear. |
|||
Mounting the object to be photographed
can be a bit tricky. The use of modeling wax is essential. I used Boekel
Tackiwax. Since this product is reusable, you can get close to a lifetime
supply for about $10 from Calumet Photographic. Put a tiny bit of wax
on the bottom of your object and place it on top of the rod. With larger
or flexible items, cut a piece of foamcore slightly smaller and mount
it on the rod for extra support. Getting everything to balance can take
a bit of patience. |
|||
Position the camera over the
jewelry at a slight angle so the rod is hidden underneath. For this type
of photography, a macro lens works best. If you don't have a macro
lens, try extension tubes or supplementary lenses to get you in closer.
You can get an idea of the current effect by using your depth of field
preview button. Manufacturers/Distributors Bogen Photo Corp.
|


![]()
Get the Latest Photo Tips, News & Reviews from Shutterbug!
| Camera Reviews Other Reviews | Mobile Reviews Photography Reviews Columns | News | Features | How-To | Resources |
 © 2025 Shutterbug
AVTech Media Americas Inc., USA
All rights reserved