- REVIEWS
Camera Reviews 
More Reviews Mobile Reviews Photography Reviews - GALLERIES
- VIDEOS
- BUYER'S GUIDES
Digital Color To B&W; Five Top Ways To Convert To Gray
For most photographers being able to switch from color to black and white with
a few simple mouse clicks is one of the most powerful aspects of digital imaging.
With digital you no longer need to pick color or black and white before taking
the photo, as was the case when film was king. Now after color capture the decision
to convert to monochrome can be made easily at the desktop.
Adobe's Photoshop and Photoshop Elements, as well as other image-editing
programs, contain simple one-step conversion solutions, such as Image>Mode>Grayscale
or Image>Adjustment>Desaturate. But many professional photographers prefer
to employ more circuitous techniques when swapping color for delicate gray tones.
These pro conversion methods often contain multiple steps but arguably provide
more control and variation in the conversion process. The specific area that
interests the pros the most is the process by which the colors are mapped to
gray. The techniques that provide interaction with, and control over, this mapping
process are the ones that provide the most potential for producing quality conversions.
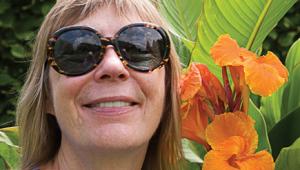
It is not that converting to gray is all that difficult in itself; it is that
sometimes the impact of the photo is lost in the process. For example, imagine
a color photo with a red rose in the foreground and dark green foliage in the
background. The picture may have good impact in color provided largely by the
contrasting colors. But convert this photo to black and white and the rose and
foliage end up similar tones of gray. The contrast is lost and the impact of
the photo disappears. Now imagine using a conversion method that is able to
map the red of the petals and green of the leaves to two different tones of
gray--the impact of the original color photo is translated to the world
of monochrome.
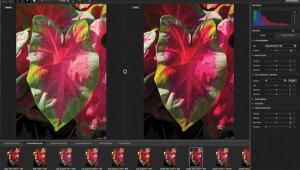
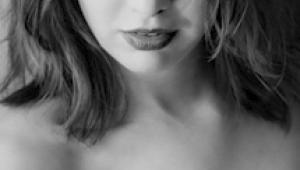
With this aim in mind we hunted around for a host of nonstandard convert-to-gray
methods that provided differing levels of control over the tones. Next we took
a colorful example image and applied each of the techniques to the photo; in
the process we created vastly different monochrome versions of the same picture.
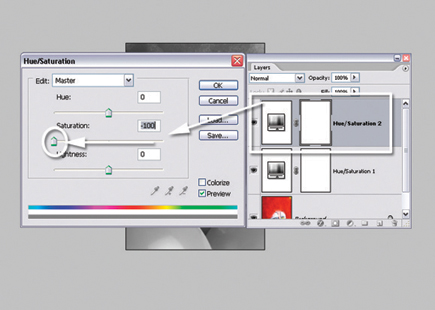
Section 1: Dual Hue/Saturation Adjustment Layers
Software: Photoshop, Photoshop Elements
In a technique made famous by Adobe Evangelist Russell Brown (www.russellbrown.com),
this approach uses two Hue/Saturation adjustment layers to both make the conversion
and provide customized color-mapping options. The upper Hue/Saturation layer
is used to make a simple change to gray by dragging the Saturation slider to
-100. By itself this layer produces the same result as when you select Image>Adjustments>Desaturate,
but the real trick is adding the second, lower, Hue/Saturation adjustment layer.
After adding the layer to the stack the mode of the layer is switched to Color.
This allows any changes made to the distribution of the colors in the lower
layer to flow through to the conversion layer above. Now by tweaking the Hue
slider in the lower layer you can alter how the colors are tinted and therefore
how they are mapped to gray.
 |
1) Add first adjustment layer. Start by adding a Hue/Saturation adjustment layer to the photo. This can be achieved by either selecting the Layer>New Adjustment Layer>Hue/Saturation command or choosing Hue/Saturation from the Create New Fill or Adjustment Layer button in the Layers palette. Don't change any settings in the layer and click OK.
 |
|
|
2) Change Layer mode to Color. Now with the new adjustment layer selected change the Layer mode to Color. The option is one of the 20 or so available from the drop-down Blending Mode menu located in the Layers palette.
 |
|
|
3) Add second adjustment layer. Now add a second Hue/Saturation adjustment layer on top of the previous one. This time with the Hue/Saturation dialog open drag the Saturation slide down to -100 and click OK. To adjust the color mapping double click on the Hue/Saturation layer thumbnail (of the bottom layer) and move the Hue slider.
 |
|
|
Pro Tip: Naming Your Layers
It is a good idea to name the adjustment layers that you add to photos so that
when you come back to the image later it will be easy to remember which layer
does what.
 |
|
|
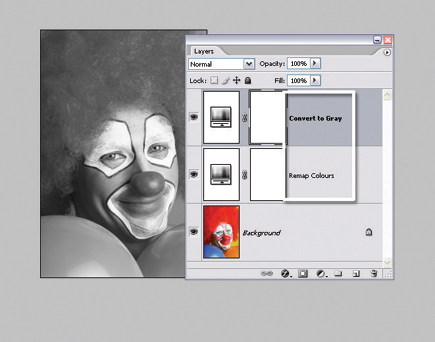
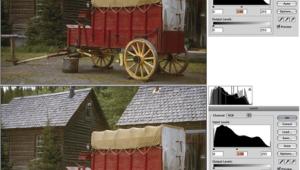
Section Two: Conversions From Channels
Software: Photoshop
All digital photos are based on the combination of separate channels. Images
using a standard color model are broken into RGB (Red, Green, and Blue) channels
but there are also other channel combinations, such as LAB (Lightness and AB
color channels) or CMYK (Cyan, Magenta, Yellow, and Black) that can be used
to construct a color photo. Sometimes the grayscale information found in a single
channel contains good color mapping and therefore good grayscale tonal separation.
The following technique uses the details found in a single channel as the basis
for creating a monochrome photo.
 |
1) Change Color modes. In this example we will use the Lightness channel of a LAB photo for the conversion. The first step of the process is to change the Color mode of the photo from the standard RGB mode to LAB. Do this by selecting Image>Mode>Lab Color.
 |
|
|
2) Display the Lightness channel. Now display the Channels palette (Window>Channels) and hide the two color layers from view by clicking on the "eye" icon at the left end of the channel entry. This should leave you with a grayscale image being displayed.
 |
|
|
3) Switch to Grayscale mode. With the Lightness channel still displayed select Image>Mode>Grayscale. The picture is now converted to a single channel grayscale photo based on the Lightness values of the original color picture only. If you intend to tint or tone the image later then convert the "L" channel to RGB Color instead.
 |
|
|
Pro Tip: Using RGB Channel Instead
If the L channel doesn't provide enough separation between converted tones
try using the same technique to pull the grayscale information out of either
the Red, Green, or Blue channels of a standard photo.
 |
|
|


![]()
Get the Latest Photo Tips, News & Reviews from Shutterbug!
| Camera Reviews Other Reviews | Mobile Reviews Photography Reviews Columns | News | Features | How-To | Resources |
 © 2025 Shutterbug
AVTech Media Americas Inc., USA
All rights reserved