- REVIEWS
Camera Reviews 
More Reviews Mobile Reviews Photography Reviews - GALLERIES
- VIDEOS
- BUYER'S GUIDES
Create A Pop Art Portrait; Back To The ’60s
Remember those bright, colorful pop art prints created in the 1960s by silkscreen
artists like Andy Warhol? In design magazines and ads recently, I've noticed
that this style is enjoying a resurgence, thanks to its bold, flat colors, strong
outlines, and dramatic impact. Perhaps you'd like to try it, either as
a personal project to expand your technical bag of tricks, or to explore as
a new market for younger clients. Their parents who grew up in the '60s
might want to be portrayed in this style, as well.
You can start with either a color or black and white original. I created this
example with Adobe's Photoshop CS2 and CS3, but you can also do it with
earlier versions of Photoshop, Elements 5.0, and other image-editing software.
Alternate image editors may have slightly different names for the commands.
Now, let's journey into this vividly colored world and transform one of
your portraits.
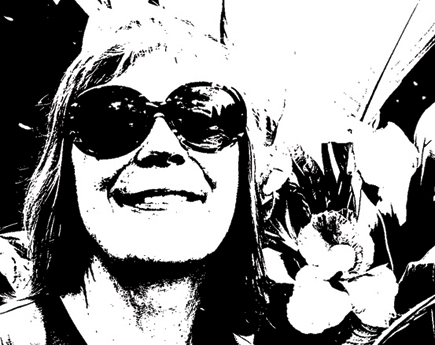
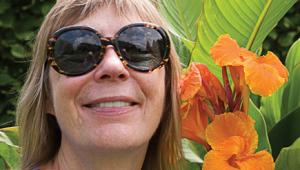
This technique works best with photos with broad outlines and strong edges.
You'll want these broad flat areas to fill with solid color. I started
with a portrait of Sybille with some flowers, taken on a sunny day. If your
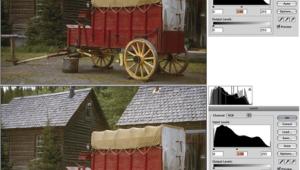
image looks flat or dull, add contrast with a Levels or Curves adjustment layer.
With Photoshop and Elements 5.0: Layer>New Adjustment Layer>Levels. With
Photoshop only, you may also choose Curves instead of Levels.
With Levels, drag the white point slider to the left to get rid of the extra
"noise" in the bright areas of the image. If needed, drag the black
point slider to the right to emphasize the blacks in the image, and fine-tune
the mid-tone slider for the best contrast. Open the Layers palette. In Photoshop,
Window>Layers. In Photoshop or Elements, duplicate the background layer by
dragging it to the New Layer icon in the Layers palette, or choosing Layer>New>Layer
from background. The new layer will automatically be named "Background
copy."
 |
|
|
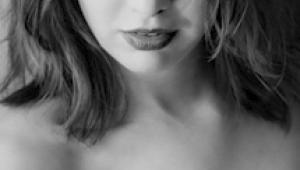
In Photoshop or Elements, choose Layer>New Adjustment Layer>Threshold. In the dialog box that appears, move the slider both ways to see all the possibilities, then choose one which shows good outlines and large flat areas of white. Here I moved the slider to set a Threshold Level of 109.
 |
Your photo is immediately transformed into a high-contrast black and white image.
 |
Now it's time to add some color. Click on the New Layer icon at the bottom of the Layers palette. Rename the new layer according to the part of the photo where you're going to apply this color, for example, "flower." We'll add each color on its own layer to make it easy to edit, fine-tune, or even change to a different color later.
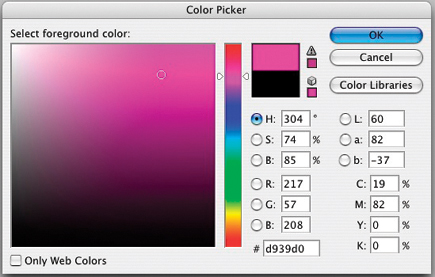 |
Select the color you want to paint this section (the flower) with. Press the letter "d" on the keyboard, then double click on the foreground color in the toolbox (it should be black). This will bring up the Color Picker. Scroll through it to check which colors might work best, and move the circular cursor within the "Select foreground color" box on the left to pick the exact hue and intensity you want.
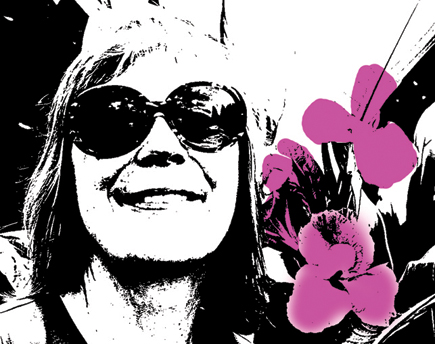 |
Choose the Brush tool from the toolbox (keyboard shortcut-press B), set a brush size at the upper left (or use the right and left bracket keys), and begin painting.
 |
Oops! The paint covers and obliterates the image below. This is easy to fix. Simply go to the top left of the Layers palette and change the Blend mode from Normal to Multiply. Now the black lines will show through your paint. Paint in the area as desired, change the opacity if you like in the options bar at the top of the screen. I like to let the color overlap, as it sometimes does with the silkscreen process.
|
| |||||||||


![]()
Get the Latest Photo Tips, News & Reviews from Shutterbug!
| Camera Reviews Other Reviews | Mobile Reviews Photography Reviews Columns | News | Features | How-To | Resources |
 © 2025 Shutterbug
AVTech Media Americas Inc., USA
All rights reserved