Studio Kits; Getting Started With Westcott’s Photo Basics Page 2
Most times when shooting with special lighting, it's a good idea to turn off any other household lights. But, since these are incandescent lights, keeping table lamps or other incandescent lamps on, which are roughly the same color temperature, isn't a problem. Bright direct daylight, which is a different color temperature, should be blocked, and any fluorescent light, which is also a different color temperature, should be turned off.
One disadvantage of some continuous light systems is they don't provide sufficient light to come up with professional-looking results. This one does. Unless you're going to be using a very high ISO setting on a digital camera, you're not going to be capturing movement, but for stationary subjects, there's sufficient light for portraiture work. Setting the cameras at ISO 400, exposures were taken at 1/80 sec to 1/100 sec at f/2.8 to f/4. That doesn't give a lot of depth of field, so multiple subjects would have to be grouped tightly, but it would be possible to shoot several people at once.
 |
|
|
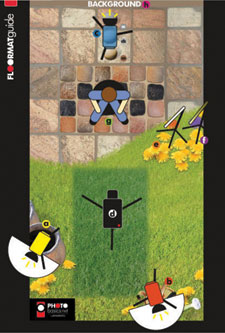
When shooting, the subject could be standing or seated, possibly on a stool
or chair. It would be nice if the back light stand extended a little higher
for shots of the subject standing. To get the best halo lighting effect in back,
the model had to be sitting.
A couple of things make shooting easier. While everything fits into the canvas
case that comes with the kit, it's a tight fit, particularly if there's
anything else that you might want to carry along. Instead of just using the
case for everything, I pulled out one of my deep-rolling padded suitcases and
carried the three heads in it. They fit like they were made for it. That made
it possible to transport them without having to take the reflectors and bulbs
apart each time, and it freed up space in the other case.
It's a good idea to carry spare bulbs along. These bulbs last quite a
long time, but Murphy's Law applies. Bulbs will go out during the most
critical shooting situation. At around $5 each at professional camera stores,
that's a small investment for the peace of mind of knowing that spares
are available.
When setting up, instead of plugging the heads into outlets and turning them
on and off individually, I plugged them into a power strip and turned them on
and off with a click of one button. And, since I was shooting at somebody else's
location, instead of using the supplied hooks to hang the backdrop, I used duct
tape that had been rubbed several times to reduce its adhesiveness. (A roll
of duct tape always comes in handy.) That way the backdrop would stay up but
the paint wouldn't be pulled off of the wall when it was taken down. Duct
taping the corners of the flooring material also kept it from moving around
too much as the subject and light stands were being repositioned.
Even though the floor grid is a good positioning starting point, adjusting and
repositioning the subject and the lights is where the creativity comes in. Try
moving the lights up or down or closer to the subject to see what might be possible.
Just watch for
problem shadows.
Once you get beyond the need for the floor grid, experiment even more. Try shooting
without the grid or the background. Try different things that might work as
backgrounds. One thing I tried was taking some shear red cloth, to make it look
like it was draped in back. For different effects, change lighting configurations.
Use props when appropriate.
You may have a two- or three-light setup, but there are times when all you need
is one light. The close-up portrait of the model sitting on the daybed was taken
with a single light. Single lights can be used for very dramatic effects. There
are all sorts of things you can try.
Westcott's Photo Basics kit is the ideal solution for photographers who
are interested in getting involved in taking studio portraits. The two-light
kit has an MSRP of $513.50, while the three-light kit lists for $641.90.
For more information, contact Photo Basics by Westcott, 1447 N. Summit St.,
Toledo, OH 43604; (800) 886-1689; www.photobasics.net.
- Log in or register to post comments

