- REVIEWS
Camera Reviews 
More Reviews Mobile Reviews Photography Reviews - GALLERIES
- VIDEOS
- BUYER'S GUIDES
Studio Kits; Getting Started With Westcott’s Photo Basics
There are various companies that offer studio kits in a box (or canvas bag). For the most part, such portable studio systems are primarily lighting setups. They might include the heads, self-contained power packs, stands, and some type of diffuser. That's enough to get started with studio work, especially for experienced shooters. But photographers just starting to work with studio lighting might want a little more help.
 |
|
|
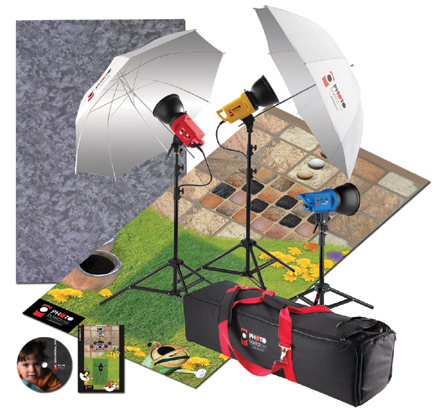
That's where Westcott's Photo Basics comes in. The Photo Basics
kit, which is available in a two- or three-light setup, not only contains the
lights, stands, and umbrellas, but also a backdrop, floor covering, and, most
importantly, a very easy-to-read chart that simplifies setting up the entire
portable studio and arranging the lights to get the most out of them. It also
includes an instructional DVD. Since the Photo Basics kit utilizes continuous
lights, no power packs are required.
I tested the three-light PB500 Constant Light system, which includes two 500w
photofloods and one 100w bulb. Everything came in one large canvas bag. There
are three color-coded heads, two tall light stands, one short light stand, and
two umbrellas that are used with the heads placed on the tall light stands.
There's also a floor mat and a backdrop.
Setup is extremely easy. The card that comes with the kit tells you exactly
where to place everything. It took about an hour and a half to set everything
up the first time. Subsequent setups took less than half that time. At the first
setup, before extending the light stands, be sure to tighten all the screws
on the extension mechanisms. A couple of them came loose, and the stands came
apart as the sections were being extended. It's also a good idea to test
the heads and bulbs before setting everything into position. Everything worked
fine.
The floor-positioning mat is a diagram that details where each stand, corresponding
head, camera, and the subject or subjects should be placed. The background is
a slate-patterned gray cloth. It can be hung with the supplied self-adhesive
hooks that can be attached to the wall. Unlike many backgrounds, which are heavy
and bulky, this background is very lightweight, so there's no chance of
it pulling the hooks off or ripping part of the wall down. To eliminate any
creases, it would be a good idea to iron it before hanging.
 |
|
|
Next, attach the umbrellas to the heads on the two stands. The floor diagram
indicates where one, two, or three subjects should be positioned. It's
a relatively tight space, so the system works best with one subject, but it
can be used for small group shots. Adjust the lights so that they reflect off
of the umbrellas directly onto where the subject would be.
The short stand with the blue head on it goes behind the subject to throw a
little light on the background. Even though it is a smaller wattage bulb than
the primary lights, be careful not to put that light too closely to the backdrop,
as these are continuous lights that generate heat. About 8" is right.
Connect and plug in the power cords and the basic studio is set up. That's
really all you need to light the set. When positioned correctly, it does a good
job of adding light behind the subject.
There are advantages and disadvantages to continuous light studio systems. The
advantages are that they are generally less expensive, and, because it's
easy to see what's being lit, are easier to work with for beginners. (Modeling
lamps do the same thing for flash studio systems, but they drive the price of
that equipment up even further.) With continuous light, you don't need
a flash meter to set exposures. A simple light meter or on-camera metering is
sufficient to determine f/stops and exposure times.
The downside of continuous light systems includes the fact that they don't
provide the amount of light that flash systems do, and the light they do provide
isn't daylight-balanced.
 |
|
|
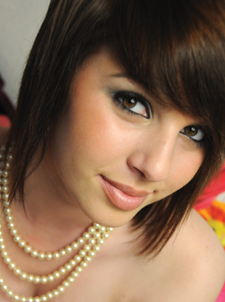
I was pleasantly surprised by the results I got with the Photo Basics kit.
I was able to come up with very good-looking pictures, right out of the box.
There are a number of things I like about this setup. For one thing, it uses
incandescent photofloods, rather than fluorescent bulbs. I like the quality
of the light that photofloods generate better than the quality of light from
fluorescent bulbs. It tends to be warmer, while fluorescent bulbs, even color-corrected
fluorescents, tend to cast a cooler light.
|
| |||||||||
- Log in or register to post comments


![]()
Get the Latest Photo Tips, News & Reviews from Shutterbug!
| Camera Reviews Other Reviews | Mobile Reviews Photography Reviews Columns | News | Features | How-To | Resources |
 © 2024 Shutterbug
AVTech Media Americas Inc., USA
All rights reserved