- REVIEWS
Camera Reviews 
More Reviews Mobile Reviews Photography Reviews - GALLERIES
- VIDEOS
- BUYER'S GUIDES
Processing a Digital Infrared Image: From Capture To Monochrome

One of the easiest ways to capture that classic black and white look when shooting an IR- converted SLR is to shoot in Monochrome mode. If your camera doesn’t offer that option, you’ll have to convert the image into black and white after the fact. That may be the better of the 2 choices because that approach will give you more control over how the final image looks.
Off the chip, the infrared image can have a red or magenta cast. A simple way to convert that file into black and white is to use the Monochrome command found in many image-editing programs, usually under the Mode menu. In Adobe Photoshop CS6 (www.adobe.com) and earlier versions it’s located in the Image>Mode>Grayscale menu tree, but you’ll need a few extra tweaks to get the traditional black and white infrared image. Here are a few tips on getting the most from IR images gathered from many years of exploring this exciting medium of expression.
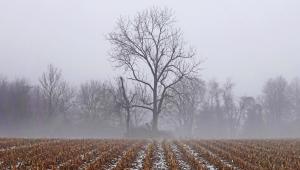
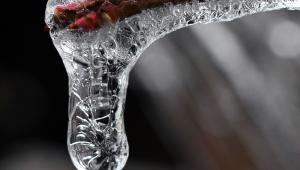
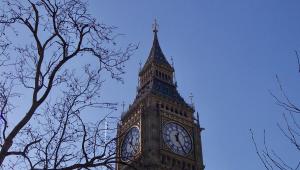
This image was captured as a color file using a D-SLR that had been converted to infrared-only capture, [1]. The Manual mode exposure was 1/200 sec at f/16 at ISO 400.
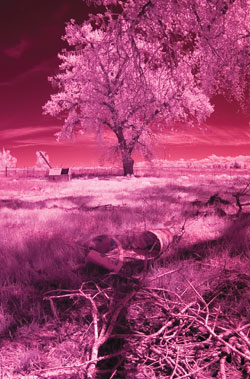
All Photos © Joe Farace
After opening the image in Adobe Photoshop CS6, I selected Image>Mode> Grayscale and a small dialog box appeared asking if it’s OK to discard the color information, [2]. Since you should only be working with a copy of the file and the original is safely ensconced on a hard drive or CD/DVD that’s tucked away somewhere, you can click OK to remove the color but that’s all you will do. You may want to convert that file back to RGB so you will be able manipulate it using all of Photoshop’s tools, not just those that will work with a Grayscale file.

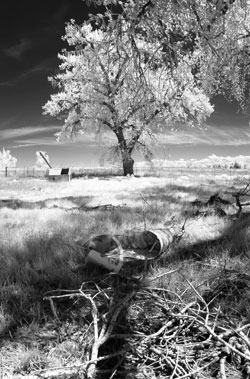
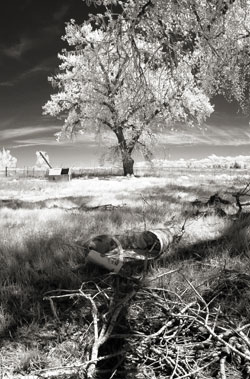
The resulting monochrome IR file often appears flat and lacks the contrast of the original image [3], so the simplest way to correct this problem is to use Photoshop’s Brightness/Contrast (Image>Adjustments>Brightness/Contrast) control or Curves (Image> Adjustments>Curves) to kick up the contrast. If you choose to use the Brightness/Contrast control, the numbers shown in the dialog box are what I applied to the finished image but in the infrared processing game there are really no magic numbers. The best approach I’ve found is to gradually move the sliders (increasing contrast or brightness) and observe the effects on a calibrated monitor before clicking OK.

Here’s the finished image with only 2 tweaks: the first removed all of the color and the second increased the contrast slightly, [4]. It may be all you need, but why stop there?
To move beyond a simple conversion approach, try other effects. Here I added a Platinum tone using PixelGenius PhotoKit (www.pixelgenius.com) then did some light tweaking with Nik Software’s (www.niksoftware.com) Viveza plug-in, [5].
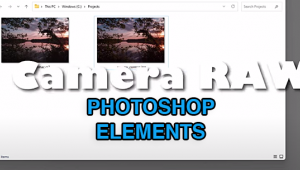
Raw files will offer more image information, more tonal spread and more options overall, so shoot Raw if you can. You can convert Raw files using many programs—here I used Adobe Camera Raw to convert the captured infrared image into monochrome, [6]. If you take the advice found in “Converting A Camera For Infrared Photography” and have an older camera converted for IR capture, it may not have the megapixels newer cameras have, so shooting in Raw will maximize the resolution that you do have to produce the best image quality. Even if you shoot in JPEG or TIFF, recent versions of Photoshop‘s Adobe Camera Raw let you process these types of files as well, available by clicking on the file in Bridge then using Command/R to open the file in ACR.
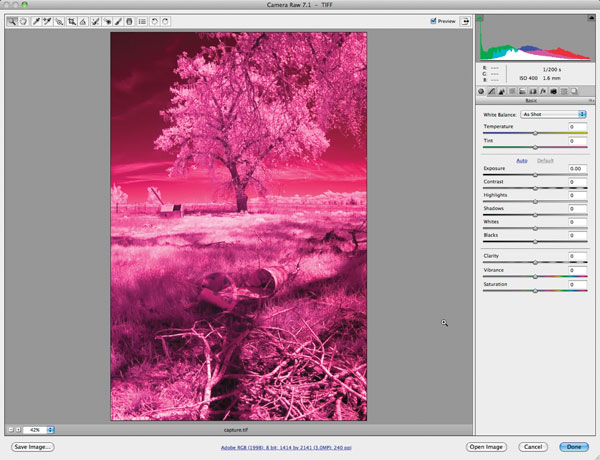
The secret of processing an infrared image using ACR is to work with the series of icon-shaped tabs positioned just below the histogram, [7]. After opening in ACR, click on the HSL/Grayscale tab and then check the Convert to Grayscale box. Viola! It’s now a black and white image, but as you can see from the screenshot, it’s not quite ready for prime time.
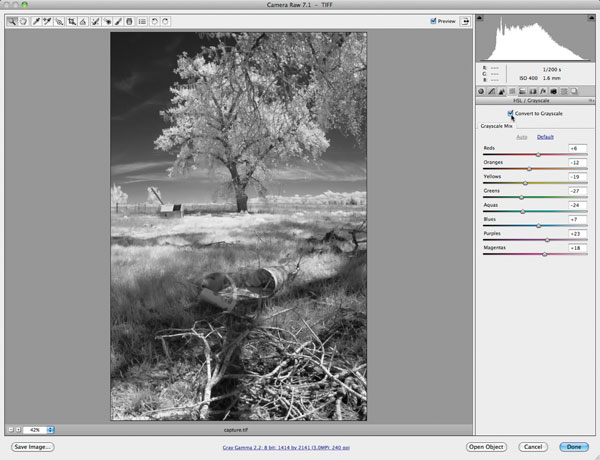
To get the traditional IR look the image may need additional tweaks, so I sometimes follow up by using the controls under the Curves tab that are found in ACR, [8]. The Curves function works much like it does in Photoshop and an S-shaped curve (as shown) will produce higher contrast. The more extreme the shape of the “S” the more contrast will be applied to the image.

You can also control contrast via the sliders in the basic ACR window. There are also additional sliders for Exposure, Highlight, Shadows and Blacks and White, [9].
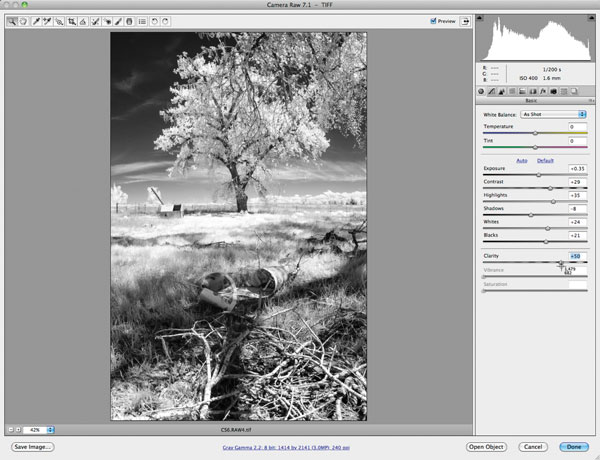
Tip: Start by pushing the sliders to the extreme ends and then backing off to find the best location for your specific image.
Because the Grayscale conversion in ACR turns the image from an RGB to a Grayscale file, you lose the ability to use the Vibrance and Saturation sliders but still have access to the Clarity (mid-tone contrast) slider. Be sure to give it a try, but preview the image at high magnification so you don’t apply too much Clarity or the image will start to fall apart.
Another approach for converting that magenta IR image into black and white uses power tools: Why not use a Photoshop-compatible plug-in, such as Nik Silver Efex Pro, which will let you add all kinds of adjustments, including grain, from within the software? Real IR film is grainy but I prefer the not-grainy look, but you may not. Nik Silver Efex Pro lets you apply lots of grain, no grain or just a little. Here I used the plug-in’s Brightness and Contrast sliders as well as the Structure control, [10].
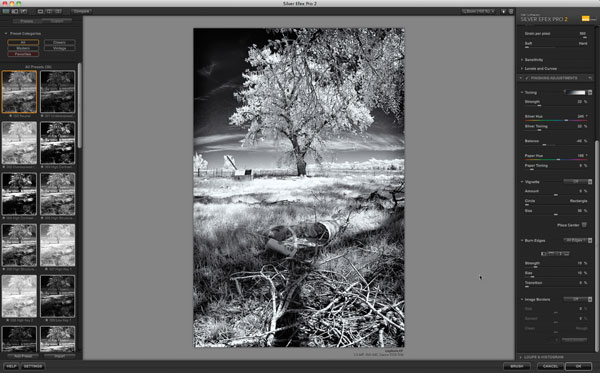
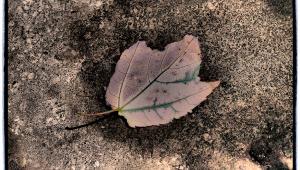
Since one of my other versions had a warm tone I added cool Selenium toning as well as Burn Edges to this version, [11]. I added a border treatment as well, producing an alternative version of my original photograph. Nik Silver Efex Pro, like any good power tool, combines many different functions within a single interface to produce an infinite number of possibilities from my original infrared image.

Converting A Camera For Infrared Photography
One of the best things you can do with your long-in-the-tooth D-SLR is to convert it for infrared-only capture. Instead of putting the camera on eBay or Craig’s List, send it to one of the companies mentioned below and have it converted to IR-only capture. You’ll be able to shoot infrared images handheld with no filters to slow you down (force you to use a tripod, or make it difficult to see in the viewfinder or LCD if in Live View). Listed here are the websites of some companies that will convert your camera to IR-only capture. Including them here does not constitute my endorsement of any particular service. My first IR-only camera was converted by a service (that’s not on the list) that took 7 months to do the job! Other services that I have tried have taken me anywhere from 1 week, round trip, to almost a month.
For more specific information on the quality of the service from any of these companies, go to your favorite photo forum and ask. You’ll be bombarded with information on the quality of services provided.
Tip: Most services have an FAQ or info page with information about the cost of the services and how they prefer to have the cameras shipped to them. Please take the time to carefully read the shipping instructions. If you follow them you’ll be very happy with the experience but if you ignore them don’t say I didn’t warn you.
Digital Silver Imaging
www.digitalsilverimaging.com/ir
Kolari Vision
www.kolarivision.com
Life Pixel Digital Infrared Conversion
www.lifepixel.com
MaxMax.com
www.maxmax.com/ircameraconversions.htm
Precision Camera
www.precisioncamera.com/infrared-conversion-services.html
- Log in or register to post comments


![]()
Get the Latest Photo Tips, News & Reviews from Shutterbug!
| Camera Reviews Other Reviews | Mobile Reviews Photography Reviews Columns | News | Features | How-To | Resources |
 © 2025 Shutterbug
AVTech Media Americas Inc., USA
All rights reserved