- REVIEWS
Camera Reviews 
More Reviews Mobile Reviews Photography Reviews - GALLERIES
- VIDEOS
- BUYER'S GUIDES
More Posing & Lighting; Tips To Help Flatter Your Subject—Part 3
As mentioned in the previous tutorials, the impact and success of a studio portrait is often the combined result of lighting, composition, body language, lens choice, camera angle, clothing, color, texture, and even luck. Armed with a few portrait techniques, however, your work will improve dramatically. There are many portrait-making methods that can help you develop your own style and ultimately make your work unique.
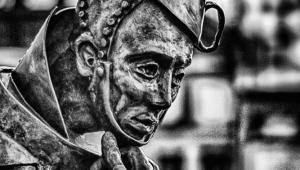
The Profile
The lighting you use for a profile portrait can be very engaging if done properly.
Oftentimes, a narrow lighting or rim lighting approach can work to accentuate
the profile in an elegant yet striking way.
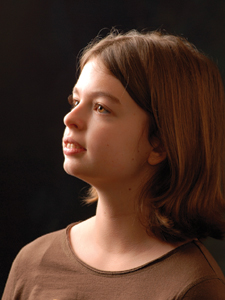
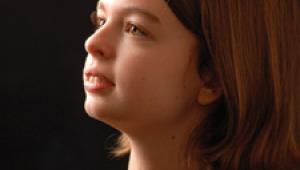
This first example (#1) is a less-than-optimal profile, as it shows part of
the opposite cheek and breaks the line of the profile. Also notice how the hair
dangling below the chin on the far side of the face is distracting and detracts
from the line of the profile.
 |
|
|
For the fill light, it's typically best to have it be less intense in
order to draw the viewer's eye to the line of the profile. For a close-up
profile like this, the fill light could simply be a reflector positioned close
to the main light (on the same side) that both bounces light into the shadow
areas of the face as well as blocks the main light from shining directly into
the lens.
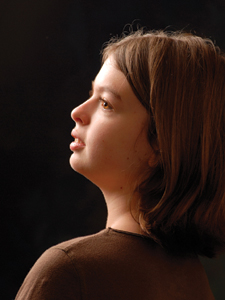
In #2, we see that because of the angle, the profile is not interrupted by the
opposite cheek or hair. How much of the opposite eyelash to show depends on
the individual. The main objective here is to not have the cheek break the line
of the nose.
 |
|
|
When shooting a profile shot, have your model look ever so slightly toward
the camera, as this will end up looking more natural. When the eye looks straight
ahead in a profile, it usually shows too much of the white area and not enough
of the iris.
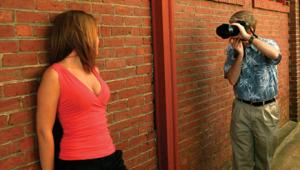
For #3, notice how our subject's body is turned facing away from the camera.
This angle is an excellent choice for brides where you can also capture the
detail in the back of the wedding dress.
 |
|
|
Note, however, that this pose can be somewhat unflattering around the neck, especially for those who are overweight. You can combat that problem, though, by positioning the hair or a bridal veil over the wrinkled neck area.
Camera Height
Relative To The Subject With respect to perspective in close-up portraits, it's
usually best to keep the film plane parallel to the facial plane, usually at
eye level. That said, modifying this rule slightly can help to correct flaws
or even make a creative statement.
For 3/4 or full-length shots, the best height for the camera is usually between
chin and chest level. This helps to prevent your subject from appearing distorted.
For full-length shots, the camera is usually best positioned between chest and
waist level.
Lens Choice For Portraits
For full-length shots, use either a normal lens or moderate telephoto lens.
The lens approximates the diagonal distance across the film plane. So for full
frame 35mm, a normal lens is around 50mm. For the average digital sensor, however,
it is typically half that--about 25mm. A moderate telephoto lens is about
70-85mm for full frame 35mm, and 35-42mm for digital sensors.
For 3/4 length shots, use a moderate telephoto or telephoto lens. For head-and-shoulders
close-up shots, use a telephoto lens, which is about 105-135mm for full frame
35mm, and 52-67mm for digital sensors.
Posing The Female
For full-length shots, the body pose is critical in how it conveys emotion or
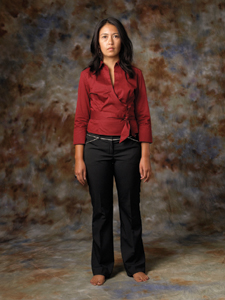
character to the viewer. In #4, notice how our subject is standing, facing straight
on to the camera with equal weight on her feet. This makes for a static, almost
confrontational effect.
 |
|
|
Notice the difference in #5, where our subject has shifted her weight to the back foot. Her body now faces away from the camera and her front foot points toward the camera.
 |
|
|
Rather than dangling at the sides of the body, the arms have now created a
space that gives the body a more slender appearance. When the arms are positioned
alongside the body, they add to its mass.
This effect is more noticeable in a two-dimensional photograph than it is in
three-dimensional reality.
Also in #5, notice how the head is slightly tilted to the high shoulder, giving
a slight curve to the body. This is a classic feminine pose, and men are usually
not photographed in this manner. If the head were perpendicular to the shoulder,
it would be a more masculine pose and would be suitable for both men and women.
A woman who is heavier will often photograph better in the masculine pose, as
a feminine tilt of the neck can result in an unflattering look.
- Log in or register to post comments


![]()
Get the Latest Photo Tips, News & Reviews from Shutterbug!
| Camera Reviews Other Reviews | Mobile Reviews Photography Reviews Columns | News | Features | How-To | Resources |
 © 2024 Shutterbug
AVTech Media Americas Inc., USA
All rights reserved