Choosing and Using Lenses Page 2
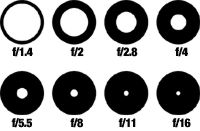
| Curvature of field is yet another thing lens designers have to deal with: the image produced by a single lens element is focused on a curved plane, while the film is a flat plane. In normal photography, this isn't a great problem, but in close-up copy work and enlarging, flat-field lenses are necessary. Again, multiple elements help, as does stopping the lens down. By now, you've probably concluded that stopping the lens down is the answer to all lens problems. In a way, it is. It reduces the effects of the aforementioned problems, and increases depth of field as well. But it also creates diffraction, the bending of light around obstacles in its path (the obstacle here being the lens diaphragm). When the lens is stopped down to small apertures, the light rays tend to bend away from the lens axis, reducing image sharpness. This is one reason why a pinhole camera, with all its depth of field, still produces fuzzy images—the tiny pinhole aperture diffracts light something fierce. Today's computer-assisted lens designs and high-tech optical glasses and plastics provide us with highly corrected lenses that are amazingly sharp. But even so, most of them tend to be at their sharpest when used at middle apertures rather than when wide open or stopped all the way down. At wide apertures, the various aforementioned lens aberrations reduce sharpness, and at small apertures diffraction reduces sharpness. So, unless you need the depth of field provided by a small aperture, or need the speed of a wide-open aperture for low-light shooting, you'll generally get the sharpest results when using an intermediate f-stop. While we're on the subject of lens problems, here are a few more. Distortion comes in two basic forms: pincushion and barrel. In pincushion distortion, straight lines near the edges of the frame bow in toward the center of the frame. With barrel distortion, straight lines near the edges of the frame bow out away from the center. Such distortions are often evident in zoom lenses, with barrel distortion appearing at short focal lengths and pincushion distortion at long focal lengths. There's not much you can do about distortion if it is present (just compose so that no straight lines appear near the edges of the frame), so it's wise to check for it before buying any lens. Internal flare is a loss of contrast and sharpness caused by stray non-image-forming light reflected from inner lens surfaces, a bad side effect of multiple-element lenses. Most of today's lenses incorporate multicoated lens elements whose anti-reflection coatings greatly reduce the problem. Another form of flare occurs in backlit situations when light from the source directly strikes the front lens element. Using a lens hood, which extends in front of the lens and keeps extraneous light from striking the front element, will generally solve this problem. An added benefit of a lens hood is protection of the front element from fingers and rain. A final lens problem is vignetting, the cutting off of the corners and edges of the image. This can be caused by a lens hood that is too long for the lens, or it can be inherent in the lens itself—it's especially evident in high-ratio zoom lenses, such as 28-200mm models. Stopping the lens down will generally eliminate inherent vignetting; switching to a shorter hood will eliminate lens-hood-caused vignetting. Focusing Lenses for more-advanced cameras come in two types: manual-focus and autofocus (of course, most autofocus lenses can also be focused manually). With manual-focus lenses, you turn the focusing ring to focus the lens. With simpler cameras, you set the focusing ring to a zone-focus symbol for near, medium or distant subjects; with reflex cameras, you turn the focusing ring until the subject appears sharp in the viewfinder. With autofocus lenses, just point the AF frame in the viewfinder at the subject and lightly depress the shutter button, and the lens will automatically focus on the subject. Autofocus systems in most compact point-and-shoot 35mm cameras employ an infrared beam and electronic triangulation, while those in AF SLRs (and some point-and-shoot models) use a phase-detection system that measures contrast to determine the amount of defocus. Infrared systems won't work through windows or on images in mirrors (the beam is deflected by the glass) or beyond 25 or 30 feet (beyond that, depth of field usually covers everything with point-and-shoot cameras), but are relatively inexpensive, and work in total darkness. Phase-detection systems can have problems with dimly lit and low-contrast subjects, but generally are more accurate. Autofocus isn't perfect, but today's AF SLRs work amazingly well under a wide variety of conditions. With most lenses, the front element moves farther away from the film as you focus on closer subjects. Some lenses feature internal focusing, in which lighter central elements move rather than the heavier front elements, thus making for faster autofocusing and lenses that don't rotate or change their physical length as they focus. You learned earlier that simple lenses tend not to focus all colors of light on the same plane. Even photographic lenses corrected for this do not focus infrared rays on the same plane as visible rays, so when using black-and-white infrared film, you must compensate for this. To make this easy, most lens makers include infrared focusing marks on their lenses. When using black-and-white infrared film, focus in the usual manner, then rotate the lens' focusing ring so that the focused distance appears opposite the infrared focusing mark rather than opposite the normal focusing index. (In color infrared film, two of the three emulsion layers are sensitive to visible light, so it's best to focus normally rather than using the infrared focusing mark. In any infrared shooting, it's wise to stop the lens down so depth of field can help compensate for the difference in focus plane between visible and infrared rays.) |
- Log in or register to post comments

