Photographic Super Course: Macro Photograqphy Page 3
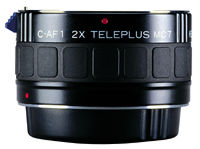
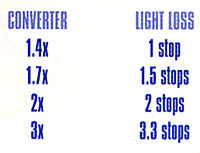
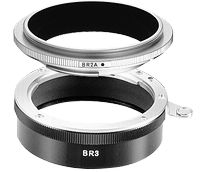
| Reversing Rings A lens-reversing ring is simply a small metal ring with a camera-body mount on one side and a threaded ring into which the front of the camera lens screws on the other. The reversing ring attaches to the camera, extension tube or bellows, just like a lens. The front of the camera lens screws into the reversing ring. Why use the lens reversed? Because standard (nonmacro) lenses are optically optimized for normal shooting distances, they produce somewhat below-optimum image quality at close-up distances—particularly edge softness due to curvature of field. Reversing the lens produces better results for close-up work, and greater magnification with normal and wide-angle lenses. Tele-Converters Most major-brand tele-converters produce good results. There is a slight loss of image quality, but not a lot. Some manufacturers offer matched tele-converters, made specifically for use with a particular lens (or a specific focal-length range). These can produce even better photographic results than general-purpose converters. The main drawback of tele-converters is they cause a loss of lens speed. When you attach a 2X tele-converter, the lens becomes effectively two stops slower. For example, attach a 50mm f/1.4 lens to a 2X converter, and you've got a 100mm f/2.8 lens. Attach a 200mm f/4 lens, and it becomes a 400mm f/8. Automatic converters that connect to the the camera's metering system will automatically compensate for this loss of light transmission when the camera's through-the-lens metering is used. With other converters, you must meter in the stopped-down mode. When using a separate hand-held meter and a 2X tele-converter, set the lens to an aperture two stops larger than the meter reading calls for: If the meter calls for f/11, set the lens aperture ring to f/5.6 (or increase exposure two stops by slowing the shutter speed). The reason that tele-converters are included here is that the lens's minimum focusing distance remains the same when a converter is used. Thus, if you have a 300mm lens that focuses down to 8.5 feet, it becomes a 600mm lens that focuses down to 4.5 feet when attached to a 2X tele-converter. Because of this, you can get some great close-up images by using a tele-converter. Close-Up Shooting Tips A mirror prelock (if your camera has this feature) will lock the mirror in the up position before shooting, so you can let the vibration caused by the mirror flipping up out of the film path to settle down before you make the exposure. This vibration, although minimal, can reduce image quality when working at high magnifications, especially at shutter speeds in the one second to 1/30 range. Of course, you won't be able to see through the viewfinder while the mirror is locked up, but for most close-up work, you'll have your composition and focus locked in with the tripod before you make the exposure, so that won't matter. For hand-held close-up work it's easier to move the camera slowly toward the subject until it comes into focus, rather than trying to adjust focus via the lens' focusing ring. If a specific magnification is desired, set focus for that, then move in on the subject until it comes into focus. When using extension tubes or bellows, you'll find the image in the viewfinder quite dark because of the extension. To make focusing easier, don't use the central split-image—it will black out. Instead, use the plain ground glass area of the viewfinder. You might carry a small flashlight to help illuminate your subjects for easier focusing. To minimize blur due to subject movement, use the fastest shutter speed the light level will permit. And since depth of field is extremely limited at close-up shooting distances, you'll generally want to shoot at the smallest aperture possible to maximize it. Of course, short shutter speeds require larger apertures, and vice versa. One answer is fast film—today's ISO 400 films are by and large excellent. If there's a breeze, you can use a sheet of poster board to shield your subject from it. White poster board makes a good reflector. Dark poster board can be used to block harsh sunlight from the subject. If you want to use slower, finer-grain (and richer-color) films, there is a way around the fast shutter speed/small lens aperture dilemma: electronic flash. Used at close range, a simple electronic flash unit provides enough light to permit stopping the lens way down to maximize depth of field, while its brief flash duration minimizes the effects of camera and subject movement. An off-camera sync cord lets you move the flash unit off the camera's hot-shoe for more lighting flexibility. A ringlight flash literally surrounds the lens with light, providing soft, even, shadowless lighting on the subject when such lighting is desired. |
- Log in or register to post comments

