- REVIEWS
Camera Reviews 
More Reviews Mobile Reviews Photography Reviews - GALLERIES
- VIDEOS
- BUYER'S GUIDES
The Quality Of Light: Seeing “Photographically”

Light is paramount in photography. Whether you are shooting film or digital, indoors or outside, and whether you are using a point and shoot camera or an expensive D-SLR, light has a profound effect on the artistry, appeal and the success (or failure) of your images. There are two aspects of understanding light. First, you must be aware of its qualities; second, you have to know how to manipulate it to get the best possible image out of any given situation.
A case in point is the comparison photos of the medieval Ogrodzieniec Castle in Poland, (#1 and #2). The first time I was there the sky was white and the lighting was diffused. I returned a year later and at sunrise the color was golden, the angle of the sun was low, and the impact of the light on the scene comparing the two scenarios is remarkable.

All Photos © Jim Zuckerman

Let’s look at the qualities of light in depth so you have a full understanding of this all-important topic in photography. What I have always found so interesting about learning to see is that something can be so obvious once you notice it, but before that it can be staring you in the face and you aren’t aware of it at all. This is why I maintain that photography really taught me to see, and one of the most important lessons I learned when I first started shooting seriously was to be aware of the qualities of light.
Color Temperature: Color Cast
The concept of color temperature is an integral part of photography, and yet many photographers are not really sure what it means. The concepts of color and temperature don’t seem to have a direct relationship with each other, but light sources are often defined in terms of their color temperature and we speak of using the correct white balance with a particular type of light. In addition, the measurement of color temperature is in Kelvin degrees.
What is this? First, let’s talk about “white” light. The light that we refer to as white actually has many shades of color. For example, when you are indoors the lamps that illuminate the rooms of your house are thought of as white light, but when compared to a fluorescent tube or the light from the sun, the incandescent bulbs seem yellowish. The Venetian model I photographed in a hotel room during Carnival (#3), is a perfect example. Her mask is receiving light coming in from a window, and look at the color difference between this and the light emanating from the wall sconce. The lamp fixture is much more yellow than diffused daylight.

The convention in photography is to consider white light to be the light coming from the sun at noon in the latitudes of the lower 48 states in the US as well as Europe and Japan. Many of the new energy saving bulbs as well as fluorescent tubes try to simulate this color, but the truth is that the color is never quite the same as sunlight during midday.
Kelvin, like Fahrenheit and Centigrade (or Celsius), is a scale for measuring temperature, and is used primarily in the scientific community. Zero degrees Kelvin (this is defined as absolute zero where there is no molecular movement) corresponds to -459.67° Fahrenheit.
The relationship between color and Kelvin temperature is quite interesting. It is derived from heating a “black body radiator” (think of this as a piece of black metal) until it glows. The particular color seen at a specific temperature is the color temperature. For example, when the blackbody is hot enough and begins to emit light, it is dull red. This color is similar to the reddish glow from a fire, as in (#4) which is a shot of the summer solstice celebration near Vilnius, Lithuania, and it is about 2000° Kelvin. As more heat is applied to the black body radiator, it glows yellow, and then white and ultimately blue.

The colors radiating from the black body are correlated to colors we are familiar with in our daily lives. The color emitted from a tungsten lamp indoors, such as the 1959 Cadillac I photographed in the Petersen Automotive Museum in Los Angeles (#5), is identical to the yellow-white glow when the blackbody radiator temperature is approximately 3200° Kelvin. When the temperature of the blackbody rises to 5500°, the quality of white light is identical to the color of the sun at midday as in the seascape I shot in the Dominican Republic, (#6). The bluish quality of twilight just before dark seen at The Bean in downtown Chicago (#7), is similar to the color of the blackbody at about 8000° Kelvin.


Color Temperature And Photography
When we all shot film, we’d buy film that was manufactured for a specific Kelvin temperature, i.e. daylight or tungsten. Daylight balanced film was made to produce images with color that looked correct outdoors during the middle of the day, while tungsten balanced film gave us accurate colors indoors when the lighting came from incandescent light bulbs that were rated at 3200° Kelvin.
Digital technology uses these same traditional concepts but with a new twist. You can simply adjust your white point and this changes the color balance. For example, if you set the white point, or white balance, to 3200, you are telling the camera that you want light that is more yellowish than midday sunlight (such as the light emanating from a tungsten light bulb) to be shown as white noon-type daylight. This means that daylight scenes photographed with this white balance will be bluish while overcast conditions and deep shade (about 7000° K) will be exceptionally blue.
When you use a daylight white balance setting, outdoor scenes like the shot at Karnak in Egypt (#8), will be color corrected if the sun is out. If there is cloud cover, the pictures may be slightly on the cool side (bluish) as you can see in the snow covered desert shot in Arizona (#9). That’s where the cloudy white balance setting is useful. By switching to cloudy WB, you are telling the camera to remove the blue cast and produce color that is akin to what you expect when shooting with a daylight white balance in direct midday light. In this landscape shot, I happen to like the blue color cast, so I didn’t remove it. In my own work, I never use cloudy white balance on my camera. If I want to remove a cool color cast, I do it in Adobe Camera Raw or Lightroom (www.adobe.com) using the temperature slider. If you shoot in Raw mode, the temperature slider gives you the ability to adjust the color temperature after-the-fact. This is something that was impossible to do with film (and it also can’t be done very effectively with JPEG files).


Auto White Balance sounds like it is the perfect solution for all lighting conditions. This isn’t true. AWB is fine for most situations. However, when you shoot pictures at sunrise, sunset, the AWB “corrects” the golden tones from the low angled sunlight and makes them white. In other words, the yellowish cast that we expect (and love) from sunrise and sunset lighting will be virtually eliminated if you use Auto White Balance. While this can be corrected using the temperature slider in ACR, by doing it right the first time you save yourself an extra laborious step in post-processing.
Direction Of Light
One of the most important qualities of light is its direction. Whether you are shooting a portrait, landscape, macro shot or a city skyline, the angle from which the light illuminates the subject makes or breaks the picture.
In an outdoor setting the light can come from overhead, from the side, from an oblique angle, from behind the subject and it can be diffused and softened. Each of these types of lighting has its own characteristics.
Overhead light from a midday sun is considered the least attractive type of light photographers use. The portrait of a tribal man in Papua New Guinea (#10), is a good example of why this type of light isn’t flattering to anyone. The contrast is extreme, and even though the exposure is correct the eyes are in shadow due to the protrusion of the brow, the nose is highlighted (never a good idea) and the pattern of light on the face is about as unattractive as it could be.

When the light is overhead as well as slightly behind the subject, it is especially challenging. It looks bad because the shadows are usually very dark and detail in them is hard to distinguish and sometimes it’s lost.
Overhead sunlight can also cause unattractive shadows such as in the picture of white rhinos (#11). This picture was taken about 11 o’clock in the morning, and my driver and I had spent several hours looking for this family of rhinos in Namibia. Unfortunately we found the animals when the sun was too high, and even though I like the interaction between the mother and baby, the pattern of the tree branches from the patchy lighting is seriously detracting. It hurts the picture because the contrast and the pattern are so strong and defined that our attention is diverted from the subjects.

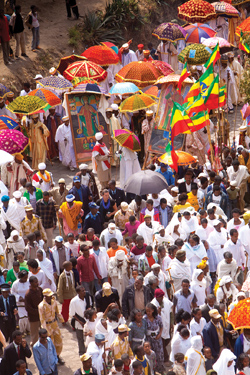
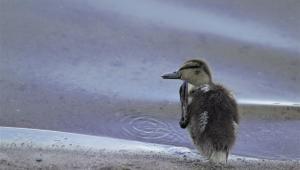
Is overhead lighting always bad? No, it isn’t. Sometimes it works out to be quite acceptable. In the picture of the sacred ibis (#12), the sun was high in the sky but it was illuminating the bird from the front. That made the difference, and even though I would have preferred a different type of lighting, this picture is a keeper. In another example, the picture of the Timkat festival in Ethiopia (#13), passed beneath me from a hilltop vantage at 11 o’clock in the morning. The sun was high and from my point of view, the procession was lit from behind. In contrasty light, this is not desirable. I salvaged the image by opening up the shadow detail with the fill light slider in Adobe Camera Raw. This was the only way to mitigate the contrast from an overhead sun.

Another acceptable shot with overhead sunlight is the unusual portrait of a cheetah standing on the roof of my Land Rover in Kenya (#14). Some of the cheetahs have become comfortable around people and use vehicles as they would a termite mount to get an elevated view to spot prey. I was sitting in the middle seat of the vehicle shooting up through the hatch (which is why I couldn’t include the cat’s feet—I couldn’t see them). The sun was very high in the sky, but I was able to expose such that I captured good detail in the cheetah and still returned color in the sky. This was taken with film, so it’s even more amazing I was able to do this. I didn’t have the benefit of an LCD monitor to judge the exposure.

Front Lighting
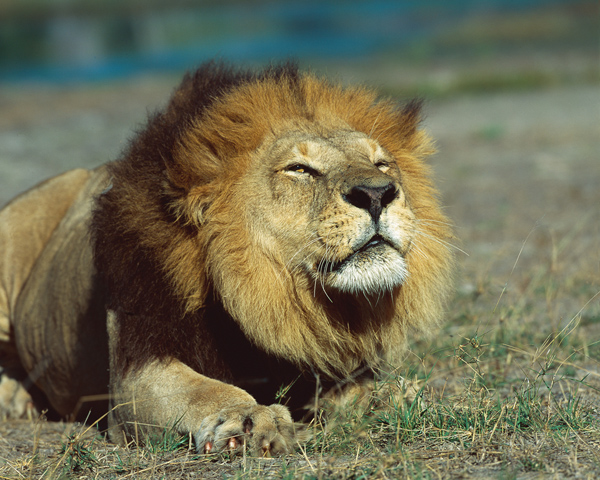
When the light source is directly in front of your subject, the lighting is flat and lacks dimension and depth. This isn’t necessarily bad, though. As photographers we use front lighting all the time. The tall ship I photographed near Norfolk, Virginia (#15) is an example. This kind of direct frontal light during morning and afternoon hours makes colors rich and saturated, and it provides enough light to hand hold the camera while using a fast shutter speed and a fairly small lens aperture. This is a big advantage that front lighting has when shooting outdoors. For example, when I photographed the lion in Botswana (#16) I could use a low ISO, a shutter speed of 1/250, and a relatively small aperture so the entire head and mane were sharp.

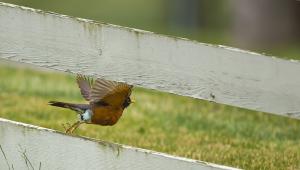
I mentioned that front lighting looks flat and devoid of dimension, and that’s true except when the subject’s form has contours. Look at the body of the superb starling that I shot from ground level in Kenya (#17) and you can see that even though the bird is lit from the front, there is a sense of dimension and texture due to the way the various parts of the bird are illuminated. Look at the belly and the lower part of the wing. They don’t look flat; instead they have pronounced depth.
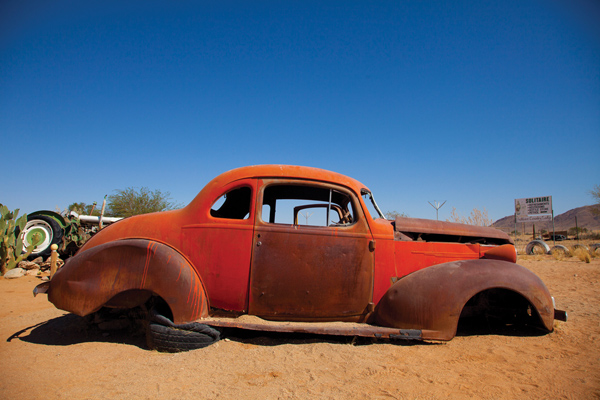
Front light changes character as the sun gets lower in the sky. I took the photo of the camel driver in Morocco (#18) about 2 o’clock in the afternoon. The sun was high in the sky but not directly overhead, thus the subjects were front lit. Notice, though, how harsh the light appears. The same kind of harsh light is seen in the junker car (#19). In the picture of a Las Vegas showgirl (#20) the sun was much lower in the sky—it was about 45 minutes before sunset—and although she is front lit just like the camel driver and the old car, it is softer and more golden in color.


For outdoor portraits using direct front lighting, my favorite is when the sun is virtually touching the horizon. Atmospheric haze or dust softens the light even more, such as when I photographed the young Himba girl in Namibia (#21). Notice how this light almost looks like I used a large diffuser over the sun, and also notice how the girl isn’t even squinting from the light. There was a tremendous amount of dust in the desert air, and this worked to my advantage in giving me the most beautiful light for photographing people…or animals. In (#22) I used the same kind of light to photograph a wild dog also in Namibia, and although this was taken on a different day as the Himba girl, the air was filled with the same density of dust that diffused the setting sun.


Sidelighting
When the sun illuminates a subject from the side, it changes everything. Sidelighting has a number of characteristics that make it quite compelling. First, it increases texture. Compare the two pictures of rhinos (#23 and #24) and look at their skin. The black rhino I took in Tanzania in (#24) shows much more than texture than the one I photographed with a wide angle lens (because it was a captive animal in a private reserve in Kenya). The captive animal was taken with front lighting, and although I consider this a successful image, it lacks the rich texture and dimension that the photo from Tanzania possesses.
The same thing happens in landscapes. In the photo of Mt. McKinley in Alaska (#25) look how much texture there is in the grass. Sidelighting is a favorite type of light among landscape shooters.


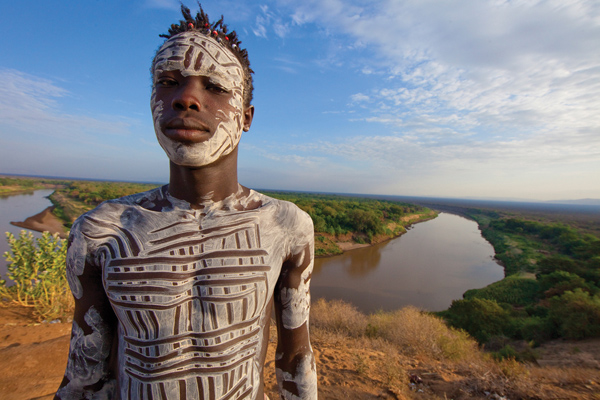
Another characteristic of light coming from the side is that it divides the subject in half with light and shadow. This is a striking way to light many types of subjects. With faces, it is especially interesting. The portrait I took in Morocco of a young man of the Berber tribe (#26) is an example. Notice how his body is front lit, but he turned his head away from the sun so only half of it is lit while the other half is in shadow. I used the same lighting when I photographed a young Karo man in Ethiopia (#27) and also in Ethiopia when I spotted a Nile crocodile in the late afternoon (#28). When photographing people, you can obviously direct them to turn toward or away from the sun to capture sidelighting. Often it’s just a simple turn of the head and suddenly your portrait has increased drama. When you photograph wildlife, it’s a matter of waiting for the animal to look in a certain direction and when you see the effect you want you have to quickly take the shot. That’s what I did when I photographed the caracal (#29). Sometimes these moments are so fleeting that if you hesitate, you’ll miss the shot.


Sidelight also produces long shadows that add to the artistry of your images by introducing graphic elements. The photograph of the Indian military in Delhi (#30) is an example. Look at the shadows on the ground of each of the soldiers. Also, notice how their faces are divided between sun and shadow. Similarly, from a mountain vantage point I photographed a Swiss village along the shore of Lake Lucerne in the early morning (#31) and the trees, buildings and cars are casting shadows that add to the graphic nature of this image.


Backlighting
Many photographers consider backlighting to be the most beautiful type of light. There is no question that it is incredibly dramatic, and it makes the subject stand out from it’s environment in the most artistic way. Because it’s so compelling, backlighting underscores how light can make or break a picture.
Backlighting takes different forms depending on its intensity, the angle with which it illuminates the subject, the amount of ambient light on the subject itself and the exposure.
The photograph of the cypress silhouette I shot near San Francisco (#32) shows a black form against a light background. This is one type of backlighting where a proper exposure on the background means that the subject turns out black with no detail. The photograph of a giant smoke tree in Palm Springs, California (#33) is also backlit but I included the sun in the composition, and in the foreground there is a lot of detail. Both images are shots of trees and both show a lighter background and a silhouetted foreground, but the result is quite different.


The horse and rider in (#34) also exhibits backlighting, although the light was not directly behind the subjects but at an oblique angle. Nevertheless, the woman and the horse are rim lit, and they are not even close to being silhouettes.
Another backlighting example is the flower in (#35). This looks like flash but it was taken in a Costa Rican restaurant where the flower was shaded by an overhang and the background was in deep shade. The indirect ambient light (it wasn’t even sunlight) on the flower was much brighter than the background, and therefore each petal glowed with light. By correctly exposing for the flower, the background became black.


Transillumination is another form of backlighting in which the light comes through a translucent subject and makes it seem like it is glowing from within. For example, look how luminous the leaf on which the frog is resting looks in (#36). No other type of lighting produces such saturated and brilliant color. This was done under controlled conditions with a flash, but the result is the same as when the sun is the light source such as in the picture of the costumed model in Venice (#37).


Diffused Ambient Light
The easiest type of light to exposure for and to use is soft light such as from an overcast sky, shade or a north-facing window. This is also one of the most beautiful and complimentary types of light, and it is essentially directionless. The reason artists use a north window to light the subjects of their portraits is because it’s so attractive. There are no harsh shadows, no overexposed highlights, and the dynamic range fits into the parameters of digital sensors.
I can’t think of a subject that doesn’t look good with diffused light. It is my favorite type of lighting for outdoor portraits, as in (#38). Notice how this young Turkish girl isn’t squinting from a bright sun. The catchlight is coming from the sky behind me.

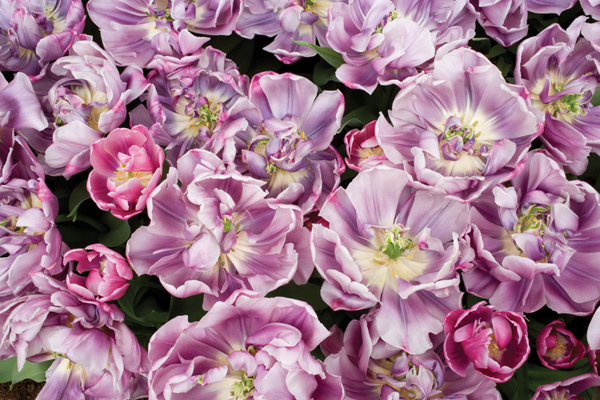
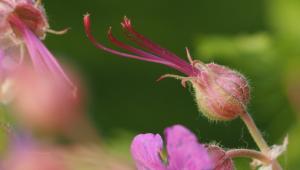
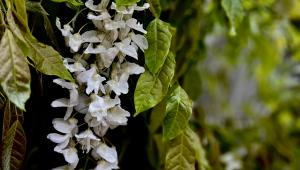
Flowers and gardens also look great with soft light. I feel that in most situations it is the ideal type of light to make the colors of the petals look saturated, and there aren’t any pronounced shadows or bright hotspots from direct sunlight to distract us from enjoying the flowers (#39).
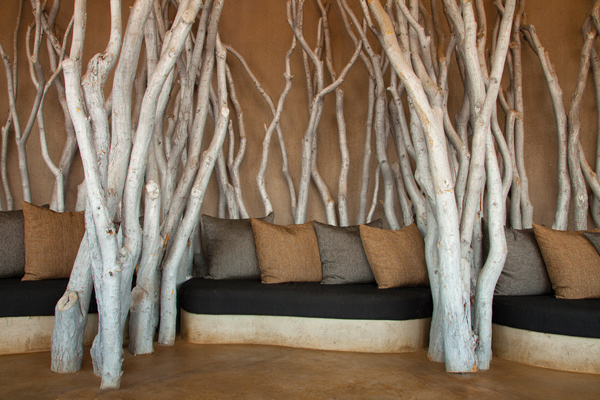
Another instance where diffused light was the best case scenario is a unique seating area in a beautiful lodge in Namibia (#40). This area of the main lobby was lit entirely by the light coming in through large windows.
Metering And Exposure Options
Understanding exposure is an integral part of understanding light. By knowing the exposure options you have in each situation, you control how much detail can be seen in the shadows and the highlights, and this determines how your pictures will look.
The issue comes down to this: Do you expose correctly for the highlights and let the shadows go dark or even black, do you expose correctly for the shadows so all of that detail is revealed while you disregard the highlights (and they will usually be overexposed or even blown out, with no texture or detail—i.e. solid white), or do you compromise between the two extremes? After you make that decision, you then have to choose the best Exposure mode on the camera that will give you what you want.
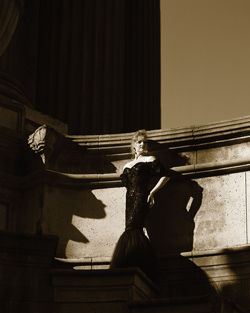
Let me show you the consequences of these decisions. In the photo of a fashion model I shot in San Francisco (#41), I exposed for the highlights knowing the shadows would be very dark. In this case, the high contrast image works well because the shapes of the various forms—the model herself and the architecture—look good. Had I exposed for the shadows and let the highlights become very light, the texture and detail in the model’s skin would have been largely lost to overexposure, and the texture in the highlights of the structure behind her also would have been absent. There are exceptions to every rule in art and photography, but usually blown highlights are distracting, unattractive, and therefore undesirable.
Dynamic Range
The obvious question to ask is why do we have to choose one or the other? When we look at a subject with contrast, we are capable of seeing the detail in both the highlights and the shadows with no problem at all. Why can’t the camera capture that?
There are two reasons for this. First, we see images over time. When we look at a bright area of a scene, our pupils constrict to a certain degree to let less light into the retina. This is similar to a lens closing down from f/5.6 to f/11. When we turn our attention to shadows, our pupils dilate somewhat. These changes happen quickly and automatically, but they occur over time.
When you take a picture, the lens aperture of the camera can’t change (unless you are shooting video) during the exposure. It is a single fixed value, and therefore the camera has to expose correctly for the highlights, the shadows or it has to compromise between the two.
The second reason is that digital sensors are not as sophisticated as our eye/brain combination. The dynamic range—the ability to see detail in shadows and highlights at the same time—is much more limited in a digital sensor. Even with the advances in technology regarding Raw files and post-processing techniques, our cameras don’t come close to what we can see and process in our brain. Therefore, while you can see incredible detail throughout the most contrasty of scenes—such as a black Labrador retriever on snow with direct sunlight at noon—a digital sensor can’t reproduce the detail throughout the scene as you see it.
Consequently, you have to choose whether to expose for the highlights or the shadows, or whether you want to compromise somewhere in the middle. I go into metering and exposure in more detail in Part Two of this issue.
Soft Vs.Harsh Light
Light that is considered to be soft is characterized by an absence of pronounced shadows and highlights. For example, the blue gray tanager I shot in Costa Rica, (#42) exhibits extremely soft lighting. The sky was covered in a thick cloud layer that diffused the light. I photographed the cabin partially buried in snow near Crater Lake, Oregon (#43) in soft light as well. Notice that even though you can see some shadows, they are very subtle.


Soft light is flattering to virtually every subject. Whenever you are in doubt as to how something should be lit, you can never go wrong with this kind of light. For portraits, it is always flattering to your subjects, whether you are shooting animals, (#44) or people (#45). Soft lighting is also very easy to expose for because the dynamic range falls within a digital sensor’s ability to capture all the detail.


Harsh light, on the other hand, is problematic for meters. It is characterized by dark shadows juxtaposed with bright highlights. Meters try to interpret these extremes and come up with a good exposure, but depending on the picture and what you want from the picture, the results are not always acceptable.
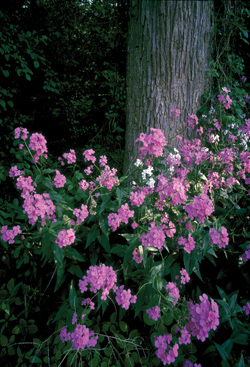
In nature, harsh lighting usually comes from shooting when the sun is overhead, as in the picture of a beach hut in the Dominican Republic (#46) and the Navajo sandstone I shot in southern Utah (#47). It is considered less attractive, even garish, in many situations and most photographers try and avoid it when possible. These two examples are actually not that terrible in terms of light, but the picture of the cactus taken in the desert around Tuscon, Arizona (#48) is what we want to avoid. You can see how the digital sensor was unable to show good detail in the shadows if the highlights were exposed correctly. The flowers I photographed at the same time, (#49) is a terrible picture because of the harsh light. Compare this image with the magenta flowers I shot in soft lighting in Michigan (#50). What a huge difference!


High Key Vs. Low Key
When most of the elements in a picture are white or very light, the picture is said to be high key. Conversely, when an image consists primarily of dark and muted tones, it is thought of as being low key.
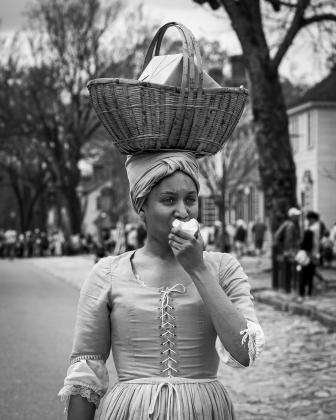
A good example of a high key picture is the image of Carnival participants in Venice, Italy (#51). The white sky and the white masks and costumes make this high key. Note that the light doesn’t have to brilliant backlighting or full of glare to be defined as high key. The model in (#52) is also high key. The makeup, the white dress, and the white smoke as a backdrop define this picture. As much as I love brilliant color in my pictures, one of my favorite color schemes is white on white.


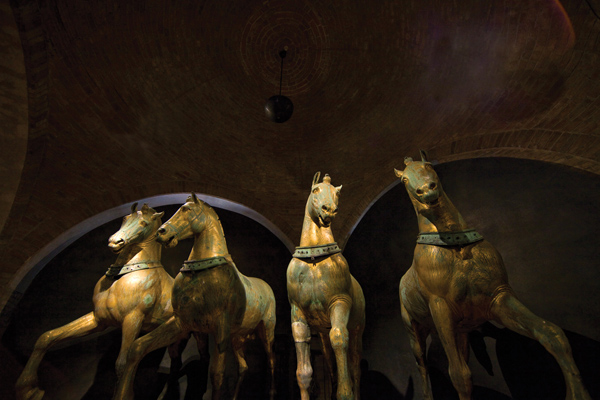
Low key lighting usually has a dark mood that evokes mystery or intrigue, and it is always subjective, or moody. The serpentine trees forming a tunnel in Northern Ireland (#53) is an example. Also low key is the dark illumination on the famous horses the Venetians looted from Turkey after the Forth Crusade in the 13th century (#54).

- Log in or register to post comments


![]()
Get the Latest Photo Tips, News & Reviews from Shutterbug!
| Camera Reviews Other Reviews | Mobile Reviews Photography Reviews Columns | News | Features | How-To | Resources |
 © 2025 Shutterbug
AVTech Media Americas Inc., USA
All rights reserved