- REVIEWS
Camera Reviews 
More Reviews Mobile Reviews Photography Reviews - GALLERIES
- VIDEOS
- BUYER'S GUIDES
Prints Don’t Match The Image On Screen; Answers For A Color Managed Printing Workflow
Each month through the Digital Help column I receive many e-mail messages on how to get prints that match the on-screen image. I have included a sampling of some of these queries as well as some solutions to these problems so challenging to many photographers.
 |
|
|
Questions
For years I have been printing with great success on a Canon i9900 inkjet printer. I have never had to calibrate my monitor…Recently, I purchased a PIXMA Pro9000. The print colors are quite different from the monitor, particularly in the magentas and reds.
Brayton Maggs
I may be somewhat off-base here but I am compelled to get this off my chest: Judging from readers’ letters and my own frustration, having colors in prints look like the pictures done on screen is almost impossible.
Larry Vipond
I am trying to get prints through Aperture using an Epson 2200 and an Apple Cinema Display, calibrated with Spyder2. Prints are underexposed on the printer but overexposed on the display.
Andy Wittenborn
 |
|
|
Why is my Canon iPF5000 printing all of my pictures so dark? I know that I cannot get pictures to look exactly like the screen, but these are far from it.
Martha Meyer
I read an article on color management setup that made me wish you would provide information using, for example, Photoshop Elements 6.0 software, a PIXMA Pro9500 printer, and a monitor for a step-by-step color management setting procedure.
Daniel S. Yorksie
 |
|
|
Answers
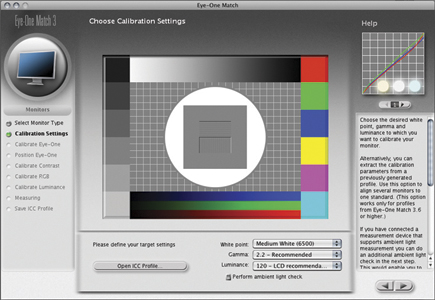
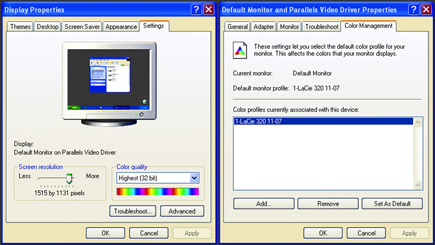
1. A procedure or workflow that will result in prints that match what you see on screen must start with a calibrated and profiled display. Otherwise your computer and an application like Photoshop have no idea and no information as to what colors or brightness you are seeing on screen. So how can the printer match what is on screen when it is ignorant of what you are seeing? All reproduction devices like displays, printers, and scanners produce their own unique interpretation of color; they are “device independent” and conform to no color standard. Calibration and profiling makes a color reproduction device conform to the ICC color standard by first measuring what the display or printer reproduces on its own and then recording the differences between the device output and the ICC color standard and recording those differences in a profile file.
 |
|
|
|
| |||||||||


![]()
Get the Latest Photo Tips, News & Reviews from Shutterbug!
| Camera Reviews Other Reviews | Mobile Reviews Photography Reviews Columns | News | Features | How-To | Resources |
 © 2025 Shutterbug
AVTech Media Americas Inc., USA
All rights reserved