- REVIEWS
Camera Reviews 
More Reviews Mobile Reviews Photography Reviews - GALLERIES
- VIDEOS
- BUYER'S GUIDES
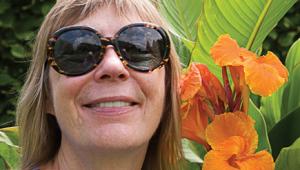
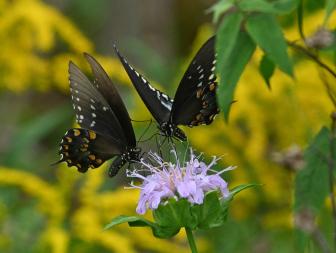
Output Options; Selective Sharpening; An Ideal Choice For Portraits Or Blurry Backgrounds With An In-Focus Subject
In my last column I covered using Unsharp Mask to sharpen your images for output,
whether print or screen. This time, we'll go a step further and talk about
selective sharpening. Why would you want to use selective sharpening? It's
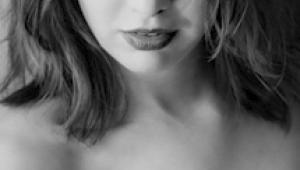
the ideal choice when working on portraits, where you want to keep the skin
smooth but have good detail and focus on the eyes. You'll also find selective
sharpening useful when you have soft blurry backgrounds with an in-focus subject
like a flower. Using Unsharp Mask on these image types can render the backgrounds
too harsh, detracting from the main subject.
To get started, we'll duplicate our image onto a new layer in Photoshop
(any image-editing program that supports layers and masking can handle this
task, but I'm using Photoshop CS2 for these examples). If you've
been working on your image and have multiple adjustment layers already, you
can flatten those adjustments into a new layer to begin sharpening by using
Alt + Control + Shift + E to merge all visible layers into a new layer.
 |
|
|
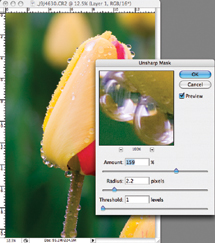
On this new layer, apply Unsharp Mask to the entire layer using the guidelines
presented in my last column (October 2006 issue of Shutterbug, or on the web
at www.shutterbug.com).
Remember that Unsharp Mask works by enhancing the contrast between edges in
your image. The Amount adjustment controls how strong the contrast will be;
Radius controls how wide the area considered an edge is; and Threshold sets
the limit for how different adjacent pixels must be to be considered an edge.
At this time, you need only worry about how the primary subject, or the area
you want sharp, looks. Don't worry about the other areas of your image,
we're going to fix those soon. If you're doing a portrait, sharpen
for the best possible detail in the subject's eyes. For other types of
photos, sharpen for the main point of interest.
 |
|
|
Now, we're going to add a layer mask to the image to hide the sharpening from the areas we don't want. A layer mask works by painting over your image with black or white. The simple way to remember which is which--black conceals, white reveals. By painting over the image with the Paintbrush tool using black, you hide the sharpening adjustments for that part of the image, leaving only those parts you want sharpened. Choose Layers>Layer Mask>Hide All (I find this to be faster when most of the image will not be sharpened) and you'll see that your changes have all seemingly disappeared, and the icon in the Layers palette will be filled with black. Alternatively, you can click on the Layer Mask icon in the Layers palette which will give you a new mask with all areas visible.
 |
|
|
If your program doesn't support layer masks, an alternative to this
method is to erase the sharpened layer where you don't want the effect
to be visible. This isn't as effective though because you have less control
over the effect.
|
| |||||||||


![]()
Get the Latest Photo Tips, News & Reviews from Shutterbug!
| Camera Reviews Other Reviews | Mobile Reviews Photography Reviews Columns | News | Features | How-To | Resources |
 © 2025 Shutterbug
AVTech Media Americas Inc., USA
All rights reserved