- REVIEWS
Camera Reviews 
More Reviews Mobile Reviews Photography Reviews - GALLERIES
- VIDEOS
- BUYER'S GUIDES
Nissin MF18 Digital TTL Macro Flash: A Versatile Ringlight
The Nissin MF18 fully supports Nikon’s i-TTL autoexposure as well as Canon’s E-TTL system. I tested with the Nikon 60mm Micro, but also had success with a zoom, namely the Tamron 70-300mm with a Marumi DHG Achromat Macro (plus-diopter) lens attached, both on my Nikon D300. Much of my close-up work with the MF18 involved Manual shooting mode set on the camera for tighter exposure control, and manual focus.

MF18: The Controller Unit
Seated in the camera’s hot shoe and tethered to the flash tube assembly is the Controller. This Controller houses the batteries and, as the name implies, directs all flash activity. On the surface, the MF18 Controller looks like the company’s Di866 Mark II unit, except that it lacks the tilt/swivel flash head. It sports a similar auto-rotating, full-color display on the back, which gives you a quick read on what’s going on. And the function buttons are identical, with cursor keys that are used to navigate and adjust settings. The on/off button also serves to lock in settings (check this indicator in case flash settings are not responding—you tend to forget you’ve set it).
Main Menu & TTL Mode


Two Halves: Better Than One
The MF18 employs a screw-in (stepper-like) adapter ring that the circular flash head clips onto on the face of the lens. The system comes with a wide range of adapters (52, 58, 62, 72, and 77mm)—neatly packed inside a hard leather case.
The circular light actually consists of two flash tubes, so you can adjust the output ratio between them, via the Controller. In TTL and wireless TTL that ranges from 1:1 to 8:1 (or 1:8) for modeling—or shunt all power to one half for dramatic lighting or when attempting to avoid intrusive or potentially glaring surfaces. But be careful, as the brighter side may also get hotter in the process and need to be toned down.
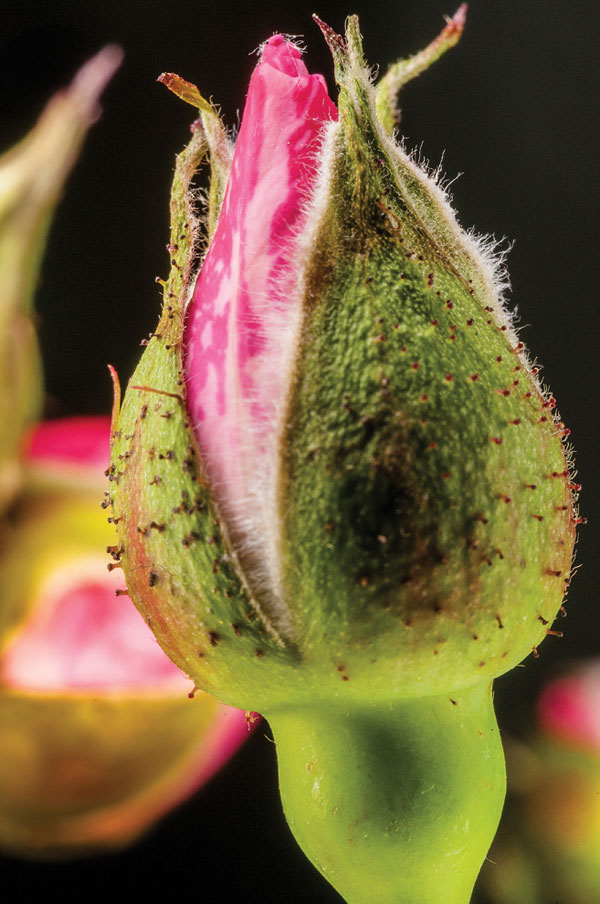
The flash tubes themselves are heavily diffused and very slightly angled in an effort to further reduce glaring reflections. But that doesn’t always work, regardless of ratio settings, since shiny leaves rarely cooperate and tend to throw off some hot spots that you may wish to deal with in post. The same is true of brightly colored flowers. In Lightroom, for instance, I may use the Graduated Filter or Adjustment Brush to tone down offending areas.
You can rotate the ring, notably, to modify where shadows fall when using light ratios or to place greater emphasis on certain areas (or to deemphasize others). The two halves can also be expanded to accommodate larger diameter lenses and larger subjects (keep in mind that the idea is to bathe the subject in light).
I should also point out that, because the quantity of light is weak, compared to a standard on-camera flash such as the Di866 Mark II, the formation of shadows on the background is minimized or alleviated entirely. Using smaller lens apertures will further ensure the success of this technique, by limiting the reach of the light even more. Again, keep in mind that your primary lighting target is that small subject immediately in focus.
Expanded Circle Of Light

© Jack Neubart
Bright LEDs
A set of four LEDs is embedded in the ring head: one pair flanking each flash tube. These bright lights are superior focusing lamps. And they serve as proportional modeling lights roughly corresponding to flash output, extinguishing on one side when the respective flash tube is switched off.
The LEDs are activated by holding the Set button on the Controller unit for 2 seconds. (I would have preferred a separate on/off switch, since tiny critters don’t wait around.) Interestingly, these LEDs remain in an active state, entering standby after a fixed interval. Partially press the camera’s shutter button and they’re back on (ditto when switching the camera off and on again). They also come alive again after each exposure, so you’re not left in the dark. This is an amazingly helpful feature, since it frees you to focus on the subject instead of distracting you with needless added steps to switch the focusing lights back on. The power draw is minimal, since they are LEDs, so no need to worry about that.
Light Ratios In Action


Photos © Jack Neubart
TTL And Manual
The beauty of the MF18 display is how readable it is. In TTL mode, hit the left/right cursor keys to set flash bias in 1/3 EV steps; the up/down keys control output ratio between the two halves. It’s that simple and straightforward. The exposure override operates in tandem with the camera flash bias settings, so make sure the camera flash control is initially at zero, to avoid unexpected flash exposure errors.
The MF18 has two Manual output functions. The basic Manual function controls output from full to 1/64 for each flash tube, whereas the Fine Macro mode takes output on each flash tube from 1/128 all the way down to 1/1024. I made several exposures in Manual flash mode (camera in Manual) with very satisfactory results. It may take some effort to arrive at a usable exposure and output ratio, but I also felt more in control than when using TTL flash mode. Still, I preferred TTL mode for its speed and efficiency.
There is also a Full Automatic TTL mode (“A”), which lacks user overrides on the flash—hence I avoided it. (Note: Make sure to hit the Set button when switching modes or the flash will revert to the previous mode.)
Ring Flash + Zoom Lens

© Jack Neubart
Wireless TTL
As a wireless TTL aficionado, I couldn’t resist adding a remote SB-900 to the mix—to illuminate a white backdrop behind a still life subject. Unlike the Di866 Mark II, which operates as both Master and Remote (slave) flash, the MF18 works only as Master flash, on four channels.
Assigning a remote flash to a Group can be tricky. The two flash tubes act as Group A and Group B (they’re labeled “A” and “B” on the back so there’s no confusion). The off-camera remote speedlight can serve as an extension of Group A (but not Group B)—hence controlled by the ratio settings. Or it operates independently as Group C. I felt more comfortable setting the off-camera remote as Group C so I could control output up to +/- 3 EV specifically on this flash.
Getting Close
© Jack Neubart
Wireless TTL Mode

© Jack Neubart
Recommendations
This is the only ring flash I know of that expands to accommodate larger diameter lenses. But this feature also allowed me to encompass larger subjects, such as butterflies. That said, this flash could be used with even larger subjects from near distances, without noticeable falloff corner to corner, apparently owing to the level of diffusion built in. But you will see soft shadows behind the subject under these conditions. That’s where the wireless remote (aimed at the background) came in handy, blanking out those distracting shadows.
Even more, I loved the modeling/focusing LEDs. This design should serve as a model for other ring flashes. The highly readable display is also a big plus, whether in TTL or Manual flash mode. And the flash was powerful enough to allow me to stop down to small apertures, which is often necessary in extreme close-ups, for enhanced depth of field. Perhaps my only disappointment was that the ring assembly is tethered to the housing. But that didn’t stop me from enjoying practically every moment I spent with the Nissin MF18 ring flash. I highly recommend it.
LED Focusing/Modeling Lights

© Jack Neubart
Specs At A Glance
Nissin MF18 Digital TTL Macro Flash
Dedication: Nikon with i-TTL dedication and E-TTL Canon version
Guide Number: 53 (ISO 100, in feet)
Illumination Angle: 80x80 degrees
Power Source: 4 x AA battery
Recycle Time: 0.1-5.5 seconds (alkaline, Ni-MH)
EV Compensation In TTL: +/-3.0, in 1/3 EV steps
LED Modeling Lamps: Four
Color Temperature: 5600K at full power
Wireless Remote: Master (four Channels, three Groups)
Firmware Terminal: USB
X Terminal: Yes
External Power Pack Socket: Nissin Power Pack PS300/Canon CP-E4/Nikon SD-8A, SD-9
Adapter Rings: 52, 58, 62, 72, 77mm included (49, 55, and 82mm optional)
Dimensions: Main body: 4.5x2.6x3.3”; Ring flash: 4.7x5.3x1.6”
Weight: 15.7 oz w/o batteries
Price (Street): $439
For more information, contact Nissin at www.nissindigital.com.


![]()
Get the Latest Photo Tips, News & Reviews from Shutterbug!
| Camera Reviews Other Reviews | Mobile Reviews Photography Reviews Columns | News | Features | How-To | Resources |
 © 2025 Shutterbug
AVTech Media Americas Inc., USA
All rights reserved