- REVIEWS
Camera Reviews 
More Reviews Mobile Reviews Photography Reviews - GALLERIES
- VIDEOS
- BUYER'S GUIDES
Westcott Two-Light Daylight D5 Softbox Kit Lighting Review

The trend of using continuous light sources for portraiture that I saw at last year’s WPPI show continues unabated with Westcott’s Two-Light Daylight D5 Softbox Kit being the latest offering. The kit uses fluorescent bulbs as a light source, although that word barely appears in Westcott’s early press material for the kit. Part of the reason may be that when it comes to photographs of people, fluorescent has a negative connotation but nothing could be further from the truth. The RGB spikes from fluorescent light closely match the receptive RGB spikes of imaging chips and when comparing fluorescent to tungsten lighting, which is 93 percent heat and 7 percent red light, fluorescent easily comes out the winner.


All Photos © Joe Farace
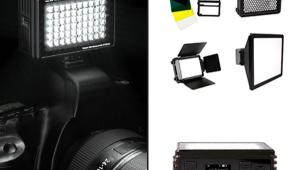
In The Kit
The basic building block of the Two-Light Daylight D5 Softbox Kit is the D5 head. Made of nylon, the head weighs a little over two pounds and is UL and CE certified. The D5 features five ceramic light sockets, each supporting up to a 50-watt lamp. The D5 head has five illuminated power switches arranged in a row across its back, each controlling a single lamp.
Basic human engineering suggests arranging them in a pattern identical to the sockets to minimize guessing, especially when initially using the system. Ultimately you’ll remember which switch turns on what bulb. The D5 has a built-in tilter bracket for positioning and a heavy-duty, 13-foot cord with an in-line power switch that I would have preferred located on the D5’s back.
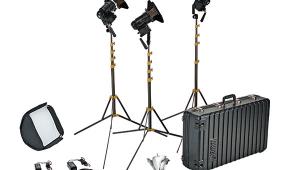
For $399, the kit includes two D5 light heads, two 24x32-inch Basic softboxes, 10 27-watt daylight-fluorescent lamps, and two 6.5-foot light stands. The softboxes have a reflective silver lining to maximize output with heat-resistant rods that mount on receptacles on the D5’s head. It all comes in a 10x12x29-inch box that has a handle so it can double as a carrying case, at least for a short time. For the location photographer, a more lasting solution might be a Lightware C6032 32-inch Cargo Case ($173) that will hold all that gear with room left over for accessories and an extension cord or two.
"For $399, the kit includes two D5 light heads, two 24x32-inch Basic softboxes, 10 27-watt daylight-fluorescent lamps, and two 6.5-foot light stands. The softboxes have a reflective silver lining to maximize output with heat-resistant rods that mount on receptacles on the D5's head."

Set Up
It is after all a kit, so some assembly is required. The light stands are, well, lightweight and while seemingly adequate for the task at hand, one of them had a slight bend from the weight of the D5 lamp head/softbox combo. Since the kit is aimed at the aspiring pro this might be acceptable in the short run but if you plan to seriously use the kit an upgrade to Westcott’s own Pro eight-foot Free Sliding light stand ($35) or something similar would be in order.
After mounting the D5 lamp head atop a stand, open the softbox components. Install the rods by first insetting into the fabric housing with the plastic tips pushed into the pockets on the softbox’s edges. To mount, insert the rods in the first hole, off the center hole, at the D5’s top and bottom. Do this before inserting the bulbs and obviously before installing the softbox’s front diffuser. Screw in the bulbs and handle them carefully to avoid using the pig tail end, although that’s easier said than done. Then install the front diffuser but first turn it inside out from how it comes out of the bag so the Velcro tabs mate with their siblings on the softbox’s exterior.
There are no Guide Numbers for the D5 if only because standard formulas ignore the effect of shutter speed on the total amount of light striking the camera’s sensor. Measuring the output of one D5/softbox at 10 feet with a Gossen Luna-Star F produced an exposure of 1/60 second at f/2.8 and ISO 400, which I thought was surprisingly good, compared to some of the moderately and low-priced LED studio lights that I’ve previously tested. The light from the D5/softbox appears intense but when I tried to use the combo during a boudoir portrait session to balance bright window light, it couldn’t quite handle the challenge, although I was ultimately pleased with the final lighting produced during that session.

In The Studio
For my shoot with Pamela Simpson, I found the quality of the light from the D5/softbox combo to be beautifully soft and neutral. Checking the color spectrum output with a pocket spectrometer showed a thin black band (gap) in green and a dark gray one in red, which to be fair could be caused by the color of the front diffuser’s fabric.
When the D5/softbox was placed too close to a black backdrop it produced a magenta cast along the edge. It’s likely that the green spectrum in one or more of the lamps was higher than the blue and red components so when the camera white balanced for the extra green, spill onto the background crossed over as magenta. On the other hand, the unintentional RF interference that some fluorescent lamps produce during video capture was not present when shooting test footage at shutter speeds from 1/30 to 1/500 second. At the same time I had no qualms about the real-word neutral quality of the light produced.
I recently received a Savage Translum background that looks like frosted glass and is available in rolls of 54 inches wide by 18 feet. Translum is made from Mylar and can be framed or hung on a background stand.
I was concerned that placing a D5 head with all five of its lights turned on would not be bright enough to sufficiently illuminate the Translum background but when used with the other D5 it created wonderfully room-filling light, though admittedly an exposure compensation of plus two stops was required to achieve proper exposure and balance both the front and back lights.


Conclusion
Considering this kit’s price point, there is a lot of lighting value to be found in the Two-Light Daylight D5 Softbox Kit. Overall it boils down to that for the money, the quality of the light produced by Westcott’s kit is impressive.
Acknowledgements: I would like to thank Boulder, Colorado’s Starr’s Clothing Company (www.starrsclothingco.com) for providing some wardrobe worn by Pamela Simpson. A big thank you goes out to lighting industry innovator Gary Regester (www.garyregester.com) for his help understanding how fluorescent lights behave during digital photography.


![]()
Get the Latest Photo Tips, News & Reviews from Shutterbug!
| Camera Reviews Other Reviews | Mobile Reviews Photography Reviews Columns | News | Features | How-To | Resources |
 © 2025 Shutterbug
AVTech Media Americas Inc., USA
All rights reserved