Master Class
Have Cameras...Will Travel!
Monte's Mexican Memories-Part 1

Photos © 2003 Monte Zucker, All Rights Reserved

It doesn't take me long to pack when I get invited to teach a class in an area that I'm anxious to visit. In my rush I did forget to pack my socks, however. But I had my cameras, a few lenses, a tripod, lots of memory cards, and my passport. Michele Gauger, entrepreneur for The Yucatán Photographic Experience, invited me to join her in Mexico for a photographic safari. I will remember The Yucatán experience for the rest of my life...and have lots of pictures that will help me relive the entire adventure. Here are just a few.

I'll start off with 
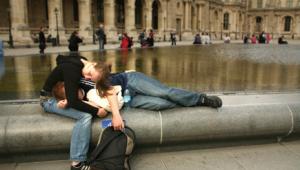
a couple of pictures from my last day there, a day in which the class relaxed at Michele's little home by the sea. As I took a walk to the local Internet station (an adventure in itself) I looked back 
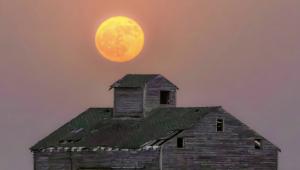
and saw the side of her next-door neighbor's house. It intrigued me enough to go back for my camera and get this first picture.

At any other moment I would never have given the view a second thought, but after the excitement of the week this little vignette of local color caught my eye sufficiently enough for me to zero in on it and capture the forms that most people would have passed by without giving a second glance. The scene was lit exactly how I had been teaching my class all week. That is, shoot from the shaded area into the light. The same applies in still life as it does in photographing people. At a different time of day the picture would not have existed.

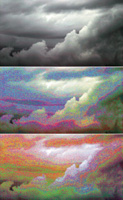
Later that same day this peaceful scene changed totally when an approaching storm was coming in off the Gulf of Mexico. We were relaxing on her back porch when the shapes of the clouds caught my attention enough to take a picture. Even though I shot in color the picture came out in black and white, because that's exactly what the scene looked like. Later that evening I played with the image in Photoshop. By going to Image/Adjust/Hue/Saturation I took the Hue slider all the way to the right. To my amazement lots and lots of color came about. This intrigued me so much I decided to take that color image and do the exact same thing with it. "Hue" taken all the way to the extreme! Lo and behold, I got a whole new set of colors. So, naturally, I put them all together in one.

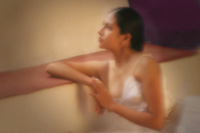
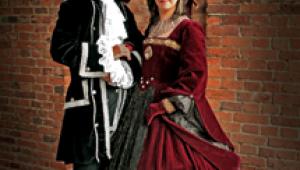
Most people tend to go out where the light is and photograph into the dark backgrounds behind their subjects. I constantly corrected those who were still doing that and pointed out how being inside on the shadowed side of the faces created much more depth to the subjects and even in the whole picture. Working with ballerinas was almost like cheating. They fell into poses so gracefully. Yet, I often had them lean from the waist in the opposite direction from the way they were facing--much the same as I would do with any of my subjects in front of my camera. Yes, for photographic purposes I often adjusted the poses of the dancers to look good from my camera positions.

Up until now all of these photographs were made with my 28-135mm IS Canon lens on the Canon EOS 10D camera. Notice that with the use of this lens I was able to confine the view through my lens to just that area that I wanted to see. Had I used a wide angle lens I would have included too much background behind my subjects.

In this picture of the two ballerinas I could not help but get some of the outdoors through the window on my right. Since I thought that the outdoor area was a distraction, I cloned it out of the picture with the Rubber Stamp tool. That was the area to the right of the vertical line. The light coming through the second archway toward the left side of the picture was darkened down with my burning-in as described earlier.

Michele had posed the ballerina lying down below the window in this next photograph. I loved what she was doing. What I "added" to her composition was to include some of her reflection on the tiled floor in the foreground of the photograph. But the major change I made in this photograph and in several of the others was to change the bright blue on the inside of the archway to a much more subtle tone. The blue was just too jarring to the eye. To do this I first selected the area with the Magic Wand.

Then, I had the selection "grow." It now included the entire deep blue inside the archway. I then went into Image/Adjust/Hue/Saturation and moved the Hue to the right until the blue changed to a color that I could live with. The final touch was to burn-in all the edges of the photographs and to tone down some of the potted plant that picked up too much reflective light.

"Lots of space above her," I kept explaining. "It creates a more relaxed atmosphere in which she can be resting. It also includes more of the environment which in this case adds immeasurably to the photograph."

Shoot From The Dark Out Into The Light!
Each day we took an expedition to an interesting and picturesque location where we could photograph models provided for us by Michele. We visited monasteries and haciendas that were over 450 years old. Doorways, archways, hallways, interior gardens, exterior gardens, they all provided us with ideal lighting. We just had to learn how to take advantage of each of the locations we found.

One piece of advice that I constantly repeated was to position your camera on the shadowed side of the subjects and shoot out toward the source of light. Now, come to think of it, I actually did the same for the two pictures that appear earlier--the corner of the house and even the cloud picture. Anyhow, one of the first locations that I flipped over was this staircase that lead up to a garden. The light was coming in from above perfectly.

Notice how I positioned the ballet dancer at the bottom of the picture--looking up toward the light. I placed his face against a very plain area of the wall, so that his profile would be easily defined against the background. To intensify the light coming in from above and to draw attention to his face I made a duplicate layer of the image in Photoshop. Then, in Image/Adjust/Curves I brought the right side of the curve down to the middle, darkening the image below. With the Eraser I took away a wide stroke of light leading from his face to the top of the picture. Finally, I adjusted the opacity of that layer to the amount of burning-in that I wanted. I burn-in areas in just about all of my photographs as a final finishing touch.

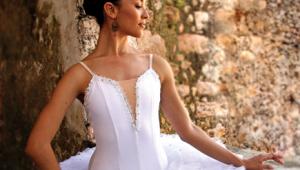
While exploring the monastery I found a dilapidated organ in the deep shadows of a hallway. I loved it. I wanted to use it as a prop, much against Michele's protestations (she was sure that it would fall apart if touched). I brought it out into the light of a doorway a few feet away and used it as a prop for this ballerina.

In a matter of seconds I posed her in a feminine pose, split lighting her face with the light coming in from my right, and positioned my Westcott Monte's Illuminator (reflector) to my right to pick up the daylight and wrap it around onto the right side of her face. I kept telling the photographers around me, "The reflector has to be turned toward the light source, or it won't pick up any light to reflect! Then you angle the reflector only a slight bit to get it to bounce the light onto the subject's face."

Notice how I burned-in the sides and bottom of the picture to focus the viewer's attention onto her and the musical instrument. I did pick up a little extra contrast in the musical instrument by going to Image/Adjust/Levels and sliding the left and right arrows slightly into the center. This made the highlights and the shadows a little more extreme.

Soft Focus Lens Or Soft Focus In Photoshop?
I'm often questioned about whether I prefer to use a soft focus lens or do the softening in Photoshop. Usually, I prefer to do the softening in Photoshop, except when I want the entire photograph to have "that certain glow" about it that I can only get by using my Canon 135mm soft focus lens. It can be adjusted to just about any degree of softness depending on the f/stop and whether you use the 0, 1, or 2 adjustment to the degree of softness you want. This photograph was made at f/5.6 with the ISO set for 400 and the softness set to the maximum. Cropping here was to exclude anything that could possibly take away from the simplicity of the subject. The light came in mainly through the open archway above her. A secondary light source that highlighted the back of her left arm came through a doorway that you will see in a future picture. Once more I changed the color of the inside of the archway.

Join me next month for Part 2 of my Mexican memories.

I wanted to let you all know that I was just invited to be a guest host for Shutterbug's Alaskan cruise in August 2004. Hey, I'm ready to pack, but this time I'll remember to bring my socks along...and some sweaters, scarves, and gloves. I'll have my cameras, flashes, and everything to make this another adventure of a lifetime. Hope some of you will come along with me.

The time is now. Enjoy each and every day and at the same time create some wonderful memories. I'll help you if you give me the chance! Let's sail through Alaska together? What do you say? To register, please see page 160.

X