- REVIEWS
Camera Reviews 
More Reviews Mobile Reviews Photography Reviews - GALLERIES
- VIDEOS
- BUYER'S GUIDES
Low Light Special Effects: Unique Photo Ops

Low light photography presents many challenges, but like any challenging situation it also opens up opportunities to create unique images. Think outside the box and you will be surprised at the kind of images you can produce. The techniques I describe below will get you started. Try each one and see why there is no limit to what you can create with some imagination and effort, and have some fun in the bargain.
Painting With Light
An artist with a paintbrush applies color to a canvas, and a photographer with a light source can apply light and color to a digital image. The tools are different but the idea is the same. A lot can happen to a photograph when the shutter of the camera is open for a lengthy period of time.
Take for example, the row of first century B.C. megalithic heads on Mt. Nemrut in Turkey (#1). This is a 30 second exposure at dawn and during that time I walked down the row of heads holding a Brinkmann (www.brinkmann.net) Maxfire Dual Xenon Spotlight (see page 8) shining the light on the ancient sculptures as I moved toward the camera. I chose this particular high intensity light because it’s very light for traveling and it’s inexpensive. During the long exposure, I “painted” the heads with light. I decided to move from the farthest head to the camera position so I could light them from behind and from the side (from the camera’s point of view) to create interest, artistry, texture and dimension. Had I lit them from the front, they would appear much flatter and they wouldn’t look as good. (But something always happens—notice the last head in the row. It is blurred and that’s because the person in my photo tour who opened the shutter for me accidentally bumped the tripod during the beginning of the exposure.)

All Photos © Jim Zuckerman
I chose the lens aperture based on test shots. This was a situation where a meter was useless because the exact amount of time I painted the heads with light varied every time I made a shot. The best I could do was to take a few initial exposures to see what f/stop offered me the best exposure. I wanted a decent amount of depth of field so all of the sculptures were sharp, so I raised the ISO to 640 and that enabled me to use a lens aperture of f/9. I was with a photo tour group, so I told everyone how to set their cameras for the best results. I was racing against time because the sky was getting light, and an exposure that let in too much light would blow out the detail in the background. After every shot I quickly looked at the LCD monitor to make sure all of our exposures were right on.
I also painted a single head with the Brinkmann light (#2). Notice that I also chose side lighting for a more dramatic image. Also note that I didn’t stand at the camera position and hold the light at arm’s length. You can tell from the angle of the light that it was coming from the left side at about an 80˚ angle. Because the shutter was open for 10 seconds, this gave me enough time to move into position to obtain the kind of angle I wanted. I lowered the ISO to 250 in this case because I had more time to devote to a single subject—as opposed to the entire row of heads—and the f/8 aperture gave me a good exposure on the dawn sky plus the correct exposure on the head. I felt it was important to show the cobalt blue color in the background as opposed to letting it go black. I wanted the definition in the headless bodies in the background (the heads fell off the bodies due to earthquakes).

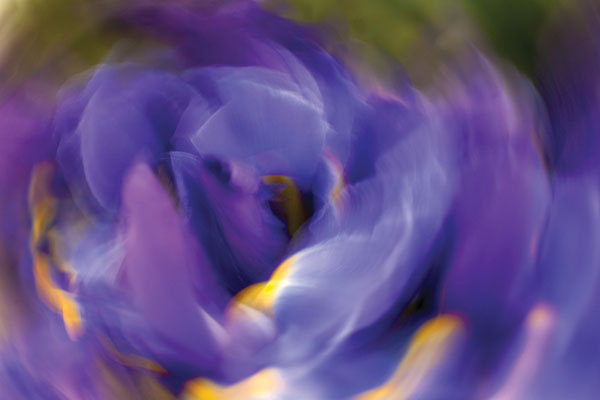
You don’t have to go to exotic locations to use this technique. In (#3), I painted some flowers in my home with a flashlight. I closed the door and turned off the light to give me a dark environment and I used a 50mm macro lens for the shot set to f/27. I wanted complete depth of field, but I had no idea what the exposure time should be.
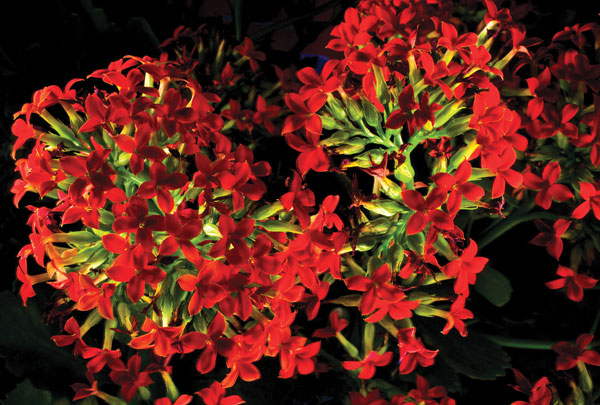
The exposure is dependent on the intensity of the light, the distance of the light to the subject, the ISO and the lens aperture. I chose ISO 100 and a small aperture, and then I had to experiment with exposure time. I did a few test shots and then settled on 10 seconds. I basically dabbed the flowers with the light. There was no rhyme or reason to how I lit them—I just played. After several exposures I decided this image was the best. You can see that some of the petals are backlit and some are side lit because I was moving the light around the flowers, experimenting as I went. If you look closely at the bottom of the picture, you can see that a few of the petals have a double image. That occurred because the flashlight bumped the flowers during the exposure, which to me added to the charm of the image.
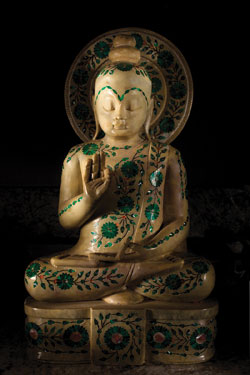
When I photographed a marble Buddha that I’d purchased in India many years ago (#4), I used the tungsten white balance setting on my camera because the bulb inside the flashlight was tungsten. This corrected the yellow color perfectly. Assuming you want correct colors, I don’t recommend using auto white balance when shooting with tungsten light sources because the image will turn out too yellowish. I used a 10-second exposure for this picture. This gives you enough time to be creative with painting the subject with light. Unless you want ambient light to be a factor in the final result, shoot in a darkened room with a low ISO and a small aperture. The only light you’ll record is from the flashlight.
Creating A Star Field
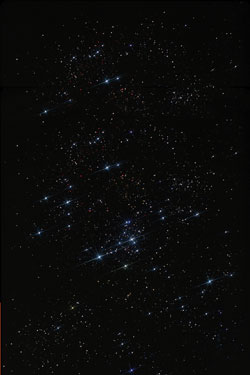
One of the background components I’ve used to embellish many types of images is a star field. Before I actually photographed the stars, I experimented with creating a fairly realistic star background that looks good unless you happen to be an astronomer. To create (#5), I sprinkled silver glitter on a piece of black velvet and photographed it with a star filter, also called a cross-screen filter. This made the point sources of light appear to radiate, simulating twinkling stars. I used a tripod, a lens aperture of f/8 and I made the back of the camera (i.e. the “film plane”) parallel with the plane of the velvet and the glitter to ensure I had maximum depth of field. I did this in a dark room and my light source was a photoflood (this is nothing more than a light bulb in a cheap reflector you can buy at the hardware store). For the exposure, I adjusted the shutter speed until I got what I wanted. This is an impossible situation for a light meter.
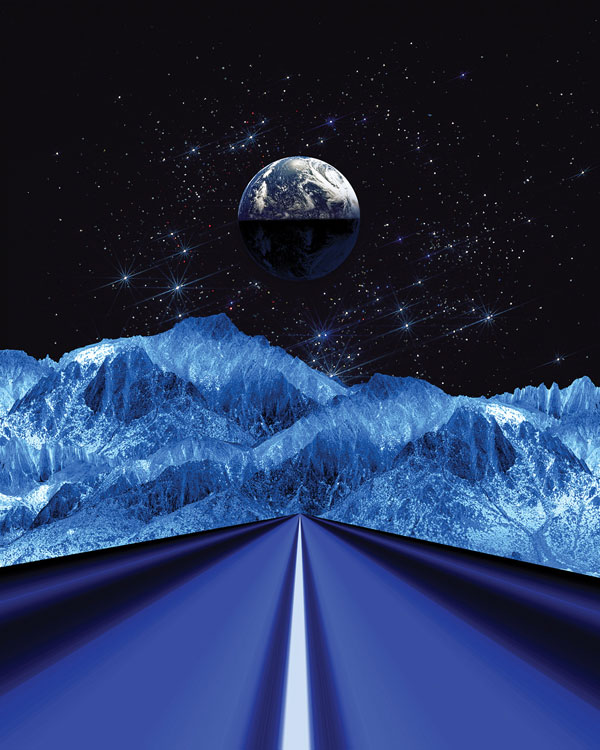
You can see examples of how I used this image in (#6, #7, and #8).


Stacking Images To Eliminate Noise
As I have said often in this issue, one of the problems of shooting at night or in low light situations with digital technology is noise. There is a unique technique to eliminate noise completely. I think you will find this both interesting and useful.
The photo you see here of an otherworldly landscape in Namibia (#9)—a quiver tree forest—was taken at sunset. I was leading a photo tour to this African country and on this particular evening we had an incredibly dramatic sky. I then combined the landscape with a shot of the night sky (#10), that I took the next evening at Sossusvlei where the largest sand dunes in the world are located. The sky was as crystal clear and stunning as I had ever seen. It seemed like I could touch the Milky Way. To photograph the stars as clear as you see here required some careful planning. I didn’t want star trails; I wanted to capture what I saw. I then used Photoshop to get rid of the unwanted noise from the high ISO I was forced to use. Let me explain.


For the picture of the stars, I wanted a long exposure to accumulate the light so the sky looked even brighter than it does to our eyes. However, a long exposure would create star trails due to the rotation of the Earth. I didn’t want that. Therefore, I limited the exposure time to 10 seconds. A longer exposure would show the beginning of the star trails in the form of oblong stars and that wouldn’t look good. Actually, 10 seconds is slightly too long, 5 seconds would have been a better exposure so each of the stars was a round pinpoint of light. To keep the ISO from becoming unacceptably high, I stuck with a 10-second exposure (as it turned out, I could have raised the ISO without any worries).
I used a 50mm f/1.4 lens to gather as much light as possible during the exposure, and I raised the ISO to 1600. That’s why the sky is as bright as it is in this image.
In order to eliminate the noise, the first step was to take 10 separate shots of the sky, obviously from a tripod, and all in Raw mode. It was important not to bump or jar the tripod in any way during these exposures. Yes, the stars move quite a bit in the time it took to shoot all 10 pictures, but that didn’t matter because the software took care of that issue.
In Adobe Camera Raw, I opened all of the images and without manipulation I hit “Open Image”. Now I was in Photoshop. I saved each file as a .psd file, and then I used the command File>Scripts>Load Files Into Stack. In the dialog box that opened (Figure A), I checked the 2 boxes at the bottom and then browsed for the 10 exposures of the sky and hit OK.

Finally, I used the pull-down menu command Layers>Smart Objects>Stack Mode>Mean (available only in CS5 Extended). This combined the images in such a way that the noise was completely gone without softening the image. The stars were automatically aligned even though they had moved a noticeable distance in the sky, and the composite photograph was perfect. It was magic!
I then used the Magic Wand tool to select the original sunset sky behind the trees and pasted the stars into the background. To be honest, when I saw these images together I was completely blown away.
Circles Of Confusion
Out of focus light sources, sometimes referred to as “circles of confusion”, create blends and patterns of color and the abstracts you can create are endless. They can look good behind another subject, they can be superimposed over a background or they can stand on their own. A simple shot of traffic lights on a rainy night (#11), offers some of the best opportunities for this because of the reflections on the pavement. I try to include different kinds of lights if possible, such as taillights, headlights and even a florescent “don’t walk” sign. The different kinds of lights produce different colors.
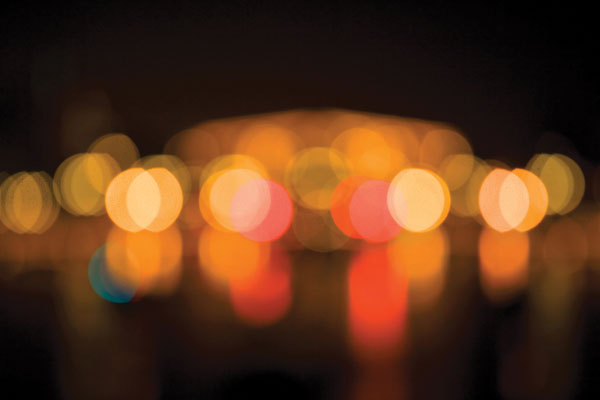
I opt for ISO 200 in these situations and a tripod really isn’t necessary since sharpness is not an issue. I stick with daylight white balance but sometimes I’ll experiment with tungsten white balance for a more bluish look.
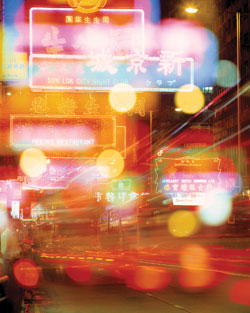
In the night shot of Hong Kong (#12), I made an in-camera double exposure. This was taken with a film camera, and although some digital cameras allow you to do double exposures, I’m hoping that in the near future it will be a common feature. One of the pictures was taken in-focus while the other was shot with the entire scene so out of focus that each of the point sources of light became soft colorful spheres. (Note: you can also combine separate images in software as well.)
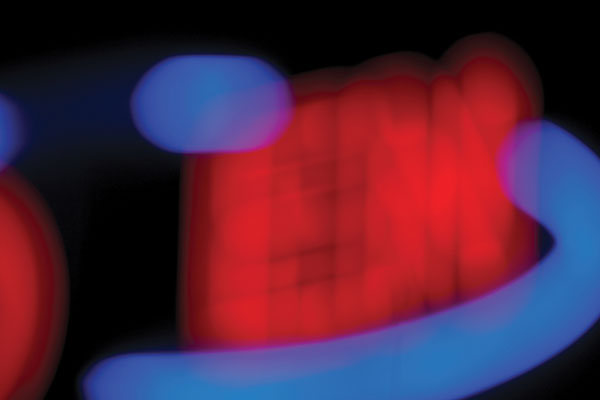
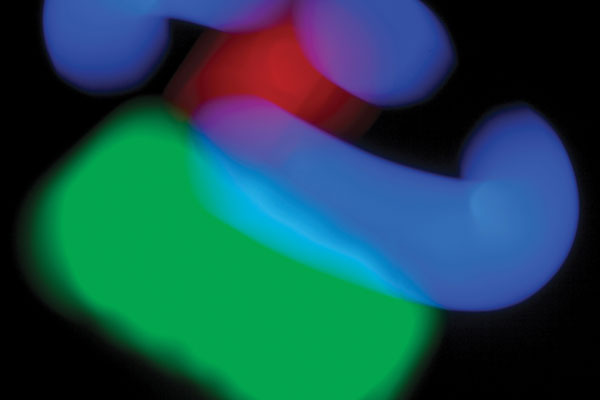
Images (#13 and #14) are pictures I took of a small neon sign at a convenience store. I used a 200mm lens and manually focused (you can’t use autofocus for this) until the lights became a complete abstraction. Neon signs don’t produce the round spheres, the circles of confusion, but their colors are so saturated that I like this beautiful combination of soft color. In addition to creating abstracts, you can combine images like these with other photos. Using the Blend modes in Photoshop, the results can be quite striking. Photos (#15 and #16) were both combined with the same neon color abstract.


A unique variation of this is to move the camera as you shoot the out of focus lights. I did this when I shot a decorated Christmas tree at night (#17) and you can see the circles of confusion surrounded by the blur of the ornaments.

Streaks Of Color And Light
As I have mentioned throughout this issue, long exposures are often necessary to gather enough light to make a good exposure. At the same time, a shutter that stays open for more than 1/8th of a second can record movement in unique ways. Depending on the speed and direction of the movement as well as the colors of the subject, the results can be quite artistic. These are images that are impossible for our eye/brain combination to record, and this makes the photos especially intriguing.
When photographers talk about capturing light streaks, we usually think of traffic lights at night, such as a rescue vehicle with flashing lights (#18). However, there are many other subjects that give you the opportunity to be creative. For example, I photographed (#19) in a subway in Prague, the Czech Republic, from a tripod. Everything is sharp except the train and the people waiting for it. This is a 15-second exposure at f/16 and ISO 100. Notice how the blurred train seems semi-transparent and that we can see the pattern on the wall across the tracks through the blur of color.


I took a picture with the same idea, (#20). I positioned the camera and tripod at the bottom of an elevator shaft in a tower, also in Prague. The lights come from the interior of the car, and with another 15-second exposure, this time at f/22 and ISO 100; I recorded the dark interior of the elevator shaft structure plus the streaks of light. How did I know the correct exposure settings for a picture like this? I didn’t. In fact, I had no idea. It was such a unique and contrasty situation—one I had never encountered before—that I didn’t have a clue what to use. Therefore, I made an educated guess and then adjusted the shutter speed and lens aperture based on the results from the LCD monitor. I used Manual Exposure mode so I could override the meter, because in this kind of unknown circumstance, I had no idea how accurate or inaccurate the meter would be. I didn’t want it taking control.

A dance performance is always fun to shoot with a slow shutter speed, but when the dancer is holding lights or candles as they twirl, the effect is amazing. The folk dancer I shot in Turkey (#21) is an example. This is a .4 second exposure and I used ISO 1250 at f/4. It was extremely dark, and in post-processing I used the fill light slider in Adobe Camera Raw to open up the deep shadows. In so doing, the digital noise became quite pronounced, especially in the dark regions of the image. Therefore I used Dfine 2.0 by Nik Software (www.niksoftware.com) to mitigate the problem. It did an outstanding job.

Also in Turkey, I used a 1/4 second exposure at ISO 500 to capture a Whirling Dervish (#22). I was using a 24-105mm zoom, and during the exposure I changed focal lengths from a more telephoto position to a wider angle. I prefer to zoom from long to short like this because the focus holds throughout the movement. If you start from a wide angle composition and zoom to a tighter shot, more than likely the image will not be focused when you look closely at the telephoto portion of the picture. In this case, the streaks of color and light didn’t come from movement since the background was stationary. It came from using the zoom lens, and in this case—since I was in an audience—I didn’t use a tripod.

Camera movement is a lot of fun when shooting flowers and gardens. You need low light, of course, because if the sun is out you won’t be able to use a slow shutter speed required for this technique. Even if you lower the ISO to 100 and use f/22 or f/32, the speed of the shutter will be too fast for sunlit flowers. For the abstract I made of irises, (#23) I visited the flower section in a large supermarket. This indoor environment guaranteed the ability to use a shutter speed slow enough to enable me to twirl the camera and create an abstract image. I used .5 seconds at ISO 250 and f/5.6. Because the indoor illumination was from mercury vapor lights (which are similar to florescent), I used auto white balance to give me the correct colors. Had the flower been outside in the shade, I would have used daylight white balance (which I use for all of my outdoor shooting).
Multiple Flash
When the light level is very low, the shutter speed can be open long enough to fire a flash more than 1 time for a variety of effects. For example, you can highlight a subject from more than 1 angle with a single flash as I did in one of the statues on the Charles Bridge in Prague (#24). This was only a 2 second exposure, but in that time my wife and I illuminated the statue from 2 angles with 2 flash units. Pushing the test button on the flash fires it when it is used off-camera and you don’t happen to have a wireless trigger. Note that I also captured some of the ambient tungsten lighting that was shining on the medieval religious sculpture, too.

In Dublin, Ireland I was presented with a different situation. There are a group of very dramatic famine figures—sculptures representing the suffering of the Irish people during the potato famines of 1848 to 1852—and you can photograph them individually or as a group. For an individual portrait of one of the figures (#25), I opened the shutter of the camera for 15 seconds. I was alone this time, so I needed the extra time to light the artwork. For one exposure, I placed a blue gel over the flash head and fired it. Then I moved behind the camera and illuminated the sculpture using a yellow gel over the flash head. I had no idea what lens aperture to use, so I did a few test shots and, based on the LCD monitor, adjusted the f/stop to give me the exposure you see here. The sky was almost dark when I shot this, but the long exposure accumulated what light was left and that’s why I was able to capture the cobalt blue color seen just before dark.

To capture the entire group of figures (#26), I had to use another approach. The statues were arranged a few feet apart from each other, and I thought it would look much better if they appeared to be huddled together. I took individual flash pictures of each on separate frames using off-camera flash. I couldn’t use the multiple flash technique because when I would re-position the camera in front of each sculpture, the shutter would be open and it would be impossible to refocus. When I photographed the collection of statues, I put them together in Photoshop at home. Since they were shot against a black background, it was easy to do.

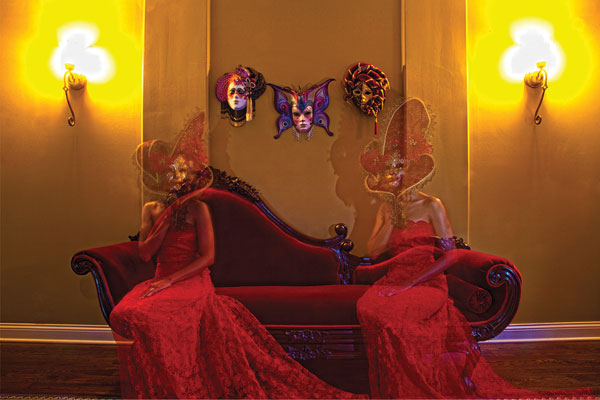
For a fun experiment, I photographed my wife in a Venetian costume (#27), with multiple flashes and with a 15 second exposure in a darkened room. I turned the sconces on to add some atmosphere, but to prevent too much ambient light from ruining the shot; I used f/19 and a low ISO of 160. We began the exposure with my wife sitting on one end of the sofa, and I opened the shutter and manually pressed the test button on the flash to fire it. Then she moved to the other side while the shutter was still open. I also changed my position and used the flash again. Doing this against a black background, like outdoors at night, means that nothing will be seen through the subject. In this case some of the detail in the wall as well as the back of the sofa can be seen through my wife, making this look ghost-like.


![]()
Get the Latest Photo Tips, News & Reviews from Shutterbug!
| Camera Reviews Other Reviews | Mobile Reviews Photography Reviews Columns | News | Features | How-To | Resources |
 © 2025 Shutterbug
AVTech Media Americas Inc., USA
All rights reserved