- REVIEWS
Camera Reviews 
More Reviews Mobile Reviews Photography Reviews - GALLERIES
- VIDEOS
- BUYER'S GUIDES
Lesson Of The Month
Using A Telephoto Lens For Outdoor Portraits
In order to demonstrate the
basics of outdoor portraiture, we brought a local model and our photography
crew to a beautiful nearby beach. Careful planning and the right equipment
allowed us to achieve stunning results. Being equipped with a range
of lenses for your camera enables you to achieve the exact cropping
and background you want. A telephoto lens is particularly useful for
outdoor portraits because it has a longer focal length than a standard
or wide lens, allowing you to minimize your background. It also prevents
the distorted perspective that can happen with a shorter lens. |
||||
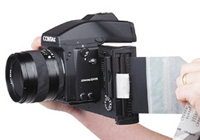
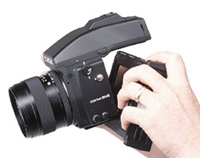
To change the look of the shot, we replaced the standard 80mm lens with a 350mm telephoto lens. Putting on a longer lens acts like a telescope in that it magnifies your subject and makes it appear much closer. This brings attention to your subject while eliminating much of the background. Because this lens is so powerful, we had to move away from our model to create a greater distance between her and the camera. To reflect a warm light into the shadowed areas of the model, our stylist positioned a Photoflex 422 Soft Gold Litedisc just below the camera's field of view (Image 2). This filled in the shadows with a warm, even light. |
||||
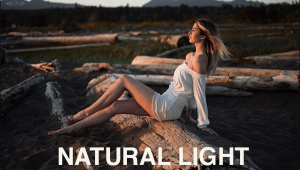
The result looked good, but the highlights were still too bright. To knock down the highlights in the model's hair, our assistants held a Photoflex 772x772 translucent Litepanel over the model's head to diffuse the bright afternoon sun. The result shows an evenly lit shot with a warm summery feel to it (Images 3 and 4). |
||||
For our second location, our
stylist changed the model's outfit and we re-positioned her with
the ocean and sand behind her (Image 5). This initial shot shows the results
using a standard 80mm lens with direct sunlight. Notice how the light
is dramatic, yet provides too much contrast on our model (Image 6). |
||||
You can clearly see the difference this makes in these two shots. The first, shot at f/4, shows a very soft, almost abstract background (Image 8). The second, shot at f/11, makes the background more recognizable (Image 9). Which you choose will depend on your subject and background. This lesson will be posted in the free public section of the Web Photo School at: www.webphotoschool.com You will be able to enlarge the photos from thumbnails. If you would like to continue your digital step by step education lessons on editing, printing, and e-mailing your photos it will be on the private section of the Web Photo School. Shutterbug has negotiated with WPS to offer our readers a special 33 percent discount rate of $30 per year. To enroll at this discount just go to: http://shutterbug.webphotoschool.com and fill out the Shutterbug questionnaire which will help us to publish lessons for you in the future. |
||||
Changing Your Background
With f/Stops Photo Tips |
||||
|
||||


- Log in or register to post comments


![]()
Get the Latest Photo Tips, News & Reviews from Shutterbug!
| Camera Reviews Other Reviews | Mobile Reviews Photography Reviews Columns | News | Features | How-To | Resources |
 © 2025 Shutterbug
AVTech Media Americas Inc., USA
All rights reserved