- REVIEWS
Camera Reviews 
More Reviews Mobile Reviews Photography Reviews - GALLERIES
- VIDEOS
- BUYER'S GUIDES
Controlling Light: Using Light In Artistic Ways
Polarity
A polarizing filter is an accessory that is inserted in the optical path—it’s screwed onto the front of the lens—and it filters out light that is polarized perpendicular to the axis of the filter. This has 3 applications in photography: it reduces reflections from some surfaces, it can darken the sky and it saturates the image by eliminating unwanted reflections.
The disadvantage of using a polarizing filter is that it reduces the light by 2 f/stops and sometimes 2 1/3 f/stops. This is a serious loss if you are hand holding the camera and/or your subject is moving because the shutter speed may be too slow to get a sharp picture. If you raise the ISO to compensate for the loss, you may be degrading image quality. If you are shooting landscapes or architecture from a tripod, then a slower shutter isn’t an issue.
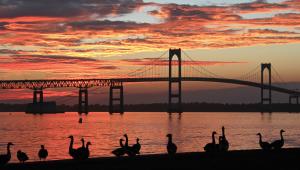
When we all shot film, photographers often used polarizing filters largely to increase the saturation of colors. It has a marked effect on a blue sky, and you can see the effect in (#1). This was taken with a Mamiya RZ 67 and Fujichrome Velvia 100 film along with a polarizing filter, and the increased saturation of the blue sky is significant. Velvia is known for its rich colors, but a polarizing filter makes it even more so. The maximum effect from a polarizing filter is 90° from the sun. In other words, at sunrise or sunset when the sun is near the horizon, the sky above you can be supersatured. If you take a picture toward the sun, the filter will have no effect at all, except, of course, to reduce the light by 2 f/stops. When the sun is at its zenith, the sky near the horizon will be most affected by the polarizer.

All Photos © Jim Zuckerman
At high elevations, a polarizing filter can turn a deep blue sky black. I was surprised when I first saw this. Many years ago when I was shooting medium format film at Bryce Canyon in Utah at 8500 feet, I used a polarizer on the sky. Although the picture was slightly underexposed, the sky went from deep royal blue to black (#2). This is a straight scan from the original 6x7cm transparency without any manipulation in Photoshop (www.adobe.com) at all.

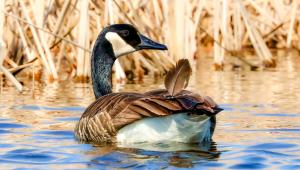
It’s so easy today to enrich colors in Photoshop or Lightroom that I no longer use a polarizing filter for added saturation. However, the filter is still a valuable tool in reducing or eliminating reflections in some situations. Nature photographers use these filters to cut down on the reflection of lakes and ponds because this reveals rocks, vegetation and fish beneath the surface of the water, and at the same time the colors are richer. In the same context, by reducing glare on leaves—either individually or in a forest setting—the green tones appear much more saturated.
Diffusion
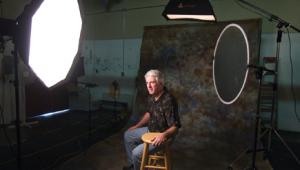
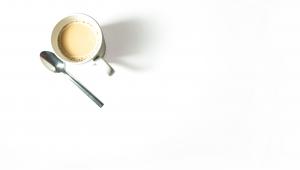
Artists for centuries have recognized that diffused light is more attractive on most subjects than any other type of light source. This is why portraitists placed their subjects in front of a north-facing window. Direct sunlight never enters a window with this orientation, and the soft light illuminated a person in a very flattering way without being harsh or contrasty.
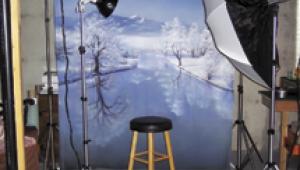
There are many ways to soften light. Studio photographers use white umbrellas, softboxes and even large frames made of PVC piping with a white piece of fabric stretched over it. When I’ve been lazy and didn’t feel like setting up one of these large diffusion products, I’ve simply taped a piece of white computer paper over a studio flash head to soften the light. This didn’t diffuse the light as much as a softbox, but when working close to a small object, it was effective in making the light more flattering.
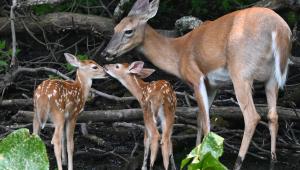
A light source becomes more diffused the closer it is placed to the subject. For example, if you use a large softbox and place it 4-5 feet away from a subject, the light will be extremely diffused. The light wraps around it in such a way that contrast is largely eliminated as in the portrait of a King Charles spaniel puppy (#3). However, if the same softbox were used 15-20 feet away, it becomes more of a point source of light, which, by definition, is more contrasty.

This is why cloud cover diffuses the light compared to a midday sun in a blue sky. The clouds act as a giant softbox that spreads the light out such that it wraps around subjects, filling in areas that otherwise would be in shadow. The sun is a point source of light that casts hard shadows with a clear delineation between light and dark. It is the difference between (#4 and #5) where the former is what I consider a terrible picture because the light is so harsh and the latter which is much more attractive due to the diffused light.


Even on a sunny day, if you can find some shade you can use diffused lighting. When I photographed a Civil War reeninactment that took place at 1 o’clock in the afternoon on a clear day, the lighting was extremely harsh. I saw a Confederate soldier on horseback that I wanted to photograph, and I simply asked him to move into the shade under a large tree. He obliged, and the portrait (#6) was one of my favorite shots of the afternoon. The key is to position the subject so patchy lighting is not part of the equation, and the background is shaded as well. If a shaded subject is positioned in front of a bright, sunny background, you will have diffused the light in the foreground but the background will be overexposed and therefore terribly distracting.

Using the shaded side of a building is an easy way to utilize diffused light. I photographed a witch during a festival at a castle in Luxembourg (#7) doing this. The sun was quite harsh, so I asked this young lady to walk around the other side of the castle for the portrait. It’s such a simple technique and yet it’s so effective.

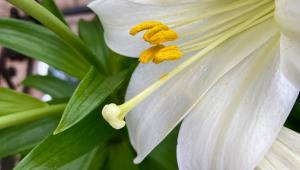
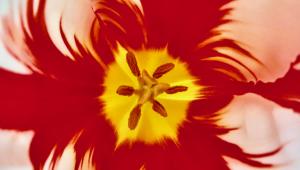
In doing macro photography, I often use the shade of my body to block the sun on a clear day. Even though a small subject will only be inches away from where direct sunlight is striking the ground, the shade I create is enough to diffuse the daylight for the softer look that is more flattering. I’ll get down on my knees to cast a shadow on a wildflower, insect, mushroom or whatever else I’m composing. It’s amazing what a difference this makes compared to shooting with the undiffused light of direct sunlight, as you can see in the pair of pictures (#8 and #9). Notice also the color shift. In the shaded flowers (#9) there is a bluish cast to the picture while the image lit by direct sunlight appears warmer, more yellowish. Shade always photographs on the cool side, and if you would prefer a warmer color tone, either use cloudy white balance or change the color temperature afterward using the temperature slider in Adobe Camera Raw or Lightroom.


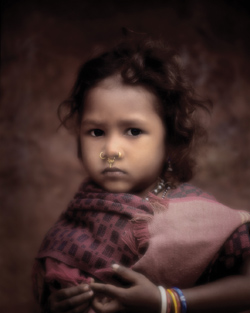
Filters that are placed in front of the lens also play a role in diffusing light. I took the portraits of a little girl in India (#10 and #11) with a film camera several years ago with and without a glass Tiffen (www.tiffen.com) diffusion filter. The filter softened the girl but it also softened the light. The particular filter I used uniformly diffused photograph, but you can also buy a Tiffen filter that is clear in the center with diffusion around the periphery of the image.

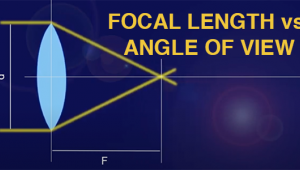
Fresnel Lenses
A unique way of controlling light is with a Fresnel lens. This is an inexpensive plastic lens that is placed in front of a strong point source of light like a flash to narrow the light beam. Instead of the normal dispersion of light as it emanates from the flash, the Fresnel lens focuses it to illuminate a smaller area. This intensifies the light, and it has the effect of: allowing you to use a smaller lens aperture and/or, allowing you to expose correctly for a subject at a greater distance away and/or, allowing you to use a lower ISO.
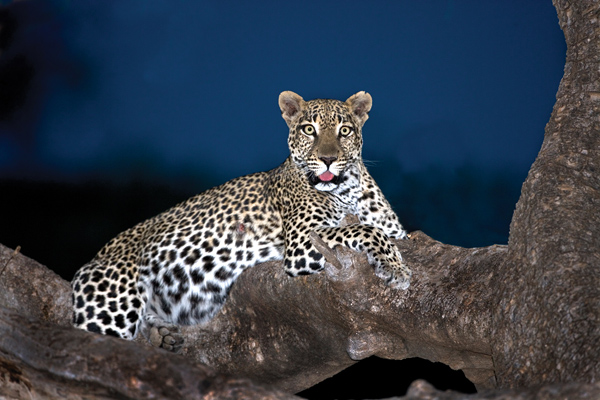
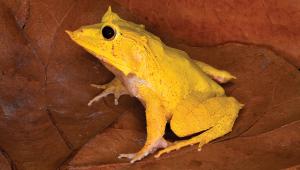
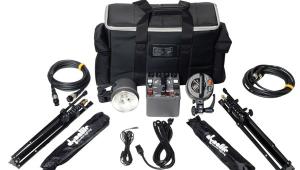
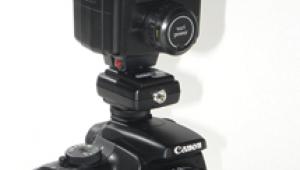
The Better Beamer (#12) is a lightweight, inexpensive device that supports a Fresnel lens in front of a flash, and Velcro (www.velcro.com) holds the sides of it together. It adds no discernible weight to your system, and the Better Beamer comes apart easily and you can carry it flat. For subjects like nocturnal animals, indoor sport events or sports at night on a large field, it is a great way to take pictures that are exposed well and with a reasonably low ISO and where the subject is at a great distance from the camera and flash. The downy great horned owls in a nest (#13) and a leopard in tree in Kenya (#14) are examples where I’ve used the Better Beamer.


Tone Curve Compensation
Controlling contrast is really controlling the light. By manipulating how light the highlights are and how dark the shadows become, you significantly impact the artistry of the image.
Some cameras consistently produce dark pictures as well as images low in contrast. This happens in my own camera, so I did a test. I took a photograph of an evenly lit wall, and assuming that camera meters are designed to make whatever they see medium gray, I would have expected the camera to set an exposure that would render the wall with a distribution over the center of the histogram. Instead, the peaks of the histograms I observed were to the left of center. To get the peaks of the resulting histograms in the center, I had to add between +0.33 EV to +0.5 EV to the exposures. Apparently, camera manufacturers don’t always properly calibrate the built-in meters to make whatever they see medium gray. Instead, they are sometimes calibrated, according to ANSI (American National Standards Institute) standards, to make whatever they see slightly darker than medium gray by about half a stop.
Some cameras have options that allow you to control the “tone curve”, or the contrast, in the camera. When you set this, all of your images will be affected and it saves you from doing all the work in post-processing later. If you see that your photos are consistently underexposed and low in contrast, you can use this feature to make the correction.
Alternatively, you can manipulate the tone curve in Photoshop, Elements or Lightroom. In Photoshop, you have tremendous control in the Curves dialog box to tweak the tone curve to the nth degree, so let’s look at what this can do for your images.
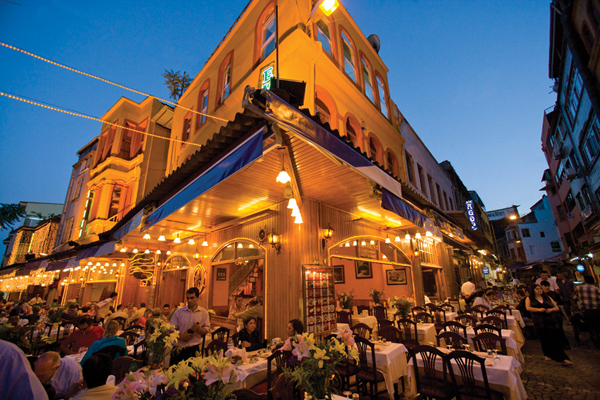
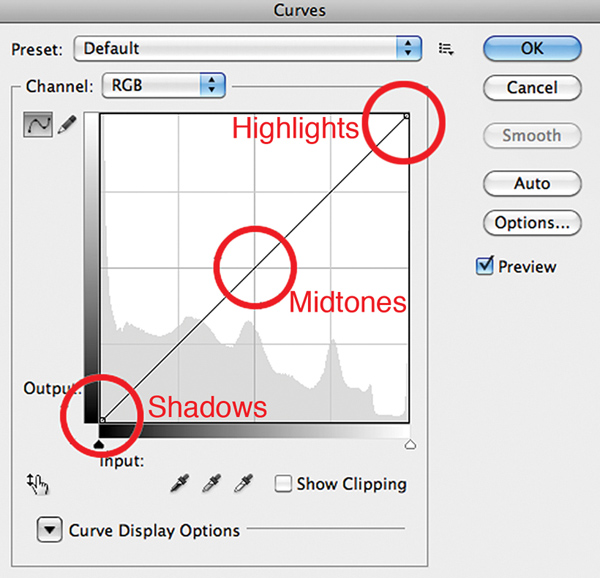
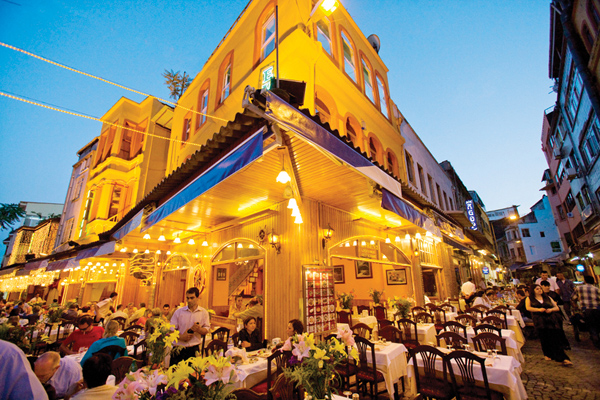
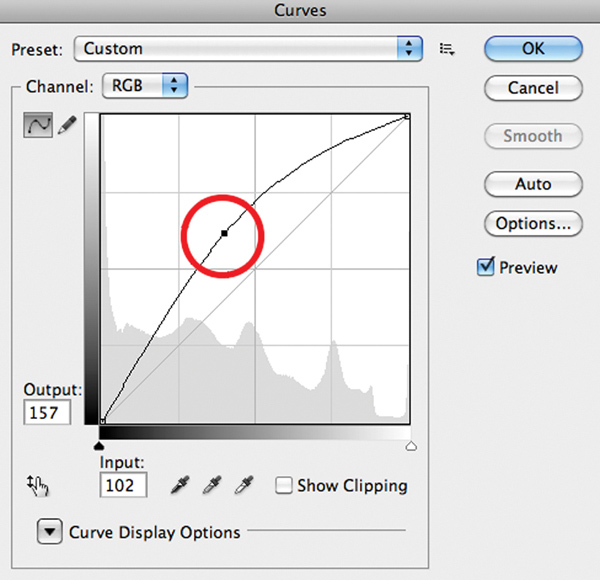
I photographed an outdoor dining scene in Istanbul, Turkey at twilight (#15). If you open the Curves dialog box with Image>Adjustments>Curves or use the keyboard shortcut Command/Ctrl M, you’ll see figure A. I’ve added the red circles to indicate the handles for the highlights, the shadows and the midtones of your image. By pulling these in various directions, you can alter the tonal values in the photograph.
In figure B, you can see that I moved the midtone handle diagonally upward, and the result is (#16). This action lightened the entire image. Conversely, in figure C, I pulled the midtone handle diagonally downward, and the photo was darkened quite a bit (#17).


These adjustments affected the exposure. To change the contrast, see figure D. I grabbed the tone curve line near the top of the graph and pulled diagonally upward and then I did the opposite at the bottom of the line. This increased the contrast, and you can see in (#18) that the highlights are lighter and the shadows are darker, and this is the definition of higher contrast.
In figure E, I pulled the tone curve line in the opposite direction and instead of gaining contrast, the photo became unattractively low in contrast as you can see in (#19).


In this way, you can manipulate contrast and exposure and change the look of your images. Keep in mind that some cameras allow you to make these adjustments as you shoot using D-Lighting (Nikon branding) or similar controls, and even the adjust contrast when you dive deep into the image parameter settings.
Color Filtration
I used glass filters and colored gels all the time when I shot film, but now because of Photoshop’s remarkable ability to alter color in post-processing, as well as all of the plug-ins available from companies like Nik Software (www.niksoftware.com), Topaz Labs (www.topazlabs.com) and Alien Skin Software (www.alienskin.com), I don’t use them anymore. However, you may still enjoy the process of using color filters so I thought I’d show some examples of how I changed the color of light when I was still doing this photographically as opposed to digitally.
My favorite special effect technique in the 70’s was using color infrared film. Unfortunately, there is no translation of this technique in the digital realm, and I say “unfortunately” because the color combinations that could be generated with this film—Kodak Ektachrome Infra-red—were remarkable. For example, the outrageous orange tree against the blue-green sky (#20) was taken with an orange filter. Orange filtration turned all vegetation orange—but with neon intensity—and the sky always turned out to be a saturated mint green. Image (#21) is an in-camera double exposure of a candle flame in which one picture was taken with no filter (the yellow flame) and to generate the magenta flame I used a yellow filter.


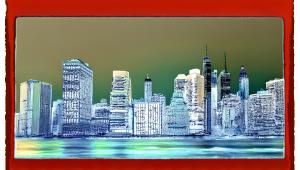
With normal color film as well as digital images, graduated filters still have their place. They are used to darken the sky so there isn’t such a large difference in exposure between the top and bottom of the picture, and when you expose correctly for the landscape or cityscape, the sky will retain detail instead of being rendered too light or even blown out. When I shot the center of Tallinn, Estonia (#22) the graduated filter toned the sky down so it appeared richer and more saturated. Graduated neutral density filters are often used where the darkened half of the filter is gray because this doesn’t affect the color of the sky, only the density.

However, color grad filters also have their place in affecting the color of light. I used a Cokin graduated sunset (www.omegabrandess.com) to shoot a sunrise in Wurzburg, Germany (#23). Notice the detail in the clouds. By exposing for the foreground, which was the correct thing to do in this situation because that is essentially the subject, the sky would have been completely overexposed without any definition in it at all. Using the filter prevented that. Had I shot this scene moments after the sun appeared above the horizon, the contrast would have been low enough to shoot this without a filter. At this time of the morning—about 30 minutes after sunrise—the exposure discrepancy between the sky and the architecture was significant enough that a digital sensor couldn’t handle the dynamic range of the shot. Only a graduated neutral density filter or HDR would produce this kind of exposure.

Similarly, I shot a roller coaster in San Diego (#24) with a sunset neutral grad. You can slide the plastic filter up and down to reveal more of the image without filtration or, in the case of the Wurzburg sunrise, I changed the color of the light throughout the image.

I photographed a sunset on the Northern California coast (#25) with a warming filter to enhance and saturate the colors. This was before digital technology, and now of course we can do this so easily in post-processing using a variety of programs. Similarly, I made a portrait of my sister, Jill, in 1970 when she was 15 years old. I used a 25A red glass filter (#26). When you shoot through a saturated red filter, either glass or plastic, contrast is always lowered and often the red channel loses detail and texture as if the highlights were blown. When we shot film, there was no remedy for this. Now we can use the recovery slider in Adobe Camera Raw or Lightroom to bring back some of the lost density in the red channel.


In addition to glass filters that screw onto the front of your lens (by matching the filter size such as 67mm or 72mm) and the Cokin-type filters that are optically superior squares of plastic that are held in front of the lens by a filter holder, you can also use colored gels. These are held in place by your hand or by tape, and they are used in front of the camera lens or the flash. The Honl Photo filters (www.honlphoto.com) are an example of a line of uniquely colored gels that change the color of light for various artistic effects. The hauntingly beautiful tree I found on the Amalfi Coast of Italy (#27) was taken with their purple gel. Notice how I partially hid the sun behind a branch. This reduced the sun in size, and point sources of light turn into stars when a small lens aperture is used.

- Log in or register to post comments


![]()
Get the Latest Photo Tips, News & Reviews from Shutterbug!
| Camera Reviews Other Reviews | Mobile Reviews Photography Reviews Columns | News | Features | How-To | Resources |
 © 2025 Shutterbug
AVTech Media Americas Inc., USA
All rights reserved