- REVIEWS
Camera Reviews 
More Reviews Mobile Reviews Photography Reviews - GALLERIES
- VIDEOS
- BUYER'S GUIDES
How to Use High Speed Sync (HSS) Flash on Location to Capture Striking Portraits

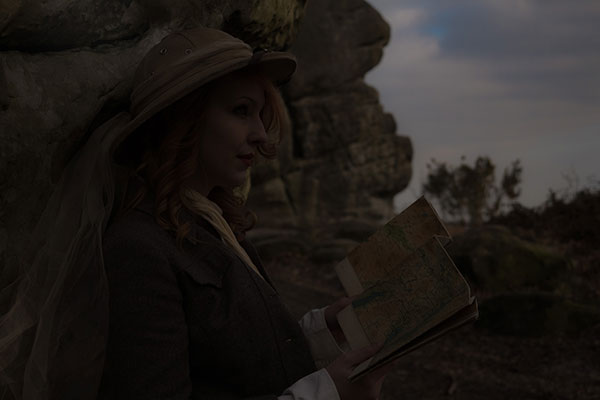
Shooting portraits on location with a wide aperture can result in some great images, but if, like me, you want to underexpose the ambient light for a more dramatic effect, you’ll quickly realize there’s a problem with shutter speed and off camera flash.
Most cameras have a maximum flash sync speed of less than 1/250th of a second and even with a low ISO I often find I need to shoot at f/11 or smaller to get the exposure I want and detail in the sky.
HSS to the rescue
Over the past few years the battery powered flashes I use have grown in size from small speedlights into larger and much more powerful full-sized flash heads. Along the way advanced flash modes such as High Speed Sync flash (or simply HSS for short) have come along too.


HSS is surprisingly easy to use. If you have the right trigger and flash combo (in my case, I used the Flashpoint XPLOR600 and an R2 transmitter), switching on HSS mode is as simple as pressing a button. The moment I do, I can magically pass the flash sync shutter speed limit and shoot at any shutter speed up to 1/8000th second.

A faster shutter speed means I can open up the aperture to control the amount ambient light that’s recorded getting me that shallow depth of field that I want.
The Downside
If you’re thinking “It can’t be that easy, there has to be some downsides,” you’re right. The most obvious is loss of power when shooting HSS over standard flash, which in my experience is around one to two stops of light. The other downside is my trusty old flash meter can’t see HSS, so it’s back to trial and error exposure guessing or a sizable investment in something like a Sekonic L858D.

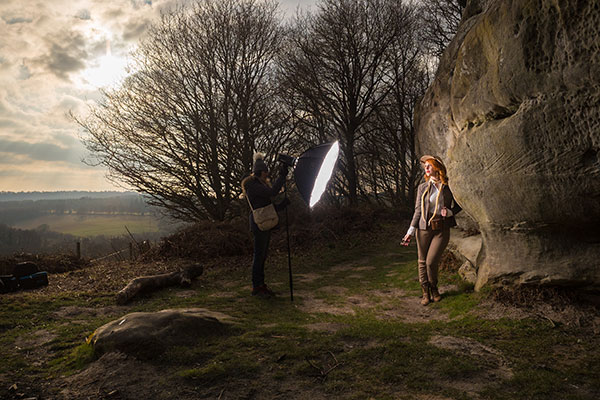
How I Shoot HSS on Location
My first step is to set the camera and the flash to manual mode. Next, I’ll dial in the aperture I want to shoot at and a low ISO. With the flash transmitter turned off, I’ll adjust my shutter speed to get the exposure I want for the background.
The upshot of exposing for the background is normally a very underexposed model, which is where the flash comes in. With the flash transmitter set to HSS, I’ll start with the flash at around 1/4th of its full power and take a test shot.

Reviewing the results, I’ll adjust the flash to give correct exposure on the model while keeping the background exposure unchanged. Usually I can nail the exposure after a couple of test shots.
It took me a few goes to really get my head round it, but once high speed sync flash is in your tool bag of tricks, you’ll want to use it more and more.

Want more tips from Gavin Hoey? Don’t miss your chance to take a hands-on workshop with Gavin at Adorama INSPIRE. Learn more about his Portrait Kit that Won’t Quit workshop on June 27th in New York City and sign up for free today. Bonus: check out the Hoey vs. Wallace Pointless Photo Challenge, where Gavin will take on Mark Wallace in a hilarious and impromptu photoshoot-off.


![]()
Get the Latest Photo Tips, News & Reviews from Shutterbug!
| Camera Reviews Other Reviews | Mobile Reviews Photography Reviews Columns | News | Features | How-To | Resources |
 © 2025 Shutterbug
AVTech Media Americas Inc., USA
All rights reserved