- REVIEWS
Camera Reviews 
More Reviews Mobile Reviews Photography Reviews - GALLERIES
- VIDEOS
- BUYER'S GUIDES
Exposure Matters: Some Notes On Aperture, Shutter Speed, ISO, Metering And Bracketing
All Photos © Sean Arbabi
There’s no question that good exposures add detail to your image file, giving you more information to work with should you process the image later. But exposure also includes focusing techniques, as the aperture settings you use to control light through the lens also affect the depth of field in the scene. As we’ll see, proper exposure has just as much to do with picking the right focus (aperture) settings as it does with metering correctly.
Aperture Settings: Exposure And Focus Too
The aperture is an adjustable iris inside a lens and the diameter at which it is set is referred to as the f/stop. It controls 2 aspects, one for focus (depth-of-field), and the other for exposure (the amount of light entering the camera). Depth-of-field (DOF) is the range of distance that appears sharp in the frame, although what might appear sharp on your LCD may not be when you enlarge the photo, so the size of the photo and the distance from which you view it all come into play.
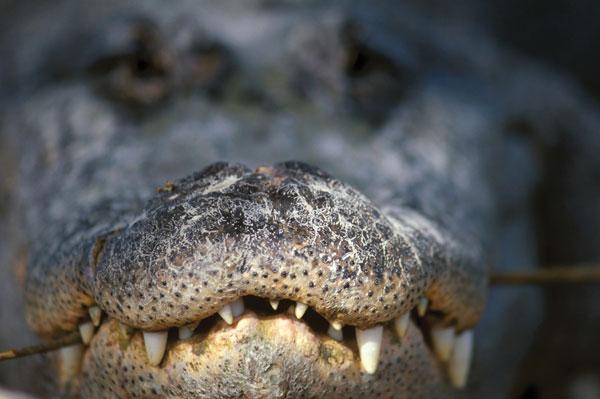
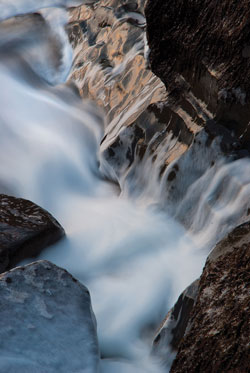
Choosing the right aperture setting can provide depth and dimension, sharp focus throughout a landscape, offer a certain feel or mood, creatively edit elements in your composition or draw a viewer’s eye to a specific area. By manipulating the aperture settings—the distance from the camera to the subject and by using different focal length settings—DOF can be measured in inches, as it was in image (#2), feet or miles. In the photo of the gator I choose a large aperture to selectively focus on its jaws. This use of “minimal depth of field” can soften backgrounds or foregrounds and really pinpoint the viewer’s eye on the subject. In this photo of a flowing stream through a valley (#3) I utilized “maximum depth of field”; working with a wide angle lens and a very narrow aperture, which ensured that I captured focus from the nearest plants to clouds in the sky.


Shutter Speed Effects
Shutter speed is the amount of time light is allowed through the lens to make an exposure. Measured in seconds (a very long time in photography) or fractions of seconds, it controls 2 aspects of image making—the amount of light entering the camera and lens, and the way motion is depicted in the scene.
Today, many cameras offer speeds from a blazing 1/8000 of a second to a slow time exposure of 30 seconds. With the goal of freezing a bird in mid-flight, I used a fast speed of 1/1600 to capture the seagull (#4). For a completely different effect I set my shutter speed to 1 second for this photo of the rush of the surf (#5).

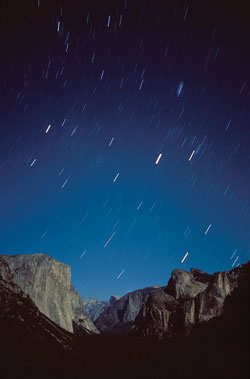
Expose over 30 seconds and often the next speed is “B”, for “Bulb”, allowing you to lock the shutter open as long as you wish. Bulb or long time exposure is great for recording night scenes. I used a cable release to lock my 5-minute exposure of moonlight on Yosemite Falls (#6), then with a 4-hour exposure to record the rotation of the stars above the Sierra Nevada (#7).

In addition to its effect on exposure, shutter speed changes the way movement appears in the picture. Stopping something in motion is always relative to the speed of your subject, the direction it is going (side to side, moving away or toward you), the distance from you, as well as the lens chosen. Very short, fast shutter speeds are used to freeze fast-moving subjects such as animals, birds or water. Their effects, when used in appropriate ways, illustrate power, speed, strength and expressive moments, as it does in this rushing water image (#8). The feel of the Nevada Falls thundering over a granite cliff is strong due to the stop action nature of the fast shutter speed.

Image Stabilization Lenses
In general, a rough guide for getting steady shots is to use the focal length of the lens as the shutter speed; make it the denominator of the fraction—for example, getting a steady shot with a 200mm lens requires a shutter speed of about 1/250 sec. That, of course, is not always possible and that’s when the stability of a tripod can increase options in the field. In situations where you cannot use your tripod, such as when I was photographing these Brown Boobies off the island of St. John (#9) using the 1/focal length rule got me a steady shot.

A relatively new type of stabilization system—in-camera or in the lens—makes low light work and steady pictures much easier for photographers. Known as “Image Stabilization” (IS), “Vibration Reduction” (VR) or other terms these cameras and lenses can “buy you” more shooting freedom and help you gain a few more stops of light to keep things steady in your work.
Choosing The Best ISO
ISO determines the sensitivity of your image sensor to light. The higher the number, the more sensitive with each doubling of the ISO resulting in a gain of 1 more stop of light, which can buy you an extra aperture settings or step-up in shutter speed. While always working with a high ISO might make sense, as the camera becomes very light sensitive, there are trade-offs. The “faster” or higher number you choose the higher the likelihood of digital noise, color shifts and too-high contrast.
While new cameras and processors do a much better job of ridding these side effects than in the past, I still choose the lowest ISO I can when the scene and light allows. Even while shooting a kayaker heading over a falls in early morning light (#10), I was able to set my ISO to 100 and still maintain a fast enough shutter speed to catch him and the water as he headed over the falls.

That’s not to say that higher ISO settings don’t come in handy, regardless of some loss of image quality. I was on a recent shoot in a slough (#11), photographing an egret from a boat as sunset approached. As the light diminished I could not steady my camera while I floated on the water, so I had no choice but to bump up to a higher ISO to compensate for the movement, avoiding camera shake caused by a slow shutter speeds. In this case sharpness took precedence over noise.

Dynamic Range
While today’s cameras can record amazing detail and a wide range of color and light, there are some limitations to how broad a range of light (from deep shadow to bright white) they can record in a single shot. Known as “Dynamic Range” it is the latitude of exposure from highlight to shadow, measured in stops of light that a sensor can record. Once you know the limits you can try to stay within them, or use the restriction to your advantage, as I did in Kings Canyon (#12), exposing for the sky and letting the trees turn to silhouettes. That’s when going beyond the range gets you a very graphic image.

Metering
Camera meters today are very complex and sophisticated but they still have similar attributes, and some of the disadvantages, of those in past. In general, every metering system will give you a good exposure if a scene is not too high in contrast, like the challenging shot of the bare trees in Kings Canyon. If the subject is tonally consistent, without large areas of bright or dark, then use any mode (P, TV, S and even M, for Manual) and you’ll get a good exposure, such as this photo in Nevada’s Red Rocks (#13). Of course, not everything we shoot is as easy on the exposure system as this shot.

One of the faults in metering systems that often bedevils nature photographers is the exposure of bright white, especially snow, and how to work it in the scene. If your system exposes only for the bright snow the rest of the color and tones will become quite dark (that’s because exposure works in lock step, with one decision influencing all the tones and colors equally). The way around this is to use a feature known as “Exposure Compensation.” The trick is to meter from the bright white and add exposure to the meter’s calculation. I used this as I photographed Condors flying over the snow-covered Andes (#14). Without the knowledge of how to overexpose the snow from my meter’s suggested exposure, I could not have tracked the bird past the dark rock outcroppings and bright white snow without it resulting in a set of poor exposures. Exposure compensation shows up as a +/- symbol on your camera. Press it and then move the command or control dial to shift exposure to the plus side.

The toughest metering pattern to master is Spot metering (in some brands known as “Partial”), yet it’s my favorite. Spot reads light from a small section (usually between 1-5 percent), allowing you to meter a small part of the scene and judge a tone without the influence of any other area. For example, having experience capturing many sunsets helped me choose the right exposure to maintain the golden light on Cathedral Peak (#15). I simply “placed” the Spot metering area over the sunlit area and locked the exposure to get just the light I saw and wanted to capture.

The default metering pattern for many photographers is “Multi-Pattern”, known as Evaluative (for Canon users), Matrix (for Nikon users) and by other trade names depending on the brand. This pattern reads the light intensity in several points around the frame and then sends the information to an on-board computer, which then comes back with an exposure “solution” for that light and color pattern—quite impressive, and in many cases quite good. I used Multi-Pattern for this photo of bighorn sheep on a trail (#16). They moved by quickly and if I took the time to Spot meter I might have missed the shot.

Exposure Bracketing
While making a number of different exposures of the same scene, some lighter or darker than the meter suggests, using bracketing helps ensure capturing a higher percentage of images with the exposure you desire. I don’t recommend making it a general practice, as it is a bit lazy and also takes up more time, processing and card space, but it can really come in handy when scenes have extreme contrast, such as this photo of sunrise along the Baja peninsula (#17). The very high contrast made it difficult to determine the best exposure at the time and bracketing came in handy, allowing me to pick the very best of the lot. As a bonus, bracketing can also assist in learning about exposure and metering and show you how your camera reacts to colors, tones, over- and underexposure. You see what happens when an image is too dark, too bright or when nuance changes the mood. And that’s what metering in nature is often about.


![]()
Get the Latest Photo Tips, News & Reviews from Shutterbug!
| Camera Reviews Other Reviews | Mobile Reviews Photography Reviews Columns | News | Features | How-To | Resources |
 © 2025 Shutterbug
AVTech Media Americas Inc., USA
All rights reserved