Do-It-Yourself
Build A Redeye Reduction Light

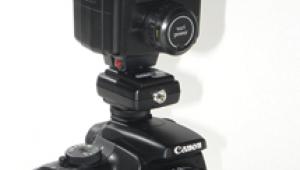
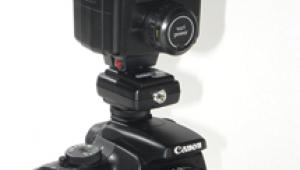
Make sure the push button is placed on the housing where it can be easily reached while holding the camera normally. A 1/4x20 nylon screw, easily cut to exact length with a hobby saw, runs through the case and into the tripod socket, and is fastened at the bottom with a wing nut or threaded knob. A strip of cloth tape applied to the top of the case keeps it from twisting on the body.
Photos © 1999, Tom Fuller, All Rights Reserved

While on-camera flash is certainly convenient, and sometimes the only way to capture candid people shots, its downside is the effect known as redeye. This demonic glow in the subject's eyes is the result of nearly point source and on-axis light entering the pupils, already dilated by the low ambient light under which flash pictures are usually taken, and reflecting off the retinas. The lens of the eye then magnifies the many blood vessels to record an image that, while great for ophthalmic study, is hardly suitable for wedding and party photography.

An increasing number of new cameras have built-in redeye reduction features, with one approach sending out a series of closely spaced, low-power "pre-flashes" that stimulate constriction of the pupils in anticipation of the main flash burst. Another, upon which this month's project is based, rapidly flickers a tiny, high-intensity tungsten lamp just before the shutter opens, again shrinking the pupils and greatly minimizing the chance of redeye when the flash goes off. Despite its low-tech approach, our inexpensive Redeye Reduction Light is quite effective and can be easily built by anyone with basic workshop skills and simple hand tools.

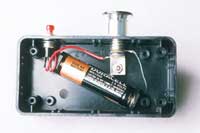
The project is basically a camera-mounted penlight with a spring-loaded electrical switch that allows the photographer to quickly flick the lamp on and off several times with a fingertip before pressing the shutter release. Parts cannibalized from a pocket flashlight are enclosed in a plastic housing to facilitate tripod socket mounting and to provide flat surfaces upon which to place the push button. This version uses a flashlight taking one AA battery, but the same design works with those requiring two AA or AAA batteries. The flashlight must be bright, easy to take apart, and equipped with a screw-base (not bayonet) bulb.

Disassemble the flashlight and save the reflector and lamp. Bore a hole large enough for the lamp holder in the edge of the project case and, as shown in the accompanying illustrations, cement or epoxy the reflector over it. Mount the holder to the inside bottom of the case with a No. 4-40 machine screw and nut (Radio Shack 64-3011 and 64-3018) or similar small fastener; adjust it so that the lamp is positioned within the reflector exactly as it was in the original flashlight; and tighten the screw firmly. Fasten the battery holder with double-sided foam tape.

The placement of the push button switch is critical and should be decided upon carefully before drilling its mounting hole. The location of the shutter release on the camera, the shape and mass of the body, your personal gripping style, right or left-hand preference, etc., must all be considered so that you can effortlessly "tickle" the button immediately before taking the picture. I suggest finishing the Redeye Reduction Light except for the switch, attaching it to the camera and empirically determining the natural fall of your fingers in normal use. Once confident of this position, which may well be different from that shown here, mount the switch and wire the components together.

It takes a little practice to become adept at effectively "blinking" the light before releasing the shutter. Too many may cause the subject to be recorded with his or her eyes closed, whereas too few may not constrict the pupils enough to minimize redeye. I have found that four, each about 1/8 sec long and spanning no more than 1 sec, is a good starting point. By holding the button down, the light doubles as a focus assist for manual focus cameras, letting you get sharp images in those reception halls where there is barely enough light to safely walk among the tables. Remember not to block the small reflector with your fingers.

Carry spare alkaline AA or AAA batteries, especially if you use the unit as a focus assist light, as the lamp must be as bright as possible for effective redeye reduction. Although rechargeable Nickel Cadmium (NiCd) batteries are more economical, their lower voltage (1.2 to 1.25v) may decrease light output beyond an acceptable level. Frequent users may want to use a larger case and power the light with C-size or even D-size alkaline batteries, or rig a way to run it from the flash power pack. A wide range of lamps is available with E-5 or E-10 bases for the creative do-it-yourselfer.

I designed this project for use with manual focus cameras and non-TTL automatic flash, and assumed the light will be off at the moment of exposure. As the illumination may skew distance and/or exposure when used with newer AF systems, many of which use infrared and other advanced detection systems prior to the actual exposure, be sure to run a test roll before putting the unit to work. And, while the Redeye Reduction Light helps, nothing is 100 percent effective, so take a tip from the pros and cover yourself by taking lots of flash pictures. Happy shooting

Parts List

Radio Shack numbers are listed, but equivalent parts from other manufacturers may be used.
· One AA or AAA powered pocket flashlight
· One single or double AA or AAA battery holder (depending upon flashlight design); 270-401, 270-408, or 270-398
· One E-5 or E-10 threaded-base lamp holder (depending upon flashlight bulb); 272-358 or 272-360
· One plastic project case; 270-1802, 270-1803, or similar
· One miniature SPST momentary push button switch, normally open; 275-1547
· One nylon 1/4x20 screw, 3" long, with wing nut
· Small nut and bolt, double-sided foam tape, plastic model cement, or epoxy

X