After The Shoot
Editing Is A Mist For Digital Photography

The final fanciful version is cute, but only for fun. For serious work I like to try and recreate a natural look wherever possible.
Photos © 1999, Jay Abend, All Rights Reserved

Even if you have vowed to never get involved in the digital imaging revolution, you've got to admit that you probably are amazed at some of the seamless things that can be done with photo editing programs like Adobe Photoshop.

I'm a fully digital kind of guy these days. My studio houses four different high-resolution digital cameras, a Leafscan 45 film scanner, and a Umax PowerLook III flat-bed. I've got a bunch of Epson ink jet printers, Tektronix color lasers and dye sub printers, and any number of fancy software packages. It's been a very expensive trip, but in my line of work that level of investment is necessary. At home I have a simpler setup--an inexpensive Pentium PC, a used Epson Photo printer, and a $49 scanner I bought at a wholesale club. Believe it or not, I get pretty good results from this little setup.

This proves that in many cases a skilled operator can get great results from modest equipment. If your friends have ever marveled at the quality of your still photography, then you probably have the kind of visual sense required to do really fine work on the computer. While there are any number of editing programs, plug-ins and packages designed to automatically enhance your pictures, a few simple techniques will ensure great digital pictures with consistency. We'll start with the most basic and obvious things and work our way up.

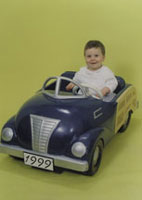
Here's the raw image as scanned by my Umax PowerLook III--flat, lifeless, and way too yellow (no fault of the scanner, that's what the original looked like). Unfortunately, the expression on little Jordan Andrew Cagan is priceless, so Mom and Dad looked to me to save it.

Choose Your Weapon. Which image-editing program to purchase? If you ever wanted to get into the graphic arts business for real, then you're pretty much chained to the industry stalwart, Adobe Photoshop. It's the biggest, most expensive, and the most pervasive in the graphic arts industry.

If you're just looking to do professional quality work at home, you can do very nicely with any number of other image-editing packages. I also own Jasc Photo Paint 5.0 and Corel PHOTO-PAINT 9. Both are full-featured complete packages available at a bargain price. Corel's PHOTO-PAINT in particular is a robust package that can do everything Photoshop can and then some, but migrating your skills from one program to another can be difficult.

On less powerful systems I've done really good work on modest packages like Adobe's PhotoDeluxe and Ulead's PhotoImpact. While they don't support the high-end features of programs like Photoshop, for images intended for ink jet printer output or for personal web usage, they're perfect.

You'll need a handful of plug-ins or enhancement programs to do any serious work. While Photoshop 5.5 has added excellent masking tools, I still like Extensis' Mask Pro 2.0. A favorite of many production oriented pros. Many image-editing programs support the Photoshop plug-in system, so you'll be able to use those plug-ins even if you don't pop for Photoshop.

Choose Your Medium. There are any number of ways to present your digital images, from the web to Powerpoint presentations to high-resolution photo prints. While color management software like Apple's Color-sync help you get repeatable color results, you've also got to know some of the rules of the road when it comes to reproduction. First of all, there is no color management software that can exactly portray on the monitor what your image will look like on paper.

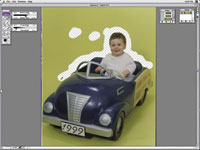
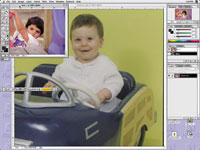
I still like Extensis Mask Pro 2.0 even though Photoshop has added masking tools in Version 5.5. Here I've used the magic brush tool to remove the sickly yellow background behind the boy. Once he is separated to his own layer, I'll use levels, Curves and Color Balance to give him a normal flesh tone to match my reference image.

Do you remember the exact day when you could actually "see" the final image in your head before you even brought the camera up to your eye? Well, you've got to develop that same sense of visualization with the digital medium. I've found that small images intended for web usage can be almost absurdly high contrast, since the dynamic range of a computer monitor is far less than that of a photo print or magazine page. Once you've run enough color prints through your printer you'll begin to understand the tendencies of your printer and alter both your shooting and editing style. Since all point-and-shoot digital cameras do substantial enhancing in the camera, you've got to try and always capture as much raw information as possible. Once you've achieved a pure white or a pure black in the digital world, there is no more information, so it's super important to keep your exposure in the safety zone. I use a point-and-shoot camera that has a very neutral color balance and doesn't do a lot of in camera processing. While some have complained about the lack of "punch" in the images, I like the ability to fix it myself later, without the camera introducing extra noise or maybe even clipping the black or white points without my knowledge. Once you know how your camera and final output device responds, you can make those decisions during the shoot.

Getting In Balance.
Probably the toughest thing to do in the subjective world of photography is establish an objective Caucasian flesh tone. Certainly we've all had the color prints from the commercial lab that exhibit green, pink, or blue flesh tones. If you're a color darkroom buff then you've learned this lesson the hard way--flesh tones that look OK in your darkroom may not look so "right" in the living room. Whether your original is a digital file or a piece of film ready for your scanner, getting the colors right is really the most important thing.

I like to keep a reference portrait on my hard drive, and keep it open while editing. Since I know that this image prints well on my Epson printer, I can use it as a reference with confidence.

Luckily for digital imagers, you can establish a pretty foolproof "standard' right in your computer. I keep a handful of very small files saved in the "Stan-dards" folder on my Macintosh. I keep a bright sunny outdoors scene, a handful of headshots in different light sources, and a couple of product shots. I have found that even with all of my experience my eye can get fooled by the monitor, room lighting, subject matter, etc. I'm almost embarrassed to admit how many times I've delivered beautifully packaged CDs of images to clients who then had to increase the contrast in order to bring up the black or whatever. It's a subjective world we live in, so I like to establish standards. Here's how: take the photos that have pleased you the most when output, you know, the shots of your kids that printed up beautifully, the still life shots that looked great, you choose. Then shrink them down so that they only take up a few inches of screen real estate. On a 1280x960 monitor that's about 320x240 pixels. I save them as JPEG images and name them "Portrait 1," "High Key Product 2," etc. When I'm editing an image, I pull up the sample and let it sit next to my image while I'm working. I match the flesh tones and overall gamma of the scene, so I know that I'm working in a color environment that has proven to work in the past.

Output Is Everything. The bottom line is simply that the proof is in the print. If you can't get your perfect images to print perfectly then your efforts are all for naught. I use Epson Photo printers for most of my personal work. Lately I've switched everything over to my Epson 1200 printer. I've had to revamp my color management profiles to get predictable output, but now I feel comfortable with it. While the printer is producing what I'm looking for as far as sharpness, color saturation, and photo quality, I've learned that when it comes to photo output, "it's the paper." Photo quality papers are most definitely not all the same.

I've had incredibly good luck with Epson's proprietary papers as well as papers intended for the dye-based Canon bubble jet printers. I also use Konica Photo IJ paper.

Don't Get Fancy. Have you ever noticed how some music from the 1950s, '60s, and '70s still sounds good today, while other music sounds awfully dated? The secret is that artists whose work endures tend to do things very simply, eschewing popular studio effects and lyrical trends of the era. If you would like your digital photography to have the staying power of the Beatles music rather than the Strawberry Alarm Clock, strip everything down to the bare bones.

It's pretty tough to lay off of some of this eye candy. (In fact it's hard for me to lay off of Eye Candy 3.0, a popular special effects package.) There are pages in Photography sourcebook filled with seamless photo-manipulations of pigs with wings, flying executives, and women with three eyeballs. Not my cup of tea. While I'm not opposed to a little trickery, like my fanciful reworking of the little boy in the car, I've found that smooth and natural photo editing produces the best results.

Every digital photo buff has to have a few wild packages, like Xenofex or Kai's Power Tools, but using their powerful effects sparingly will usually produce images that still look OK in a year or two or even 10. Of course a little fanciful fun won't kill you, as evidenced by my surreal rework of the boy in the car photo, but too much digital trickery will usually degrade the impact of a photo.

It doesn't matter if you use a megabucks megapixel digital camera or a $49 wholesale club flat-bed scanner, if you can develop a set of digital editing skills that parallel your film photography skills, you'll consistently produce excellent quality work. For my personal work I shoot a combination of film and digital with a variety of cameras. In general I've found that images with correct color balance, snappy contrast, and just reasonable sharpness can look every bit as good as photos from professional color labs. Even the pros know that photographs are highly subjective, and what looks good to me may not look good to you. Since we are so accustomed to the high level of photographic quality provided by modem films and inexpensive minilabs, even high-end digital equipment has a high standard to live up to.

X