- REVIEWS
Camera Reviews 
More Reviews Mobile Reviews Photography Reviews - GALLERIES
- VIDEOS
- BUYER'S GUIDES
What Is a Polarizer and Why Is It Important to Photography?
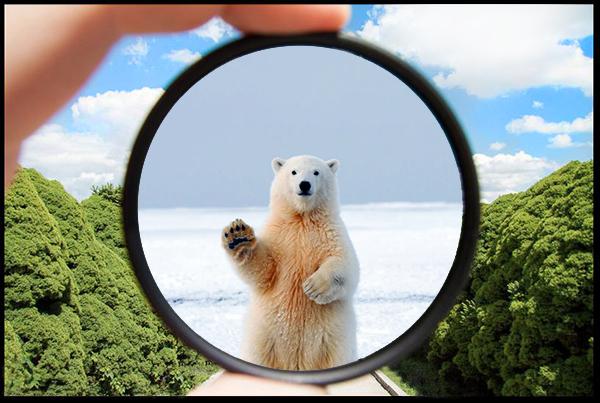
Polarizing filters make pictures look like they were taken at either the North Pole or the South Pole. Rotating the Polarizing filter shifts the appearance from North Pole to South Pole and back again. They are not always used to photograph Polar Bears; it’s easy to understand the confusion, but there are no Polar Bears at the South Pole. Polarizers are important because our ice masses are disappearing, melting away and raising the sea level around Miami. When the ice caps are gone, the only way we’ll have to recreate them—or Miami, for that matter—is with Photoshop. (Polar bear in the composited image above by Hans-Jurgen Mager/unsplash.com. ©Hans-Jurgen Mager.)
Okay, I made some of this up. But I do know how Polarizers work and why you should use one. Please read on…
Unlike some photo tools, it’s important to know the mechanics of how Polarizers work if we’re hoping to derive maximum benefit. We explain all that later, at the end, but for now let’s focus on what Polarizers do for us, and why using a Polarizer improves our photographs in many situations.
What Polarizers Do
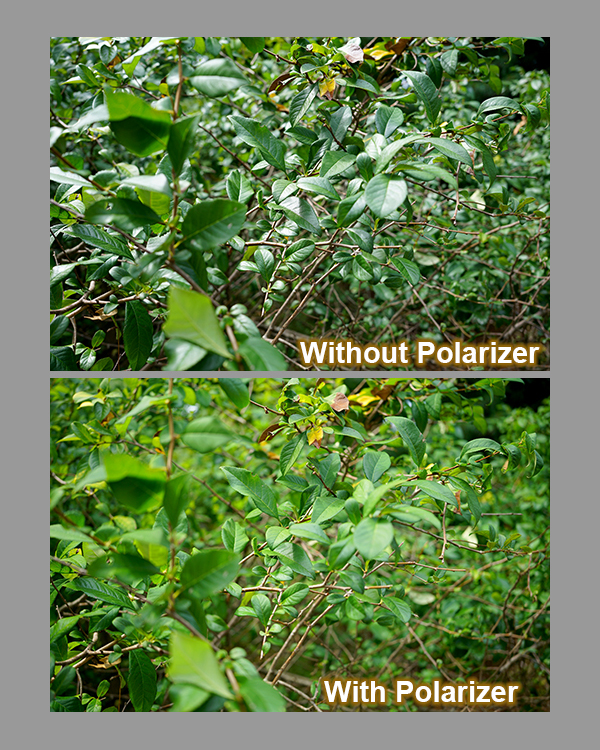
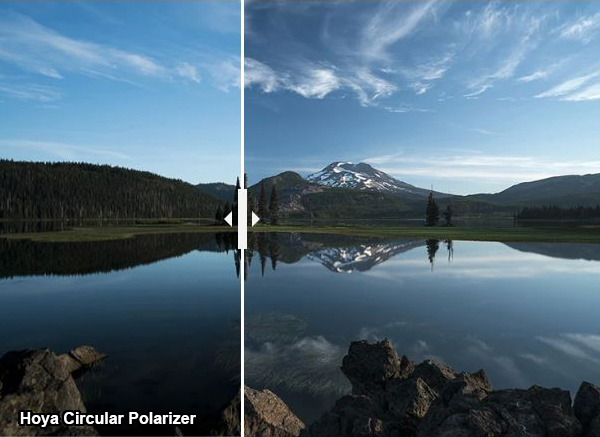
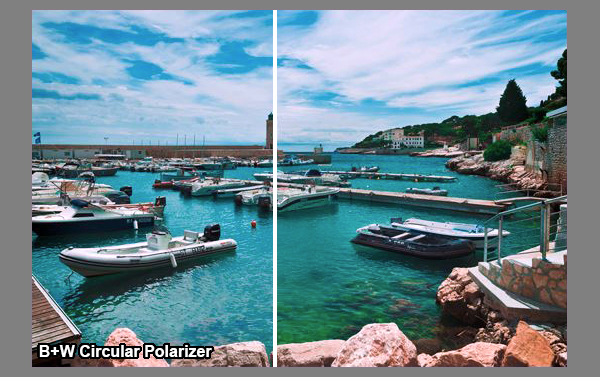
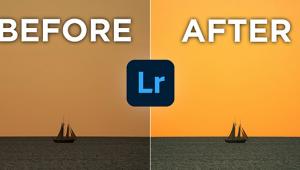
Polarizers reduce glare, enhance colors, let us see under the surface of water and darken blue skies. If we stopped there, that would be enough. With the glare removed, colors are more richly saturated and the annoying shiny spots that appear as blown highlights on flat surfaces are gone.
When light reflects off the surface of an object, it scatters in an infinite number of directions. Most of the time when we look at an object—a tree leaf, the surface of a lake or an automobile—we see color and a significant amount of glare. Glare is so common that our brain’s firmware tends to ignore it most of the time. Sadly, the photos we take capture all the glare in all its glory.
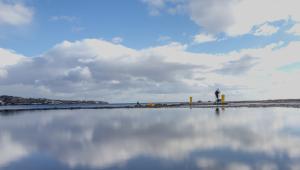
Enter the Polarizer. What a polarizing filter does is really rather simple: it blocks nonparallel lightwaves and allows us to see the objects without the disruptive glare. In the case of water, we can peek through the glare on the top layer and actually see beneath the surface, depending on water clarity.
Polarizers can also be used as an emergency Neutral Density filter. Because they block, absorb and reflect some of the light, images shot with a Polarizer require additional exposure, usually one or two f/stops. Consequently you can use a Pol to reduce available light without changing the color balance in the image.
How Polarizers Improve Our Pictures
Besides merely eliminating reflections from water and glass windows, polarizing filters suppress light that would otherwise be scattered from other flat surfaces—like car fenders and glossy painted walls—and thereby enhance the true colors of objects. The main benefit is an apparent increase in color saturation without change in color balance.
We’ve all seen “blown highlights,” those bright/white spots on color images caused by excessive glare or overexposure. The important thing to keep in mind is that in reality there was image data in those areas that could have been recorded to become part of the image, but the intense glare obliterated that data. It cannot be restored in post-processing because it wasn’t recorded in the first place. Polarizers suppress the glare and tamp down the clipped highlights thereby allowing you to record image data that you’d miss otherwise.

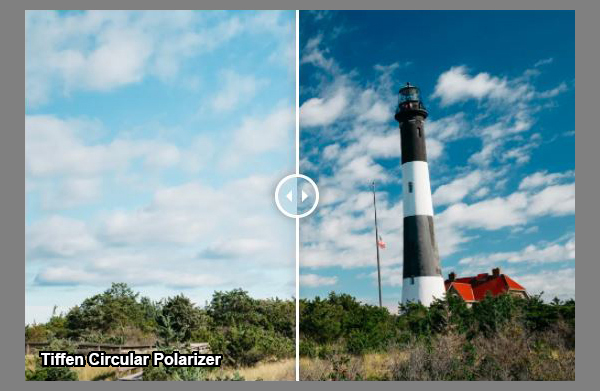
Polarizers, used properly, darken blue skies and make white clouds pop. Used incorrectly, they can make any sky look crappy and thin. The good news is you can see the impact of the filter right in the viewfinder or on your camera’s LCD, so it’s not too difficult to get the results you want.

Types of Polarizers
The great majority of polarizers in use today are Circular, not Linear like their older cousins. Most autofocus SLR cameras and cameras that use a beam-splitter or semi-silvered mirror require a Circular polarizer. Older manual-focus cameras can sometimes use a less expensive Linear polarizer. While they are not interchangeable, both do the same thing, and both are available in plastic and glass versions.
As optical materials go, plastic has a bad connotation, but it does offer lighter weight, and that can be a plus. Glass is generally regarded superior, not only because of intrinsic properties, but because sheets of glass can more readily be made planoparallel. That means that the top and bottom surfaces are exactly the same distance apart (i.e., parallel) no matter where they’re measured. In other words, planoparallel filters are perfectly flat on both sides, and the two surfaces are parallel at all points. Perfectly planoparallel filters do not introduce additional aberrations or distortions to the image the way wedge-shaped filters can.
Not as popular as they once were, some Polarizers are labeled Bi-Color Filters. Because of a property called birefringence it’s possible to change the color cast produced by certain specially-made polarizers during rotation. These usually offer a range of hues between two complementary colors, for example blue/yellow or red/green.
How to Use a Polarizer
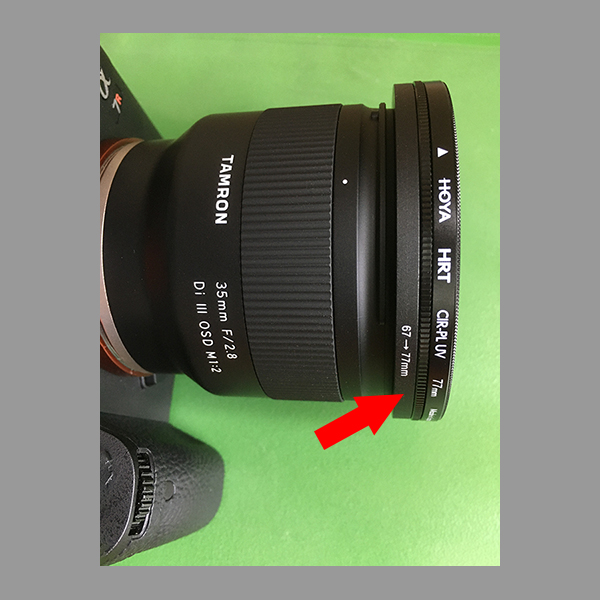
You must be able to monitor the effect of a Polarizer while you rotate it. For this reason it’s generally easier to use a DSLR or interchangeable lens mirrorless camera. In any case, the Polarizer is screwed into the filter threads on the end of the lens. Be careful to not overtighten. Because the filter is rotated during use, there is always a slight danger of inadvertently unscrewing or—conversely— tightening too much.
Use your Pol outside on a sunny day. Polarizers don’t do anything on heavily overcast days or in the dark because the malefactors they’re designed to restrain are not present.
Polarizers—and the mounts they are in—are thicker than most filters, and this can cause them to vignette (darken corners) on certain lenses, particularly extreme wideangles. No way around this except to fix in post, but sometimes shooting at a large aperture minimizes the shading. Some Pols are thin, although thin ones tend to cost a bit more.
The rest is natural. Look through the viewfinder or on the back monitor and rotate the filter until you see the results you want. Tip for purists: if you don’t shoot Raw files, set White Balance manually before attaching the filter. Yeah, it’s an extra step, but so is putting the cap back on the toothpaste. It’s possible for the effect of the Pol to influence the Auto WB algorithms in some instances.

Point for Maximum Impact
To find the area of the sky most strongly affected by a polarizer, make an L-shape from your index finger and thumb and point it at the sun as though you were shooting a rubber band into space. Your thumb does not have to be perpendicular to the ground. Slowly rotate your wrist while keeping your finger pointed at the sun. Do not look at the sun. With your index finger aimed at the sun, your moving thumb will point toward the portions of the sky where a polarizing filter delivers maximum results.
How Much Do Polarizers Cost?
If you caught our article about the $8 Polarizer we bought from Amazon, you know that CPL filters come in all sorts of sizes and costs. As with almost everything related to photography, you get what you pay for. Buy a cheap one if you plan to use it just once in a while. Otherwise, step up to a higher quality.
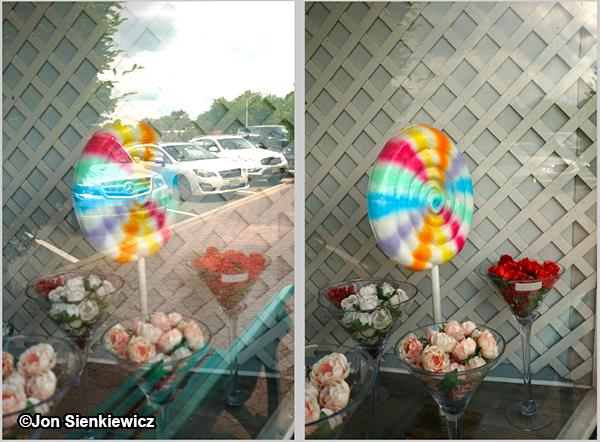
In this article there are Before/After examples representing several premium brands: B+W, Cokin, Hoya, Tiffen and my Amazon Basic Polarizer. Prices range from $15 to $100 for most common sizes. Other brands to consider are Heliopan, Lee, Schneider, Singh-Ray, Sirui, Zeiss and Pgytech (filters for drones only). Camera manufacturers like Canon, Fujifilm, Nikon and Sony also sell high quality polarizing filters.
For me, I use a Hoya HD3 Circular HRT Polarizer. I am a big fan of Hoya glass (which is used extensively throughout the camera industry for lenses and filters) and Hoya quality. The HD3 is treated with 16 layers of nano-thickness multicoating, including a coating layer that provides scratch and smudge resistance. The Hoya HD3 is very thin and is covered by a 5-year limited warranty. But most important of all, whereas most CPL filters eat up between 1.5 and 2.5 stops of light, the Hoya HD3 requires only a 1-stop increase.
The Hoya HD3 Circular HRT Polarizer in 72mm diameter is $175 from Amazon. The 52mm and 55mm sizes run right around $100. Not cheap but again, we get what we pay for.
The Darkside of Polarizers
Proving once again that nullum gratutium prandium (there’s no free lunch), there are a couple negative aspects to using a Polarizer. This explains why everyone doesn’t use one all the time.
Polarizers require an increase in exposure as explained above. This exposure increase is commonly called the filter factor and is generally around 4X (2 f/stops) depending on filter brand and working conditions. Your DSLR will still set the correct exposure automatically. In some cases, that extra exposure requirement is a dealbreaker. But these days more and more cameras perform exceptionally well at higher ISO settings, so it’s becoming easier to use a Polarizer without significant penalty simply by cranking up the ISO.
The other reason why it’s not advisable to use a PL filter all the time: it must be properly aligned (rotated into alignment) before each shot. Having it in the wrong position can intensify glare and strengthen reflections. It’s not a complicated procedure, but it could slow you down.
How Polarizers Work
Lightwaves vibrate in an infinite number of directions when reflected from any surface. Waves that vibrate in more than one direction are classified as non-polarized. Lightwaves vibrating in the same direction comprise polarized light. Polarizing filters allow polarized light to pass through but block, absorb or reflect a substantial portion of the non-polarized light.
Polarizing filters are constructed using two stacked rings. One ring is threaded and attaches to the camera lens; the other ring is free to rotate and holds a thin sheet of glass that contains perfectly aligned microscopic particles that filter the light that passes through. Only polarized lightwaves that are parallel to the filter’s axis are allowed to pass through.
To visualize this, take a look at the drawing below. The aligned particles in the Polarizer are represented by the yellow picket fence. Lightwaves are represented by the squiggly black line which is supposed to be a rope that runs through one open slot in the picket fence.

If we forcefully and erratically whip the rope in random directions, loops and bends will extend in a myriad of directions between our hand and the fence. However, the rope on the far side of the fence can jump up and down in one direction only, because its travel is narrowly restricted by the opening between the fence pickets.
The moving rope is threaded through a picket fence; the motion must conform to the shape defined by the space between the two pickets through which the rope passes.
If the fence pickets are horizontal to the ground instead of vertical, the rope moves from side-to-side rather than up-and-down. Rotating the outer ring of a Polarizer is analogous to turning the picket fence toward its side.
Trivia Question
Why did the market suddenly shift from Linear Polarizers to Circular Polarizers around 1986? We can thank the Minolta Maxxum 7000, the world’s first body-integral AF SLR camera. Linear Polarizers confused the Autofocus mechanism; Circular Pols did not. The Minolta Maxxum 7000 sold in crazy-mad quantities in the late 1980s. Ipso facto, CPL became the norm.

What is Light?
Physicists tell us that light is a form of electromagnetic radiation. Humans can perceive only a very tiny fraction of the total spectrum. The portion we can see is what we know as visible light. Butterflies, it is believed, can perceive a much wider range of wavelengths. If so, that means only butterflies truly know what color flowers are.
We know quite a bit about light, but there is much we don’t fully understand. It’s believed that light has the characteristics of both waves and particles, and that’s important to remember because even though we often talk about wavelength and frequency, we must pay attention to what the particles (called photons) are doing, too.
I’ve often wondered what happens to all of the leftover photons that accumulate in digital cameras after an exposure is made. If you’re worried about it too, send your camera to me and I’ll clean out the expired photons for a small fee (neutrinos slightly extra).
To us photographers, our main concerns are what happens when light reaches a specific medium like air, glass or water. In most of our discussion we’re more interested in how light transmits (goes through), reflects (bounces off), refracts (bends as it passes through), is absorbed (gets gobbled up) and a couple other actions. Note that these properties are very different than the common valuations like Direction, Intensity, Color, Contrast etc.
Some people define photography as “making light stand still for a fraction of a second.” Sounds reasonable to me.
—Jon Sienkiewicz
(As an Amazon Associate, Shutterbug earns from qualifying purchases linked in this story.)
- Log in or register to post comments


![]()
Get the Latest Photo Tips, News & Reviews from Shutterbug!
| Camera Reviews Other Reviews | Mobile Reviews Photography Reviews Columns | News | Features | How-To | Resources |
 © 2025 Shutterbug
AVTech Media Americas Inc., USA
All rights reserved