Portrait Professional 11: The Next Generation
This is the third edition of Portrait Professional I have reviewed (check the archives at www.shutterbug.com for past reviews) so I’ll focus this review on three areas of investigation in Version 11: what can it do, how quickly can it do it, and what’s new. I should note that I am reviewing the Studio 64 version that can handle Raw files and utilize 64-bit versions of Windows 7 or Vista. The Standard version works with JPEG files or 24-bit TIFF files; the Studio version can also work with Raw files but is limited to 48-bit color. The program can be used with Windows XP and up and also Intel Mac OS X 10.5 or later. It acts as both a stand-alone product and as a Photoshop, Photoshop Elements, Lightroom, and Aperture plug-in.

Using it can be as simple or as complicated as you wish. In its very simplest mode, just open the program, select an image, choose male or female, confirm the principal areas of the face (such as the eyes, nose, lips, etc.), hit the space bar, and let Portrait Professional 11 (PP11) work its magic. If you like the result, you’re done. If you don’t, there are many options to tweak the image to your liking. If there are multiple faces, it will select each one and you can go through them one by one without having to “save” them as in previous versions.

All Photos © Steve Bedell
PP11 Defaults
Let’s look at what happens when you leave PP11 in its default settings. Once you press “Next” or the space bar, PP11 goes to work, automatically fixing blemishes, eye lines, stray hairs, and the entire shape of the face. PP11 remains the only auto-retouching software that can actually “enhance” the shape of the face. Anthropics Technology claims to have analyzed thousands of photos of human faces and “trained” the software in human beauty to make everyone look more attractive. You can then adjust individual elements in the Face Sculpt Controls using simple slider controls, should you desire. Of course, if you do not want to change the face shape you have that option as well.
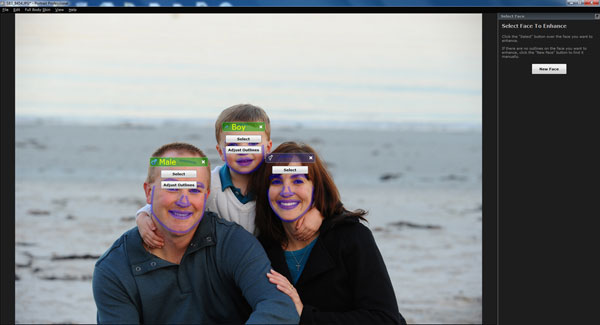
While there are some similar software programs that do not require you to mark up the face to confirm where all the facial features are, PP11 claims to be the most accurate in the industry. I really have no way to objectively confirm that, but I can tell you it appears to be very accurate, at least on individual portraits. Once head sizes get smaller, like in group portraits with many people, the auto detection is much less reliable and sometimes the faces are not recognized at all. In that case you must manually identify them and then choose the mark-up points.

Auto Retouch
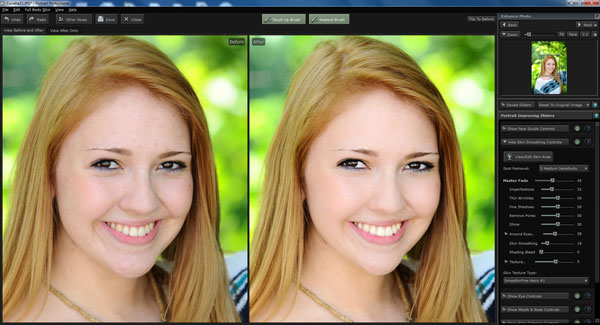
One of the major sticking points of many of the enhancement software programs is that they have a tendency to over-retouch and make the skin look like plastic. Even though PP11 claims that its third-generation skin processor produces a more natural and realistic skin enhancement, my feeling is that if you leave it to its default settings it may be fine for models but it is too heavy for portraits. And PP11 seems to consider freckles as defects, so if you have a subject with heavy freckles you’re going to really have to back off on the sliders to keep them intact. The Clearskin Touch Up Brush, however, which is similar to the Healing Brush in Photoshop, does an excellent job of removing blemishes.
New Features
PP11 has some interesting new features. There are new slider controls for bags under the eyes and crow’s feet that are quite beneficial, as well as controls for lip moistening and cheek enhancement. Moving away from the face, they’ve really expanded what you can do with hair. You’ve previously been able to thicken and smooth hair but now you also have hair color options that range from adding highlights to making significant changes to the hair color. And there are many features “hidden away” in the controls that you might need to quickly and easily correct an image, like the Restore Glasses’ Shape feature in the Face Sculpt Controls.
Each section has a Master Fade control that works in unison with each of the individual controls. For example, the Face Sculpt section has sliders for the face shape, nose, eyes, mouth, lips, and neck as well as sliders to make the eyes wider and add plumpness to the lips (without resorting to Botox). There is a green button for each section that tells you that controls are on; press the green button and all sliders reset to zero. There is also a Help button to the right of each slider so you can click on it and instantly be taken to the correct Help section. Nice!
The Portrait Improving sliders deal with things such as wrinkles, shine, and skin texture. There is even a submenu to select skin texture type. I didn’t see a lot of difference in the choices in the submenu and believe you can get the effect you want easier by just adjusting sliders.


The Eye Controls also add some interesting features unique to this software. In addition to the traditional whiten/brighten controls, there is an Add Reflection feature. No catchlight in the eyes? No problem—add one here. Options include Beach Window, Ring Light, and the rather scary Sunset. Use the Nudge tool to move the reflections in the right place.
The Mouth and Nose Controls are not about shaping features; they are used to control mostly how much color, contrast, and saturation you want in those areas. The Skin Coloring Controls allow you to change the tint of your subject and even give them a tan, should they so desire. I found the Skin Lighting Controls to be more useful than I first imagined. Want to emphasize the cheekbones a bit? Move the slider. Bump up the contrast? Move another slider. The Relight slider won’t change the light from broad to butterfly, but it will emphasize the facial highlights and add a little more zip to a flatly lit image.

As mentioned before, the Hair Controls are more extensive on this version. There is a drop-down menu showing you different hair colors that you can mix in or adjust to taste. In addition to changing someone’s hair color, this could be very helpful if you have someone with dark hair with no light on it. By just mixing in a lighter color and adjusting the amount you can actually lighten the hair without really changing the color. This is a very useful feature.
The last group of sliders is Picture Controls. These are for things like exposure, white balance, and tint. There is also a Tone Curve slider that acts something like Curves in Photoshop but the slider is much more intuitive. I find the Exposure slider to be similar to Levels in Photoshop also.


Evaluation and Recommendations
The value in retouching software such as PP11 is its ability to retouch quickly and give you the result you want without a lot of fiddling around. To this end, PP11 comes with many presets such as Young Man Natural and Woman 50+ Glamorous. It also comes with some useful ones like Reduce Double Chin, Lighten Hair, Sepia, and many others. The best thing about it, of course, is that you can save your own sliders, name them what you will, and recreate the results with one click of the mouse.
PP11 is a very versatile retouching tool for anyone looking to quickly and easily retouch an image to get just the look they want. It has probably the most extensive set of options of any similar product, and just keeps getting better. They have a forum for users and welcome new ideas and suggestions, so check it out and drop them a line!
Pricing
Standard: $39.95
Studio: $59.95
Studio 64: $119.95
Note: A free trial download is available.
For more information, contact Anthropics Technology at www.portraitprofessional.com.
- Log in or register to post comments


