Photo Software Review: onOne Perfect Photo Suite 8's Powerful Tools For Image Enhancement And Correction

Whether you need to add special effects and edges, perfect a portrait, enlarge a small file for a big print, erase an unsightly sign, pump up detail, add lens blur, or simply make basic color and tonal corrections quickly, Perfect Photo Suite 8 (PPS8) from onOne Software has an incredible number of tricks up its sleeve. What’s more, it works as a stand-alone with layers and masks if you seek these more advanced options. With eight modules and hundreds of one-click presets, the tools in PPS8 for automated and manual enhancements help you to correct, stylize, and retouch images in a layered workflow.
PPS8 is available in versions to work with Adobe’s Photoshop, Elements, and Lightroom on both Mac and Windows, as well as Apple’s Aperture, and requires 8GB of RAM. In this overview I’ll highlight the new features added in Version 8, while the sidebar will give you a sampling of everything else PPS8 has to offer.
Browse, Then Edit
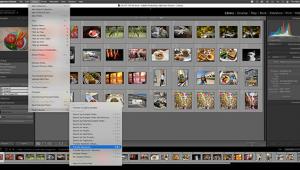
Using Perfect Photo Suite 8 as a stand-alone, or if you simply want the convenience and speed of doing everything within one program, you start with the new Browse module (#1). Use Browse to view and select the images you want to work with, whether they are on your desktop, an external drive, a network, or in the cloud via a service like Dropbox or Google Drive.
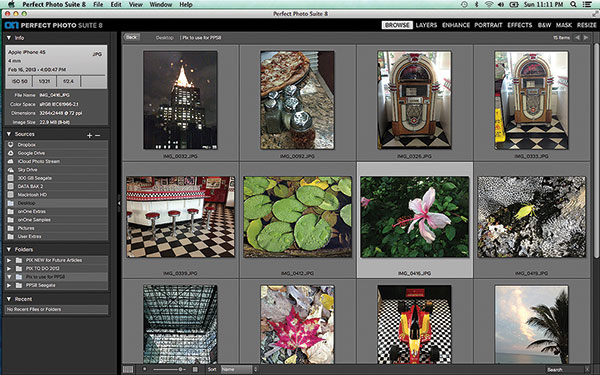
Preview your images side by side in a thumbnail grid or in a large detailed view. Both views display key metadata at the upper left. Below the metadata are Sources and Folders, where you can create favorites to quickly access your current crop of most used images. Further, speedy navigation is available via keyboard shortcuts, and you can create a selection of images here for batch processing.
When you first select an image in Browse, you are asked if you want to edit the original or a copy—I usually choose to work on a copy. PPS8 will also put the image on a layer. Further, your file format options are JPEG or TIFF without layer support, or Photoshop with layers. Finally, you choose the color space, the bit depth, and the resolution.
Perfect Enhance
Next, for basic corrections and enhancements, go to the new Perfect Enhance module (#2) for automatic and manual controls to enhance color and vibrancy, fine-tune brightness and contrast, or correct color balance. There are also tools to remove distracting objects, improve detail, add sharpening, and perform spot healing and redeye removal. You can also add a vignette as a finishing touch, if desired.
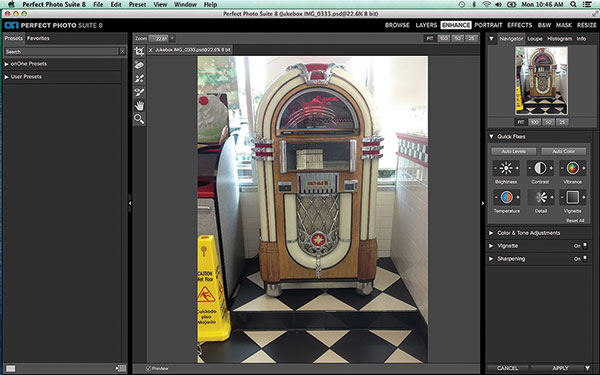
Tools found at the upper left below the Crop tool are the Perfect Eraser to remove medium and large objects, the Perfect Brush to delete small offenders like dust spots and skin blemishes, and the Red-Eye tool. In the right-hand column, under the Quick Fixes bar at the top, are Auto Levels and Auto Color buttons. Below them lie icons for Brightness, Contrast, Vibrance, [color] Temperature, Detail, and Vignette.
The idea is to click on these once for a quick adjustment, but each has plus and minus controls where each click augments the adjustment by 10 units. Finally, at the bottom you’ll see Vignette and Sharpening options. You can undo with Cmd-Z, or use the Layers module to preserve the stages of your workflow. Also, there is a full-screen mode, which hides the panels.
For example, my Rock-Ola jukebox shot was rather dull and lifeless as a result of bland lighting. In Enhance, I first cropped it to remove the clutter at the sides. Next, I used the Quick Fixes (#3), working with Auto Levels to add detail and some color. Next, I clicked on the plus side of the Vibrance icon three times to add further richness (this equals an adjustment of 30 using the Vibrance slider). Two more clicks on the Detail plus icon helped image definition. Below the Quick Fixes, the panel for Color & Tone Adjustments (#4) offers more options with 10 sliders for more precise adjustments, including shadows, which I opened up for the Rock-Ola, highlights, white and black levels, and temperature, tint, and vibrance.


Sharpening is the bottommost panel in the Enhance module (#5). Options here include icons for print or screen viewing, or to fix focus. Advanced options include more choices for type of sharpening, such as for prints on matte or glossy paper, amount, and protect darks, lights, or skin from sharpening.

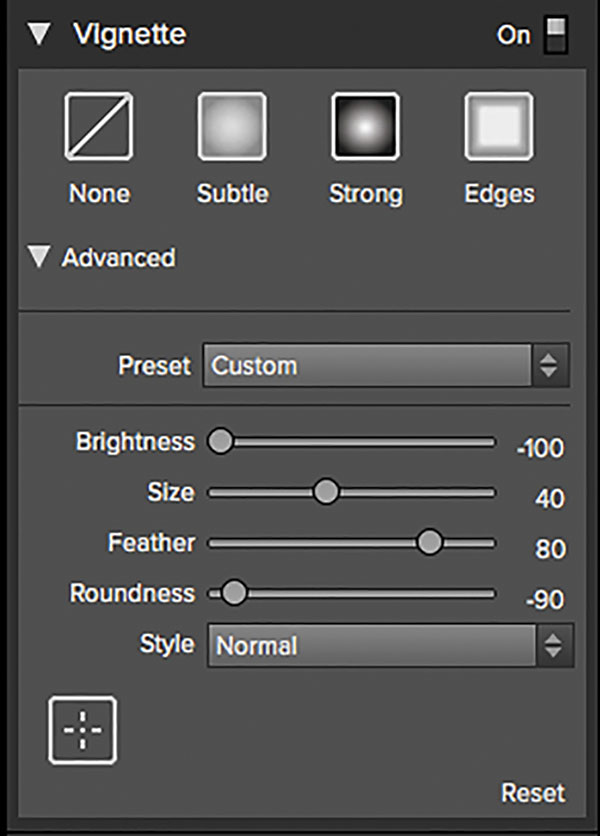
I then used the Vignette panel (#6), selecting the “Strong” icon at the top of the panel, then the preset “Edges to black,” adjusting the sliders for the effect I wanted. At the lower left of the panel you’ll see an icon with crosshairs in a square. Click on this and then click within your photo to set the center of the vignette effect. I had to do this several times to get the right placement to keep the vignette from cutting into the top of the jukebox, since my original composition left very little space at the top of the record machine.
In an earlier step for the jukebox, I removed distracting elements behind the music machine with the Clone Stamp tool in the Layers module. After performing Auto Levels, adding Vibrance, and framing the image with a black vignette, my jukebox has come back to life (#7), all within the Enhance module. You can now hear the music pulsing.

Perfect Eraser
PPS8 has your back—and middle—and foreground. The new Perfect Eraser uses content-aware fill technology to aid you in cleaning up all areas of your image. It’s available in both the Perfect Enhance and Layers modules. Just brush over the unwanted objects such as power lines and trash cans and it erases them, then automatically reconstructs the empty area by filling it with the content that surrounded the erased object.
You activate the Perfect Eraser in the Enhance module (#8) by selecting it from the Tool Well below the Crop tool. Then, paint over the area you wish to remove (#9), making sure you cover the entire zone. A red overlay appears where you paint until you release the mouse button. Then the content-aware fill performs its magic in seconds. Brush size can be adjusted via the Tool Options bar or the bracket keys.


If the first attempt does not give you a perfect result, just paint over it again and the effect should improve with each pass. You can also fine-tune the area by using the Retouch Brush after using the Perfect Brush. After painting over the distracting small flower to the left with the Perfect Eraser, it quickly and seamlessly disappears into the green foliage.
To take this hibiscus image to the next level, in Enhance after using the Perfect Eraser, I clicked on the arrow to the right of the Save & Close button at the lower right to bring up a pop-up menu and chose, “Apply, then edit in Effects.” This took the cleaned up flower to the Perfect Effects module where I chose the Glow category, then “Charge more – normal muted.” The result (#10) looks almost hand-painted with muted colors that make the hibiscus stand out dramatically, but softly.

While we’re on the subject of making things disappear, the Masking Bug has been improved to make it more intuitive. As a result, mask creation in the Effects and Layers modules is now easier and faster.
Power Effects
The flagship of the Perfect Photo Suite is the special effects module, and the new Perfect Effects has twice as many filters as the previous version. Further, Effects has been re-engineered to add adjustable filters that allow you to customize every look. Each of the 23 filters comes with multiple built-in presets—some have more than 20 presets—that you can apply with one click. Then, the Filter Options panel allows you to fine-tune each effect to your personal taste.
If you are unhappy with shots taken on overcast or bad weather days, try the new Sunshine filter to inject some warmth and punch up the colors. Because I shot an overview of Florence, Italy, on an overcast day, it looked rather drab, lacking in color and contrast, especially the background buildings. So I opened it in the Effects module (#11). In the left-hand panel, a list of all the filter categories is displayed, so I chose the Sunshine filter. Clicking the arrow to the left of the filter name opens a column of thumbnail previews of different looks (presets) within Sunshine.
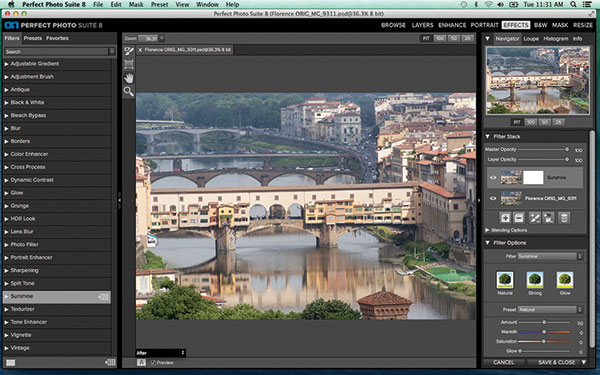
Then, in the panel to the right of the center preview window, I went to the Filter Options to fine-tune the effect (#12). I pushed the Warmth slider up to 49 and the Saturation to 39 to create an even brighter and warmer look throughout. After this adjustment, even the buildings in the background now look as if they are sunlit (#13). Finally, to make the image stand out, I selected the Borders filter and chose Emulsion Transfer 3 in order to add a striking edge treatment that looks a bit like watercolor.


Time Travel
Going back in time, the new Vintage filter lets you choose the look of films and papers from the late 1900s. If you yearn for the look of photographs from even further back in history, the Antique filter adds more aged looks, both monochromatic and handcolored. For my picture of a calla lily, I investigated the options in Vintage (#14). In the left-hand column of the Effects screen, I clicked on the Vintage arrow to show the drop-down menu of presets within Vintage. These scroll down the left column, and you simply click on one to apply it.

An even better way to see all the preset options within any filter is to move the mouse over the filter name in the left column. Just to the right of the filter name, a small grid of white squares with an arrow appears. Click on this grid and a new browsing screen (#15) opens up, displaying all the presets for that filter. You can adjust the size of the previews with a slider at the lower left. Again, just click on the preset you prefer and it will be applied and return you to the main Vintage filter screen.

I chose the Katy preset which added a deep blue/lavender hue. If you prefer another flavor, go to the Filter Options panel at the lower right of the screen. Under Style you can choose from a drop-down menu of nine different colors.
Lastly, I decided to add an edge treatment. In the Filter Stack in the right panel (#16) I clicked on the plus icon at lower left of the panel, below the layers. This adds a new empty layer or layers on which you can add additional effects. Still in Effects, I selected the Vignette filter and chose the option seen in the finished image (#17). The calla lily has been taken back in time with a lavender background, muted petals, and the lighter colored pastel soft-edged vignette.


HDR “Look”
Another new entry in Version 8 is the HDR Look filter, which applies tone-mapped characteristics to a single image with effects ranging from subtle to near surreal. Since my shot of a race car (#18) was taken in dim light, detail and punch were lacking. Taking the speedster into the HDR Look filter, I chose the Glow preset, then used the Filter Options panel (#19) to pump the Detail slider up to 100. Note how in the result (#20) HDR Look has brought out a lot of information previously hidden in the muddy shadows, especially in the sides and rear of the body. The car now glows with detail and color saturation. In trying this filter with several photos, I found that its presets work best to improve detail and tonal range for a great “normal”-looking image rather than creating the over-the-top surreal HDR look.


File Handling Enhancements
Are you a multitasker? Now you can work with multiple files at one time, moving layers between files, editing, and copying. Do you work with Raw files? If so, onOne says that PPS8 opens these files faster now, and with better quality. Further, Raw support for more cameras has been added. Also, the effects in Version 8 are said to be rendered with higher quality because artifacts have been minimized without sacrificing processing speed.
Version 8.1, which we worked with at press time, adds two additional features. You can now reset an adjustment to its default settings with a simple double-click of the slider label. An Extras Manager facilitates the import of user-created backgrounds, textures, borders, and homespun presets.
The new Batch Processing feature lets you automatically repeat your editing actions across multiple images from any one module or string actions together from multiple modules. Get consistent results quickly as you batch process filters for stylization, image resizing, cropping, and even adding your copyright or signature as a visual watermark to your entire group of selected images.
With eight modules and hundreds of one-click presets and filter option controls, PPS8’s powerful tools for automated and manual enhancements help you to correct, stylize, and retouch images in a layered workflow to make your images stand out from the crowd.
And There’s More
Space precludes the illustration of all the great effects and options in this software, but here are some additional ones of note:
Dynamic Contrast offers five presets to modify contrast and make images pop by exaggerating the levels of contrast. onOne asserts that this filter heightens clarity “without sacrificing highlight and shadow detail, creating halos, or affecting saturation.”
If you want a down-and-out look, call on the Grunge filter to add a dirty, gritty urban ambiance.
The Portrait Enhancer in the Effects module offers four presets for faces that just need a quick fix. For in-depth retouching, use the full-fledged and powerful Portrait module, which smooths skin, reduces blemishes and unwanted shine, and adds detail to eyes with effective automation and many sophisticated options.
Two film-era darkroom techniques are emulated with the Bleach Bypass and Cross Process filters. Bleach Bypass reduces saturation and increases contrast, while Cross Process creates unnatural colors and high contrast. In the era of film, these techniques were hip for fashion and portraiture for a time.
For your post-processing enhancements, the Adjustable Gradient speeds the application of effects to only the areas you want changed. With the Adjustment Brush, you can selectively paint in corrections and enhancements to selective parts of your photo: brightness, contrast, detail, vibrancy, and glow.
Lens Blur, which replaces the previous Focal Point filter, simulates bokeh, tilt-shift, and selective focus effects after the shot. It enables you to add selective focus surrounded by blur to areas you select, imitating the look of a wide aperture lens with shallow depth of field, or the use of a tilt-shift lens.
Several of the Perfect Effects presets are composed of multiple effects that are applied on separate stacked layers. In Version 8, you can now adjust or selectively remove these individually, which also allows you to return to previous states of your editing.
Legacy Features
In addition to the new features described, PPS8 has more to offer with elements that are a legacy from the previous version. Perfect B&W, one of my favorite tools, offers controls to convert your photo to black and white with dramatic and elegant enhancements. Add detail, apply selective color, replicate the look of different films and darkroom techniques, contemporary and historical. Optimize your image with tone, contrast, shadow, midtone, and highlight adjustments, dodge and burn, and add selective color.
Perfect Layers extends the editing power of Lightroom and Aperture, and gives you the power of layers in the PPS8 stand-alone version if your editing software doesn’t offer it. Perfect Layers makes it possible to combine the best parts of multiple photos, exchange elements, swap heads for better expressions or lighting, and compose creative composites. Perfect Layers makes it easier to remove unwanted objects and distracting elements with the Retouch Brush, Clone Stamp, and the new content-aware Perfect Eraser.
Legacy filter stylizations from the Effects module include Blur (four types), Borders, Color Enhancer, Glow, Photo Filter (includes warming and cooling, gradients, neutral density, and bicolor), Tone Enhancer, Black and White (offers 24 presets with a variety of subtle tones and effects—in addition to the powerhouse B&W module described earlier), Texturizer, Split-Tone, Sharpening, and Vignette.
When you need to make a really big blowup, or simply enlarge a small file, such as one from a smartphone or other mobile device, or an older digital camera, Perfect Resize will help you do it with the best quality. Based on the pioneering Genuine Fractals technology, Perfect Resize enlists patented, fractal-based interpolation algorithms designed to enlarge your images while maintaining the maximum sharpness and detail.
Prices And Compatibility
The Premium Editon of onOne’s Perfect Photo Suite 8 for Photoshop, Elements, Lightroom, Aperture, and as a stand-alone is $179.95; $129.95 for Lightroom and Aperture. The Standard Edition (stand-alone only with some limitations) is $79.95.
Contact: Get both free trial downloads and free training videos at www.ononesoftware.com.

