Corel’s Painter 11; Pixels To Paint
 For portrait, wedding, landscape, and fine art photographers, Corel’s new Painter 11 excels when you want to emulate traditional art media from your images, including oil paint on canvas, pastels on textured art paper, woodcut, silkscreen, watercolor, and more. You can choose to let the software do much of the work, or, if so inclined, you can manually trace and paint over your original photos with digital natural media, or combine the two approaches.
The latest Version 11 offers more than 40 new features. New pressure-sensitive brushes meld hand pressure and brush flow to fluidly work like traditional media, producing brush strokes with lifelike texture and precision. Enhanced drawing tools and customizable canvas, papers, and other media allow you to create your own distinctive style reflecting your individual vision. In all, you’ll find a combination of more than 940 brushes with 30 different media. You can apply these to a huge library of 600 surfaces of papers, canvas, and other substrates, offering tremendous depth and versatility.
What’s New In Version 11?
The Colors palette has been redesigned to make it easier to choose and adjust colors. By dragging the bottom right corner, the palette is now re-sizable up to 800 pixels to make it easier to see and to select precise shades and hues (#1). You can adjust colors manually with sliders or use the arrow keys to adjust the saturation value to precisely the nuance of color that you need.
In the same spirit, the Mixer palette is now re-sizable up to a whopping 1600 pixel width, providing more space to mix custom colors (#2). Extra mixer swatches appear along the top when you enlarge the palette to put more colors at your disposal and gain a clearer view of your chosen colors. When you’ve finished mixing, you can quickly reduce the palette size to take up less screen real estate.
 |
|
|
Color management has been upgraded, allowing you to save individual color profiles for every Painter document saved in the PSD, TIFF, JPEG, and RIFF (native Painter) formats. These profiles aid in accurate color reproduction whether your work is destined for print, the web, or new media. Similarly, when you import a photo from Photoshop or a scan, Painter 11’s enhanced color recognition preserves the original color profile to maintain color consistency—much better than with past versions in my experience. This should speed up your workflow by requiring fewer color corrections. The redesigned and simplified color management interface makes it easier to control color profiles when creating new files, or when opening Painter and other file types.
 |
|
|
Additionally, Version 11 has boosted Photoshop support, making file transfers between the two programs easier and more complete. Now, any PSD file opened in Painter will retain layer masks, alpha channels, blend modes, and layer groups intact, saving time and trouble. Furthermore, there’s now PNG (Portable Network Graphics) file support. For making selections within Painter, improved tools include a new Polygonal Selection tool to produce straight lines with precision and dexterity. Refinements to the Marquee tool make it more precise, and the Magic Wand more faithfully selects designated areas.
When you need to scale, move, rotate, skew, distort, or enlist perspective distortion, all of the Transform modes have been combined in a centralized Transform tool. Whether you need creative intentional distortion or retouching and correcting of geometric distortion, simply select the mode you want from a button on the property bar. Now you can also choose whether to transform the complete contents of a layer, or selected content, for greater speed, flexibility, and precision.
Bring On The Brushes
Among the enhanced content in Painter 11 are 40 new dry media brushes, including acrylic, charcoal, chalk, colored pencils, conte crayon, erasers, pastels, blenders, pencils, pens, sumi-e (a Japanese technique), watercolor, and new customizable markers—you can control how they dry to make it easier to blend colors.
As far as performance, Corel asserts that brushes perform up to 30 percent faster in Painter 11—depending on system hardware—creating a more true-to-life painting speed. While I found this to be true most of the time, larger brush sizes can still be sluggish. Also, most effects apply significantly faster than previous versions, but it usually took 15 seconds to open a 10MB Photoshop .psd file. While Painter is unparalleled in its scope and depth, like Photoshop, it takes an investment in time to learn.
Version 11 HighlightsFast Forward
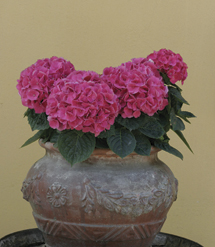
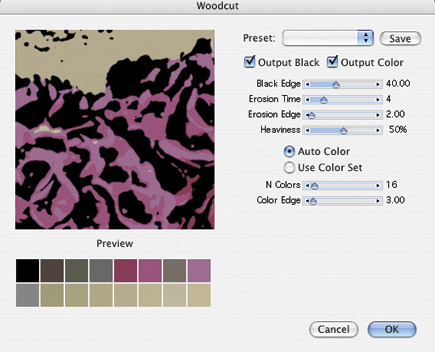
With a few clicks of your mouse button, Painter will transform the photo of your choice into graphic art. I started with a still life of hydrangeas (#3) and decided to give it a woodcut effect. When preparing an image for this effect, I pump up the saturation and contrast, either in my image editor or within Painter via the Underpainting palette. Next, from the menu bar I chose Effects>Surface Control>Woodcut which brought up the dialog box (#4). Note the range of slider controls that allow you to vary the artistic effects, such as the width of the line.
 |
|
|
You can let Painter choose colors for the woodcut based on the original photo, as I did here, by choosing the Auto Color button, or you can select another color scheme by clicking the Use Color Set option. Just under the preview in the dialog, Painter displays the set of colors it will apply to the woodcut. You can vary the number of these with a slider and see them immediately.
 |
|
|
Once you have the result you like in the preview window (slide the view around with the Hand tool to see different areas), click OK. In future versions, I’d like to see a large preview of the entire image at once—that would be a real time saver. For this 5x5”, 300ppi, 6MB file, it took about seven seconds to process the woodcut effect (#5).
 |
|
|
The “Esoterica” Menu
Want a different look? Check out Marbling, Auto Van Gogh, and Pop Art Fill under the Effects>Esoterica menu. Note: In addition to the 5x5”, 94-page printed manual included in the boxed version, you’ll need to go online for instructions—just choose Help>Corel Painter 11 Help from the main menu. That’s where I found the six-step instructions to apply an effect to a portrait my wife took of me among apple blossoms (#6). A few clicks and my image was transformed by Auto Van Gogh (#7), emulating the emphatic brush stroke style of that artist. As a final touch, I pumped up the vibrance in Photoshop CS4 and added some contrast.
 |
 |
||
|
|
The marbling effect is a technique of smearing multiple colors in wave-like patterns that can resemble marble in stone. To apply it to my image of fall leaves (#8) I chose Effects>Esoterica>Apply Marbling. While many options are offered in the dialog box (#9), I found that the defaults worked well. See #10 for the dramatic abstract marbling effect based on the colors in the original photo.
 |
|
|
 |
|
|
 |
|
|
- Log in or register to post comments


