- REVIEWS
Camera Reviews 
More Reviews Mobile Reviews Photography Reviews - GALLERIES
- VIDEOS
- BUYER'S GUIDES
7 Film Shooting Skills That Will Make You a Better Digital Photographer

Here are seven film shooting skills that make you a better digital photographer. And I’ll bet my last roll of Tri-X that they work.
Photographic Anthropologists who look back on the early part of the 21st century will note that between 2000 and 2010, the use of silver-based film faded faster than a polar bear’s suntan. Digital’s advantages ensured film’s inevitable demise, although some savvy photographers pursued silver halide happiness until well past their last roll’s expiration date.
There’s a whole generation of ardent photographers who learned their craft using film cameras but now shoot primarily digital. Maybe two generations. The approach to film-based photography was different—that’s my contention, anyway—and required a discipline and depth of knowledge that transfer positively to the digital photography experience.
The analogy of learning to drive in an automobile equipped with standard transmission comes to mind, although it’s an incomplete comparison. A better example might be the legions of soldiers who learned marksmanship using muzzle loading firearms and later transitioned to repeating rifles loaded with metallic cartridges. No doubt, some still enjoyed playing with their black powder pistols, but not when they were under attack.
With all that as a backdrop, I learned camera stuff by shooting all sorts of film cameras. By virtue of my position at Minolta Corporation, I rode the literal leading edge of digital photography, too. Today I shoot digital like I’m still a film shooter. Below are seven characteristics that I’m glad I retained because I think they improve me as a photographer.
1. Crop Failure
Some of us filed our 35mm negative carriers so that the opening was slightly larger than the negative sandwiched within. I intentionally left the edges rough, chiefly because I was incapable of making them smooth and uniform. The ragged black border that printed around each enlargement was proof positive that the composition had been done in the camera—not later on the enlarging easel.
That was a badge of honor—to compose in the camera, or as we used to say, pretending to hearken back to the view camera era, “compose on the ground glass.” I still practice this today. That’s not to say I never crop, because I certainly do. But I strive to accomplish all composition in the viewfinder, no matter what camera I am using.
Interestingly, many digital image editing programs can optionally apply a border that’s a dead ringer for one created by a whittled-out negative carrier. One of my favorite programs, NIK Color Efex Pro, even provides a slider to adjust the degree of border raggedness.

2. No “Fix it in Photoshop” Attitude
I’m not talking about minor sharpening and color tweaks; when I write “Fix it” I’m referring to removing trees from behind subjects’ heads, straightening horizons and other problems that could have and should have been done in the camera. It’s a conundrum of sorts. On one hand it’s important to be skillful enough to remove unwanted objects and remove color casts, etc., with an image editor. But it should never become a crutch.
The other day I was starting to shoot a row of trees with an infrared-only camera when a jogger suddenly appeared. She kindly volunteered to hang back while I worked, but I told her not to worry, I could fix things in Photoshop. Had I been thinking clearly I would have waited for her to pass instead of preplanning to alter the image later. But I felt lazy, and those were the words that came out of my mouth.
3. Shots Cost Money
Film was expensive—particularly color slide film when you consider the cost of processing. There were many, many times when I simply could not afford to shoot a “safety shot” of a subject. So I learned to make every shot count. Sure, it’s great to be able to bang out fifty digital shots of a single subject and not even think twice about cost. But the discipline of being stingy with film improved my timing, or at least that’s how I rationalized it.
Being frame frugal did lead to one bad habit that I wrote about in a Shutterbug article you can read here titled “7 Photographic Mistakes I Still Make.” In a nutshell, I sometimes take one shot and move on when common sense would direct me to shoot a lot more.

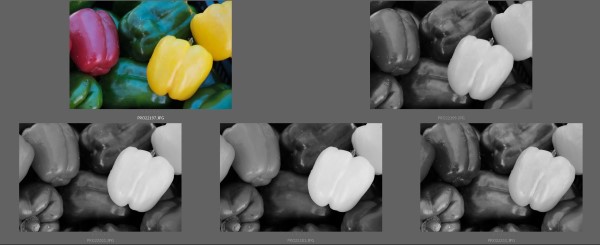
4. Think in Monochrome
I’m not very good at this, but I know people who are. Often I do decide that a scene should be rendered in black and white even before I shoot it, that’s true, but some people have really made a science of it. They tell me they can actually imagine what something looks like without color.
Try it. Maybe you can, too. Tell us about it in the comments.

5. Mind the ISO (née ASA)
Here’s the deal. Increasing the ISO setting on a camera increases sensor sensitivity, digital noise and apparent grain (or dot structure). Noise and grain are bad, but increased sensitivity is sometimes necessary to capture images in low light. Low ISO is good, but if the ISO is set too low it may be necessary to use a slow shutter speed which can contribute to image blur.
The trick is to achieve the best balance of low ISO, minimal grain, zero noise and a shutter speed fast enough to freeze the action and eliminate camera shake.
Film shooters were more-or-less stuck with the ASA (now called ISO) speed of the film they loaded into their camera for 36 pictures unless they wanted to waste part of the roll. (Some cameras did allow mid-roll change, but those were the exception.) So they had to learn to improvise. Yes, it was possible—in fact, it was common—to push the ASA by an f/stop or two and develop the film with a high-energy soup, but doing so made film grain raise its ugly head.
Film shooters learned to cope with having slow film in a dark situation and/or high speed film on a bright day at the beach. One example is shooting a moving subject like a pendulum at the apex of its motion thereby using the laws of physics to make the action appear frozen. The skills developed while handling these circumstances are positively transferrable to digital photography.
6. Filters are Glass, not Software
To film photographers, the word “filter” defined an optical layer, generally made of glass, that altered light before it passed through the camera and onto the film. Today, of course, software filters—typically in the form of Photoshop plug-ins—produce effects similar to their glass counterparts by altering the digital image file after the shot has been captured. There is a huge difference, which should be obvious—changes made by digital filters are a snap to undo. Or preview. Or combine with other filters. But glass filter transformations are difficult or impossible to reverse.
In the film world, using a glass filter properly required some knowledge of color theory and the mechanics of light. Using a green filter with monochrome film, for example, lightens the leaves of an apple tree but darkens the color of the ripe, red fruit. Film photographers had to be able to anticipate these optical phenomena.
7. Save Every Negative, err—Digital Image
Yes, I do know what the delete button is for. But storage media is cheap, and there have been too many times when I’ve been glad that I didn’t delete a “bad shot.” A film shooter would never think of excising a single negative from a roll and destroying it. I apply the same thinking to digital and I am happy that I do.
If you’ve made it this far through the story, thank you. I began writing for Shutterbug magazine in 2004, blogging for them in 2008, and in August of 2014—three years ago this month—I started these weekly columns. I’m proud to say that I haven’t missed a week in three years. That’s more than 150 stories. If you want to read more, hover over the Features tab at the top of our homepage and click on my name.
—Jon Sienkiewicz


![]()
Get the Latest Photo Tips, News & Reviews from Shutterbug!
| Camera Reviews Other Reviews | Mobile Reviews Photography Reviews Columns | News | Features | How-To | Resources |
 © 2025 Shutterbug
AVTech Media Americas Inc., USA
All rights reserved