- REVIEWS
Camera Reviews 
More Reviews Mobile Reviews Photography Reviews - GALLERIES
- VIDEOS
- BUYER'S GUIDES
Water Drops: Catching The “Splish And Splash”
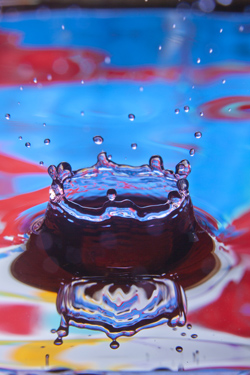
Photography gives us the ability to freeze moments in time that are impossible for the human eye to see. The collision of a drop of water with a pool of water is an event that is intriguing to see, and without the aid of a camera and flash it would be impossible to study, appreciate and admire (#1, #2, #3, and #4).
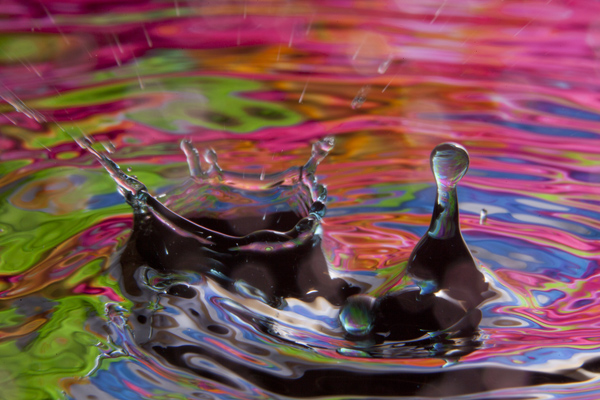
All Photos © Jim Zuckerman


Getting great images of water drops is quite easy. I had been intending to do it for years, and when I finally got around to it I was amazed at how quickly I was able to take some very cool pictures. Be prepared, though, for a lot of bad ones. This is all about hand/eye coordination and practice. You miss a lot of shots—either you hit the shutter button too early or too late—but when you get something good, it’s really exciting. The great thing about digital technology is that we can see immediately what we get, and it doesn’t cost anything to shoot as many frames as it takes to get that one incredible image. The odds are not stacked against you. I took all of the pictures in this article in about 15 minutes. That’s not much of an investment in time, given the rewards.
The Setup
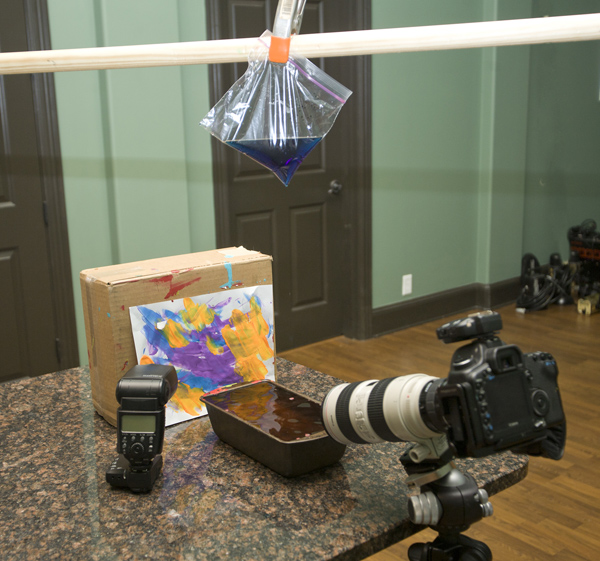
There are five things you need to take the pictures you see in this article. You can see how they are arranged in figure A.
1. A tripod. This is macro photography and focus is critical. The falling drops hit the water in the same place every time (hopefully), and the camera must be focused precisely at the right spot.
2. A flash. While you can do this technique without flash (using a fast shutter speed and high ISO), the results won’t be as good. You can use a portable flash or a studio strobe.
3. A tray of water.
4. A colorful background. You can use a photographic print, fabric, colorful paint on paper or anything else with color.
5. A small plastic bag clamped or tied to a horizontal bar or dowel.
The Procedure
To get the water drops to start falling, take a pin and puncture the plastic bag. If you use a pushpin, the puncture will be too large and the drops will fall too rapidly. Instead, use a safety pin. The drops fall into the tray full of water, and I suggest filling it almost to the rim. You don’t want to see the edge of the tray in the background. Any kind will do, from an old darkroom developing tray to a tray used in the kitchen for baking.
Place the colorful background behind the tray, and position the camera and tripod so you can focus on the spot where the drops are hitting the water. If you don’t want the wild colors that I used, set up a solid blue or white background for a monochromatic look. A 100mm macro lens is perfect for this, or you can use an extension tube on a medium telephoto. A 50mm macro can be used, too, but the working distance will be too close and you will get water drops on the lens.
To focus critically, take a pen, a plastic straw or whatever is handy and let the drops of water fall on it. This is where you focus the lens. It’s obviously impossible to focus on a falling water drop, so this is the technique I use to easily focus on the precise point where the action will be. Forget auto focus. You should take the lens off auto focus and focus manually.
The flash is aimed at the background, not the drops. This is important. Use fresh batteries in your flash because you’ll be taking a lot of pictures, and you want the recycle time to be as fast as possible. If you are using a portable flash, do so on Manual mode and reduce the light output to 1/8th or 1/16th power. The rationale for doing this is to shorten the flash duration. On full power, the length of time the light inside the flash unit is actually illuminated is approximately 1000th of a second. This varies according to the distance of the flash to the subject, but this speed isn’t fast enough to freeze the falling drops of water. By reducing the power output to 1/8th or 1/16th, the flash duration is shortened to about 1/8000th or 16,000th of a second, respectively. This will definitely freeze the movement.
The problem with doing that is the light output is reduced. To compensate for that, place the flash unit very close to the background. I suggest about 10-12” or so.
One of the benefits of reducing the power is that the recycle time becomes very short. On 1/16th power using the Canon 580 EX II, for example, I can shoot about every 1/2 second. Note that you will have to use the flash “off camera”, so you need some kind of triggering device to do so. Most cameras these days allow you to use off-camera flash using a Commander or remote firing setup right from the camera position.
Camera Settings
Use the smallest lens aperture available to you. This should either be f/22 or f/32 on most lenses. You want maximum depth of field on the water drop, but at the same time the background color should be completely abstracted. Therefore, make sure it is at least 12-15” behind the place where the drops hit the water in the pan or tray you are using.
The speed of the shutter can be the normal sync speed. This will not influence the picture at all because the flash duration is the determining factor in freezing the drops.
Variations In Color
Photographing clear water is great, but I encourage you to experiment with adding some color to the mix. Food coloring will produce some very interesting colored drops, and then as the water in the pan takes on color, change the color of the drops. Blue water drops in a red pool of water with the colorful background produces some pretty wild effects.
You can also put colored gels over the flash. This adds another dimension altogether.


![]()
Get the Latest Photo Tips, News & Reviews from Shutterbug!
| Camera Reviews Other Reviews | Mobile Reviews Photography Reviews Columns | News | Features | How-To | Resources |
 © 2025 Shutterbug
AVTech Media Americas Inc., USA
All rights reserved