Q&A For Digital Photography
To aid us in making Digital Help as helpful as possible, please be specific in your query and include components, including software, that you use. David says, “Make me guess the problem and I might guess wrong.”—Editor
Calibrating A Dell Display
Q. You may recall our e-mail exchange and my decision to buy a Dell U2410 and ColorEyes Display Pro software. I bought a Spyder3 (colorimeter) to replace an old Spyder2. Two profiling runs produced similar results, yet the color results were not OK: R = 9.94, G = 3.57, and B = 5.21. I’m willing to troubleshoot on my own if I know what specific steps to take. Can you give me any advice/suggestions on how to proceed?
Ed Osborne
via e-mail
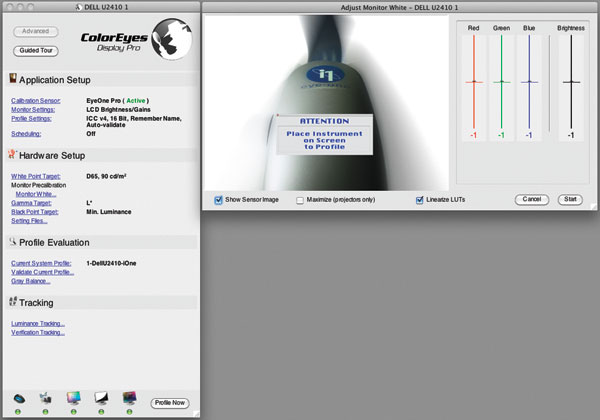
A. OK, so here is the way it should be set up:
1. Set the Dell UltraSharp U2410 OSD manual controls Mode (top button) so the display is in Adobe RGB mode.
2. The ColorEyes Display Pro Monitor Settings should be LCD Brightness/Gains as the U2410 is manual adjustment as it has no DDC support for auto setting the display, even though to set up for the Apple iMac screen you need to set ColorEyes Monitor to Apple Cinema Display, iMac, Laptop.
3. Set the ColorEyes White Point Target to D65 and 90.0 CD/m2.
4. Be sure to run the Monitor White dialog to adjust and set the white luminance of the display. The RGB gains should be low if you are in Adobe RGB mode, so you can ignore them, and they cannot be adjusted with the U2410 in Adobe RGB mode. Once the ColorEyes Display Pro Brightness is as close to zero as you can adjust the display contrast.
5. To get to a 90.0 CD/m2 that works, first set the U2410 Brightness to 50 percent, as this keeps the grayscale lineal. Then lower the U2410 contrast adjustment to between 20 percent and 25 percent, which should be close to 90.0 CD/m2, and move it up or down if the reading is above or below zero.
6. The ColorEyes Gamma Target should be either 2.2 or L*.
7. Setting the Black Point Target at the default Min. Luminance has worked well for me.
8. Then you can run Profile Now.
You should get a good read-out after the profile is named and saved. But I find running the calibration and profiling two or three times usually refines the results with betterDeltaE readings.
On Using The Datacolor Spyder3
Q. Using Windows 7, ATI Radeon HD 5700 Series, and max RAM. I have the Dell U2410 and a Spyder3Elite. I’ve calibrated but my prints still come out of my Canon PIXMA Pro9000 too dark. I’m using Canon paper and still am having these problems. I end up having to lighten the image on the screen—the guessing game—and see what comes out of the printer. This is expensive with paper and ink. Am I missing something in the setup or do I need some other software for calibration in addition to the Spyder? Any advice would be greatly appreciated.
Bob Collins
Ormond Beach, FL
A. Prints come out too dark because the image was edited and adjusted using a display that is too bright. To obtain prints that match what you see on screen, the screen’s brightness has to be the same as paper white. With the Dell U2410 first you have to set the Mode to Adobe RGB using the top button on the right with the on-screen display controls. Then with the Datacolor Spyder3Elite you have to set the software in its Expert Console. When you launch Spyder3Elite you get a Select Workflow window with three choices; choose the one on the bottom, Expert Console.
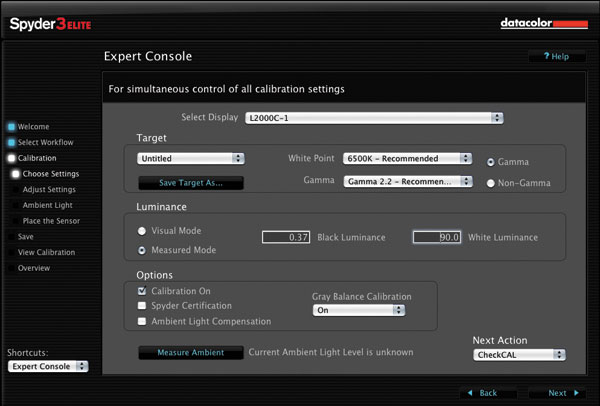
In Expert Console set the Target to a White Point (color temperature) of 6500K, and a Gamma of 2.2. Then set Luminance to Measured Mode and White Luminance to 90.0 CD/m2. In the Dell U2410 display controls (OSD) the Brightness should be set at 50 percent, then to get to a White Luminance of 90.0 CD/m2 the Contrast must be lowered to somewhere probably between 20 percent and 25 percent. Pay no attention to what the Spyder3Elite recommendations are, they are wrong. Just go ahead and use the CheckCAL dialog to adjust the U2410 OSD manual brightness and contrast. Then continue calibration and profiling until you get a 90.0 CD/m2 reading by adjusting the Contrast percentage.
Once the Dell U2410 is adjusted to the Contrast to get as close as you can to 90.0 CD/m2, you are ready to calibrate, profile, and use your image software to adjust the photograph’s brightness to look correct on screen. Then a color-managed print should match both brightness and color with the image on screen.
Are The New SSD Drives Secure?
Q. I continue to appreciate your articles and your latest CD—it is excellent. Sometime ago you offered that gold CDs were the best way to archive digital images. Now that USB flash drives have dropped so much in price, would you consider those a suitable long-term storage medium as an alternative to gold CDs?
Jim Sainsbury
via e-mail
A. It would be nice if a non-mechanical drive would have an archival life quality. But no research to determine how long they will last has been made public, even if it does exist. It may not happen, as how can a research scientist actually compress future time in an experiment? However, flash memory thumb drives have been around for a while and the experts say their life is limited, depending on use and how many times they are rewritten.
So my advice is to not rely on SSD for secure long-term storage, until we get a lot more real, practical experience as to how reliable it is. I will continue to archive my images on gold/gold CD-R discs.
A Computer For Digital Photography
Q. I am buying a new computer and have decided to go high-end on it as well as on a monitor (I have been tortured by a Vista for the last three years). The information you provide is invaluable in making the right choices. What are your thoughts?
Mary Ruppert
via e-mail
A. If you are buying a computer mostly for doing digital photography, you don’t need high-end. Photo imaging is not “computing,” a personal computer’s main processor does little to support graphics processing, and Intel is just beginning to make main processor chips that include graphics support.
But with a display, you need to see as accurately as possible as digital image editing is done by means of personal sight and perceptual judgment—you’re not calculating numbers, which is the primary reason personal computers are designed and made.
I use an inexpensive Apple Mac mini for most of my work, but it has been added to with a very good-quality pro-graphics LCD display. Sure, I also have an expensive Mac Pro, but that is because I do my own publishing work and produce multiple page text and picture files using the Adobe CS4 Creative Suite. The Mac Pro I think is gross overkill for even the most serious digital photographer.
So, to add to your reading list, here’s a recent blog I wrote on the subject of computers for digital photography, see: www.shutterbug.com/content/computer-digital-photography.
D-SLR Raw Image Software
Q. What is a good software program to process Raw images?
Chez
via e-mail
A. The one I recommend because it has a sensible adjustment tool set that is also matched in their scanner software is LaserSoft’s SilverFast: www.silverfast.com/show/silverfast-dcse/en.html.
LaserSoft’s SilverFast DC SE is a modest cost, easy to learn and use image color correction and adjustment application that has the tools to get an image to look right in a preview window, and saved as a conventional image file like .TIF or .JPG. It can be added to with more sophisticated features like print color management with upgrades from the basic SE application, and a really easy and fine color-managed print capability with a preview of how the print will be reproduced called Print Tao.
Drive D?
In the August, 2011, issue of Shutterbug, Ray Welch asked about why a “Removable Disk Drive D” shows up for his Dell U2410 monitor. If it has a card reader, as mentioned, it should be for the card reader. At least on most of my computers that is how card readers show up, as a removable drive for each card slot.
Rick McMillin
Houston, TX
You are probably correct. I missed it because I run Apple Macs and nothing will show up on screen until you insert a card in the display’s card slot, although the drive space will be seen if you open a Finder window. All of the Windows versions I run are with Apple Mac hardware so the drives are not shown the same way as they would be with a PC. Thanks for bringing it to my attention.
Change The Order Of Image Files
I finally found an answer to the question about rearranging photos and having the computer number them automatically in the sequence you desire. You do not have to number each photo individually. Use Google Picasa (free download). Open the desired photos in a folder in Picasa. Rearrange by clicking and dragging. Highlight all with Control A. Go to File, then Rename. Type in a batch “Name” you desire. This will be the new name that each photo will have. Click Rename. Highlight all photos. Go to File, then Export to a Folder. Give the Folder a name. Click on Export. Your batch of photos will now be in a new folder with the name you gave it. The photos will be in the sequence you desired and named with the batch name you gave them designated as “Name-1, Name-2” and so on. They can now be transferred to a flash drive, CD, etc., and shown on any device in the order you placed them.
There are probably similar ways to do this with other software.
via e-mail
I am glad you found a solution. It does not surprise me that Google Picasa provides the technology. I guess it is needed now that people are unlimited by film costs in how many snapshots they can make. I will surely pass your suggestion on in my column.
ANNOUNCEMENT
I am pleased to announce the latest 4.3 Edition to my eBook DIGITAL DARKROOM RESOURCE CD. The CD now contains 33 chapters totaling 399 pages in Adobe Acrobat .PDF format, providing easy-to-read text and large high-quality illustration. The CD is available for $20 plus $5 shipping and handling (US Mail if available). Ordering is as simple as sending a check or money order for $25 made out to me, David B. Brooks, and mailed to PO Box 2830, Lompoc, CA 93438.
- Log in or register to post comments


