- REVIEWS
Camera Reviews 
More Reviews Mobile Reviews Photography Reviews - GALLERIES
- VIDEOS
- BUYER'S GUIDES
Black & White, Film & Digital
This issue is dedicated to digital techniques, but I feel it’s important to have a discussion on the differences and similarities between black and white film and digital photography. I do this for two reasons—the first is that I figure some of you may have made the transition from film to digital and have carried over some assumptions about how things work. The second is that even if you have never shot film you have probably been exposed to information passed on from film photographers about how things work. Either way, there are a number of matters at the heart of black and white photography that have changed, or at least should be looked at in a new light.
First and foremost is shedding any ideas about density. Density on film results from the metallic buildup of silver as a result of exposure and development; the brighter the light (the more energy of exposure), the greater the density on the negative (the darker the area on the film). Density determines tonality and, when compared with other areas on the negative, contrast. When you print a film negative the darker areas print lighter and the “thinner” (lighter) areas print darker. A digital image has no density, obviously, because it is virtual. The light and dark areas are results of codes being translated by the computer onto a monitor. These codes are incredibly malleable and allow for changes unheard of in silver photography that go way beyond what density, which is in essence, after development, is baked into the film, could afford.
All Photos © George Schaub
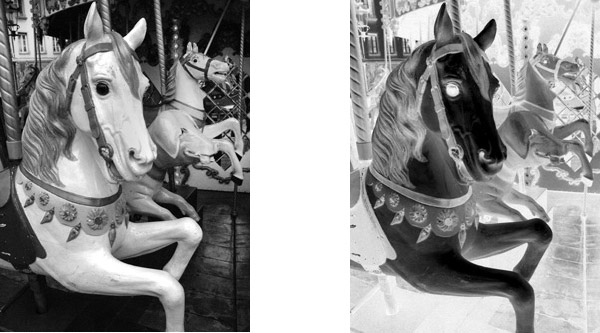
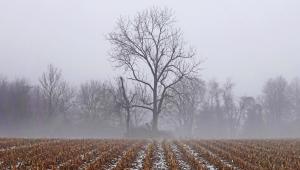
If we were to have a black and white negative of this shot (#1) we might expect it to look like this (#2). The density of the negative would be the opposite of the final positive, with more density in brighter areas and lighter in darker areas. In truth this is a digital file with the “negative” created using an Inverse command. Gross enlargement of a very small portion of the image (#3) reveals what’s really under the hood—millions of pixels all with distinct “addresses” that define the grayscale values.

Larger format film was attractive because it required less magnification to make large prints and, when used with contact printing techniques, yielded incredible detail and tone. Photographing through a large viewfinder or ground glass was a wonderful way to immerse yourself in the image in the field. The “large format” effect today is obtained through larger sensors with high resolution (megapixel count) and relatively larger pixel (photo sites) sizes.
This CMOS sensor (#4) from a “full frame” camera yields image information and images that approach what one might have obtained in the past from a medium format camera using 6x4.5cm film.

There are, as of this writing four general classes of sensors in digital cameras, aside from the smallest found in camera phones and digicams. In overall area size order there’s the so called Four/Thirds, the APS-C (or DX) sensor, the FX (or roughly equivalent to 35mm frame size) sensor and the so-called “large format” sensor, roughly equivalent to a 6x4.5cm or 6x6cm film frame, often found as a back modified to fit onto a 4x5 or medium format camera. Depending on how large you plan to make prints and given all other things are equal (a very rare situation), all four types of sensors are capable of producing image quality equivalent to a well-exposed and processed 35mm black and white film; the FX sensor can yield results equivalent to medium format film; and the “large format” sensors yield results equivalent to large format film.
One thing that has really changed is that there is no more black and white! Every digital image you make in a digital camera is a color—RGB—image. The vast majority of digital cameras have a checkerboard red, green and blue filter between the lens and the sensor, through which light is “sorted” and then reintegrated later in the image processor to create a color image.
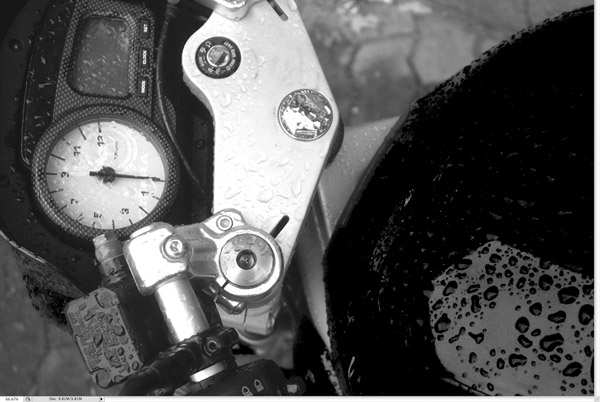
When you dissect an image you find it is composed of three “channels” of color information, R (red), G (green) and B (blue). If you look at the distinct channels you can see how each works as a sandwich which combined creates a full color image (#5), but when isolated and looked at as monochrome channels shows the filtering effects on monochrome “conversion,” or rendition. Note the speedometer and gas tank and how the yellow and red colors change in grayscale when inspected on the blue (#6), green (#7) and red (#8) channels.


Aside from the color to grayscale conversion information the channels reveal, each channel also has characteristics that can be enhanced, exploited or corrected when processing the image. This photo was made at ISO 1600 with no Noise Reduction filtration activated (#9). The blue channel (#10) shows considerably more noise than the red channel (#11).


But taking it one more step—there is no color image; indeed there is no image in the camera memory or the computer drive onto which you download it. The image is merely an assemblage of codes and instructions of what to do with those codes, as well as a record—the EXIF data—of how you set up the camera for the shot, that can only be seen on a monitor when translated through a computer. That’s quite a change from looking at a frame of film on a light box.
Another change is what film photographers might expect to be the “panchromatic response” when photographing in Monochrome mode. Black and white film photographers shoot with red, yellow, orange or green filters over the lens to alter the color contrast—or color to grayscale conversion—of the film so that more or less density would record on the corresponding or complementary color in the scene. These filters make no sense now as that effect can be programmed into the camera at the time of exposure or altered later with software. Now there are “channels” of red, green and blue recorded. To stretch an analogy it is almost as if we are shooting Kodachrome in that each color layer is, or can be processed separately. In digital those different channels have different characteristics that can be exploited and altered in processing.
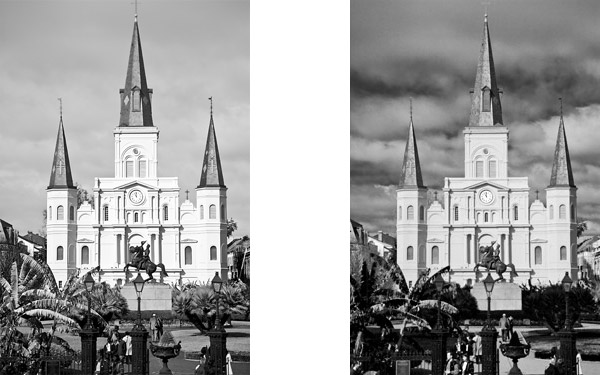
When film photographers wanted to really deepen a blue sky they would place a red filter over the lens. The filter blocked blue (its complement) making for less density of blue on the film record, thus a darker area in the reversed print. This can now be done easily enough through filter “emulation” in the camera or in software. Here’s one image processed to emulate a shot made through a blue filter (#12) and a red filter (#13).
Perhaps the weirdest part of digital for film photographers to accept is that there is no image, just a bunch of numbers that are later reassembled by a computer to look like an image on a monitor, or print. But with that comes an incredible opportunity for many photographers to become engaged in black and white photography like they never could, or imagined they could, before.
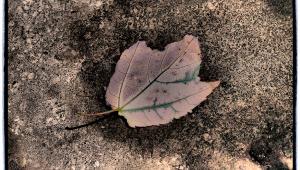
This photo made with a Lensbaby (#14) illustrates the power you have in processing color images using simple conversion tools. When you translate from color to grayscale you can alter the tones of color at will. (More on this in the processing sections to follow.) The color shot, when simply “desaturated”, yields a nice grayscale image (#15). However, it gets expressive when you take matters into your own hands and play with the way the reds, greens and blues translate to grayscale. Here the reds are made much lighter and the shades of green are “dropped out” completely to deep, featureless tone. No other processing steps were used, or required (#16).


- Log in or register to post comments


![]()
Get the Latest Photo Tips, News & Reviews from Shutterbug!
| Camera Reviews Other Reviews | Mobile Reviews Photography Reviews Columns | News | Features | How-To | Resources |
 © 2025 Shutterbug
AVTech Media Americas Inc., USA
All rights reserved