- REVIEWS
Camera Reviews 
More Reviews Mobile Reviews Photography Reviews - GALLERIES
- VIDEOS
- BUYER'S GUIDES
Photoshop Basics: Make Faster & CLEANER Selections with 5 Easy Tips (VIDEO)

Photoshop’s Selection tools offer a variety of ways to improve an image. They enable you to lighten or darken one portion of a scene without affecting the rest of the image, selectively adjust colors, remove distracting elements, or cut out an object from one photo and place it on another.
The challenge is that these tasks can be difficult, even when using Photoshop’s dedicated Selection tools. For example, unless you know a few tricks, you may see traces of the original background around the cutouts you make.
British photographer Glyn Dewis has developed an easy method for achieving faster and cleaner selections, and he demonstrates his approach in the video below. Dewis’ technique doesn’t require any advanced skills, and by following his advice you’ll be able to make precise selections to create photos that look natural and realistic.
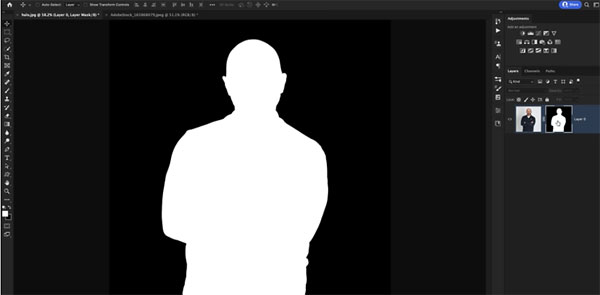
There’s a link in the description beneath the video for downloading a sample image, so you can follow along and make the edits Dewis explains in real time. For the first of his five tips he creates a very simple selection of a self-portrait against a bright background.
The first step is clicking on the Select tab in Photoshop’s navigation bar and choosing Subject from the dropdown menu. From there it’s a simple matter to make the cutout, and Dewis demonstrates how it’s done by adding a second layer and invoking the Minimal command.

Now that you’ve got the hang of it, Dewis moves on to slightly more challenging images, and he uses a variety of methods to keep things simple while still achieving great results. You’ll see how to use the Roundness and Squareness settings for optimum accuracy, learn a quick method for hiding ugly halos, and discover a helpful trick for employing Photoshop’s Overlay Blend Mode.
Bottom line: After watching this episode you’ll never have to fret about making clean selections again. You can find more great Photoshop advice by visiting Dewis’ YouTube channel.
We also encourage you to watch another editing tutorial we posted recently, explaining how to use Lightroom’s “Virtual Copies” for a faster more efficient workflow.


![]()
Get the Latest Photo Tips, News & Reviews from Shutterbug!
| Camera Reviews Other Reviews | Mobile Reviews Photography Reviews Columns | News | Features | How-To | Resources |
 © 2025 Shutterbug
AVTech Media Americas Inc., USA
All rights reserved