Photographic Multishot Techniques; Photomatix Pro “Exposure Blending” Function Page 2
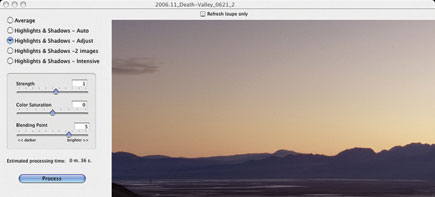
Photomatix Pro will load the files and temporarily blend them for preview in the dialog box. You can then select your blending method from the options offered in the window (figure 5).
 |
|
 |
|
|
The primary purpose of the Average method is to reduce noise. It is most useful for image sequences with largely similar exposure settings, or with small bracketing increments, or where the photographer had to use high ISO speed settings. Here, we are only interested in the resulting low-noise LDR image. We don’t generally use the Highlights & Shadows – Auto method, because it doesn’t allow any manual user control.
Our two favorite methods are Highlights & Shadows – Adjust and Highlights & Shadows – Intensive. We nevertheless recommend that you experiment with all the other methods too.
Processing time can vary substantially – from a couple of seconds to nearly an hour, even using the same source files. The actual time required depends on the number of images being processed, their size, the selected blending method and, of course, how powerful your computer is. Photomatix Pro estimates the remaining processing time and displays it in the program window.
While the Photomatix Pro HDR function generates its HDR images from the various tonal value areas in the source images, the Exposure Blending function scans the source files to determine the source of every single pixel in the resulting image.
Our personal favorite method is Highlights & Shadows – Adjust, but we used Highlights & Shadows – Intensive for our example in figure 6. The Strength slider controls the microcontrast intensity. The Color Saturation control is self-explanatory. Radius defines the size of the area around each pixel from which the tonal values for the interpolation of the resulting image are taken. A larger radius will lead to longer processing times, but will reduce halo effects in high-contrast transitions and edges.
 |
|
|
After experimenting, we selected the values shown in figure 6 and clicked the Process button. After nearly six minutes, the preview LDR image was displayed, which we then saved as a 16-bit TIFF file. Keep in mind that if you use 8-bit source images (JPEGs, for example), your results will also be 8-bit.
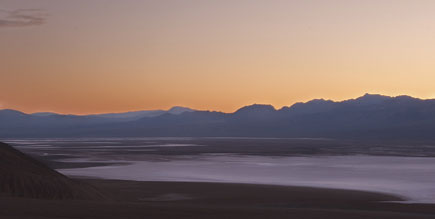
Figure 7 shows our resulting image, which we cropped a little at the top. This version is a definite improvement on our source images. The salt flat and the sunrise mountain peaks are both more clearly defined.
 |
|
|
- Log in or register to post comments


