- REVIEWS
Camera Reviews 
More Reviews Mobile Reviews Photography Reviews - GALLERIES
- VIDEOS
- BUYER'S GUIDES
Lesson Of The Month
Creating Natural Light Indoors
Have you ever come across
a portrait or architectural shot that looks as though the lighting was
completely natural, only to find out later that it was artificially
lit? It's a sign of a good photographer who can use artificial
light (strobes, hot lights) without it being noticeable, so that the
viewer is drawn to the subject matter, as opposed to the lighting gear
just outside of the frame. |
|||
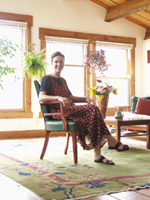
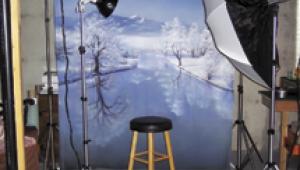
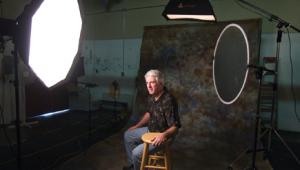
To illustrate, I asked my wife,
Heather, to pose here for a living room portrait. It was mid-morning,
and the sun shone through the rear windows creating a backlight scene.
I set my Olympus E-10 digital camera on a tripod, framed up the shot,
set the aperture to its smallest diameter to achieve the maximum depth
of field (f/11 with the E-10), and set the shutter speed to render a good
exposure on Heather (#1). |
|||
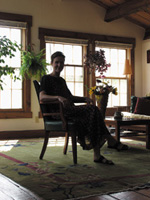
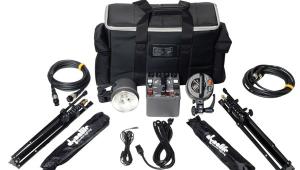
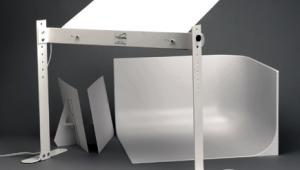
Reviewing the shot, I realized I liked the exposure on the back end of the room and now I just needed to throw some diffused light on Heather and the foreground. I set up a Photoflex 5-foot OctoDome softbox, attached a Quantum portable strobe head and power pack to it, and secured it to a Photoflex LiteStand. I brought the OctoDome in as close as I could without having it enter the frame to create a large, diffused light source. Once it was positioned, I powered it up. |
|||
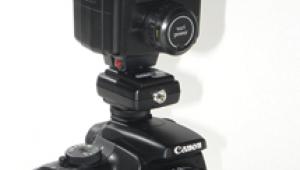
I mounted a Quantum Radio Slave sender to the hot shoe of my camera and attached the receiver to the flash head to be able to trigger the flash wirelessly. I adjusted the flash power manually and took a series of shots until the exposure looked good in the back of the camera. One of the nice things about shooting digitally with strobe equipment is that you can see your lighting ratios immediately on the LCD of your camera, eliminating the need to invest in a light meter or pay for test Polaroids the way you do with film. It's also a lot faster shooting digitally (#3 and #4). |
|||
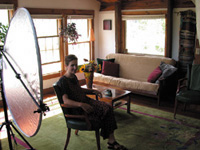
The OctoDome served as a nice
fill light to the light coming through the windows, but I noticed that
the right ride of Heather looked a little dark. To give the overall shot
a brighter feel, I brought in a Photoflex 32" MultiDisc attached
to a LiteDisc Holder and LiteStand to the other side of Heather and positioned
it so that the Soft Gold side would reflect light thrown from the OctoDome
into the shadows (#5 and #6). |
|||
It's good to know how to adjust your lighting ratios so that you can achieve the look you're after. And as we've demonstrated here, having the right lighting tools will make a huge difference in the quality of your results. Technical Equipment Camera/Media: Olympus
E-10 digital camera; Manfrotto 3021 tripod with 410 head; 128MB CompactFlash
card This lesson will be posted in the free public section of the Web Photo School at: www.webphotoschool.com. You will be able to enlarge the photos from thumbnails. If you would like to continue your digital step by step education lessons on editing, printing, and e-mailing your photos it will be on the private section of the Web Photo School. To enroll for WPS just go to www.shutterbug.net and click on WPS Free Lessons. |


![]()
Get the Latest Photo Tips, News & Reviews from Shutterbug!
| Camera Reviews Other Reviews | Mobile Reviews Photography Reviews Columns | News | Features | How-To | Resources |
 © 2025 Shutterbug
AVTech Media Americas Inc., USA
All rights reserved