- REVIEWS
Camera Reviews 
More Reviews Mobile Reviews Photography Reviews - GALLERIES
- VIDEOS
- BUYER'S GUIDES
How to Create Cool Miniature Planets with Adobe Elements or Photoshop

Yes, you know that the tools and filters in Adobe Photoshop and Elements can do many amazing things, but did you know that they can empower you to make your own planets? If you have yearned to create and rule your own worlds (and who hasn’t?), then pull up some of your images and fire up Elements or Photoshop. We are going to create a galaxy of new worlds.
It’s best to start with a panoramic photo, but you can experiment with other formats as well. Use a panorama taken with your camera or smartphone if it has a panorama mode, or crop one of your existing shots. Or you can use the Photomerge tool in Photoshop or Elements to join two or more frames you’ve shot together into a seamless pano. When you shoot the components to make a panorama, overlap them by 20-30% to make the stitching process easier. For more details, here’s a link to an article I wrote on the subject.
If you have a photo you want to use, but it isn’t in a panoramic format, you can duplicate all or parts of the image and add them to the original to make it more horizontal. As far as composition, consider including a unifying foreground element such as grass or water at the lower portion of your pano. This will provide a defined center for your final planet transformation and make it easier to read visually. Also, having some elements rising into the sky adds graphic interest, objects like buildings or trees. Creating new worlds involves a certain amount of trial and error, so be patient and have fun along the way.
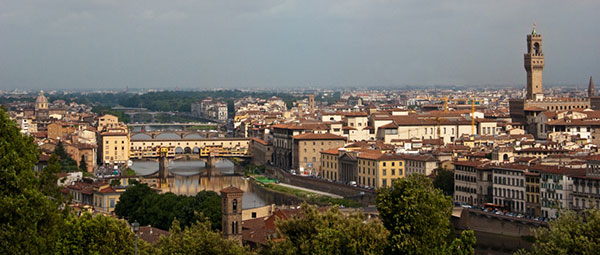
For the first example, #1, I stitched a pano using Photomerge in Photoshop from several shots I had taken in Florence, Italy. For the examples shown here, I worked in Photoshop CS6 and Photoshop CC14. With Elements, the tools may have slightly different names. Also note that the tools necessary for this technique are available in earlier versions of both Photoshop and Elements.
The next step is to reformat the photo to a square. Here’s how: with the file open in Photoshop (or Elements) choose Image>Image Size from the menu. This will bring up the dialog box shown in #2. At the lower left, circled in red here, be sure that the Resample Image box is checked and uncheck the Constrain Proportions checkbox. NOTE: Once you’re done making planets, be sure to re-check Constrain Proportions to maintain the normal proportions of all images you may re-size in the future!

Then look at the pixel dimensions at the top of the Image Size box. Now, in the value for the short side, type in the dimension of the larger side of your image, so that both dimensions are the same. Here the width is 3502 pixels, so I highlight the shorter height and type in 3502 there, #3. Click OK and the result is a funny looking square stretched version of the image, #4. Next, choose Image>Image Rotation>180 degrees to invert the squared off image, #5.
![]()


Finally we get to the grand filter finale. From the Filter menu, choose Distort>Polar Coordinates, #6. In this dialog, select the Rectangular to Polar button at the bottom, and use the minus button to see the entire effect in the small preview. Click OK and your pixels will be re-mapped into a planet, #7. Sometimes this is all you need to do. But more often than not, a bit of tweaking is called for.


You may have to cover up a strong line where the two ends of the pano meet. I do this with the clone tool, and sometimes enlist the dodge and burn tools. In this Florence example, the sky was rather grey. So I selected the sky with the magic wand tool, then used a hue/saturation adjustment layer to make it bluer. In other cases, you can increase the saturation of the sky with the burn tool set to midtones or highlights and the opacity at about 10%. If there is some blue in the sky (not just grey), another approach is to use the sponge tool set to saturate and paint over the sky, again starting at about 10% opacity.
For most planets that I plan to enlarge to 12 x 12-inches or larger and print on the Epson Stylus Photo R3000, I sharpen using unsharp mask from the Filter>Sharpen menu. I start with settings of amount 100 to 150%, radius 1 to 1.5, and 0 threshold.
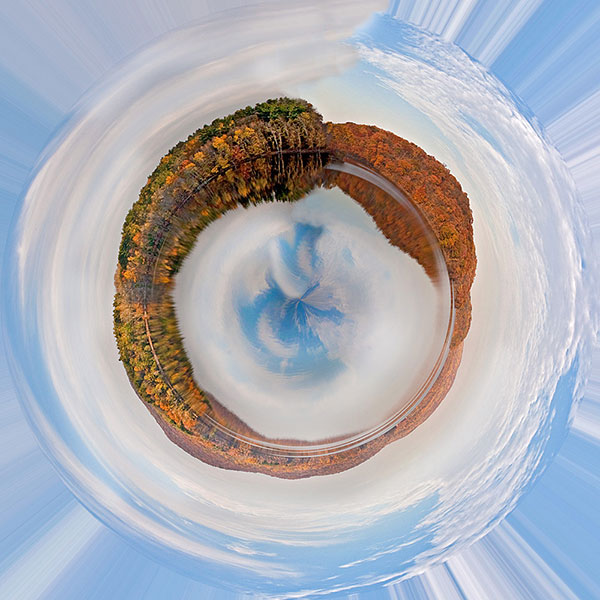
Nature and landscape subjects can work very well with the planet technique. For the next example, I chose a fall landscape with colorful leaves along a blue body of water, #8. This pano was stitched from five separate exposures using Photoshop Photomerge. Applying the steps outlined above, I created the vibrant planet seen in #9. For this transformation, no further tweaking was needed.

While creating your own planets is a fun effect, it does take some experimentation and patience to find the right original to work with. Keep playing and you’ll be rewarded.
Resources: Adobe Photoshop Elements 11, 12, or 13; Adobe Photoshop CS5, CS6, CC. Some older versions of both programs may also have the necessary tools, but my memory doesn’t go back that far. Check the Adobe website for details. Adobe Systems, www.adobe.com.
- Log in or register to post comments


![]()
Get the Latest Photo Tips, News & Reviews from Shutterbug!
| Camera Reviews Other Reviews | Mobile Reviews Photography Reviews Columns | News | Features | How-To | Resources |
 © 2025 Shutterbug
AVTech Media Americas Inc., USA
All rights reserved