- REVIEWS
Camera Reviews 
More Reviews Mobile Reviews Photography Reviews - GALLERIES
- VIDEOS
- BUYER'S GUIDES
The Great Expanse: 8 Tips on How to Photograph Landscapes in Their Best Light

(Editor's note: This landscape photography how-to is sponsored by Tamron.)
I've always loved the natural world and was hiking, backpacking, and adventuring outdoors long before I first picked up a camera. Simply put, there's a lot of natural beauty in this world: It inspires me, and I've made it my mission in life to share that beauty with others.
Photographing landscapes has become my bread and butter. I'm always striving to showcase the majestic scenery in front of my camera, both figuratively and literally, whether that's at sunrise, sunset, or under the northern lights. I use a variety of lenses—including the Tamron SP 70-200mm VC G2, Tamron SP 24-70mm VC G2, Tamron SP 15-30mm VC wide-angle, and Tamron 16-300mm VC PZD models—so I can achieve a range of creative compositions. I personally prefer using zoom lenses for landscapes, as they offer me more flexibility to change my composition and perspective. Here are some of my tried-and-true tips for achieving awe-inspiring landscapes of your own.
1. Ensure sharpness in your landscape photos.
Quality optics are absolutely necessary, so first and foremost, make sure your lenses fit that bill. If you want a landscape photo that offers sharp focus throughout the entire image frame, use a smaller aperture to extend the depth-of-field to cover the entire scene being photographed. You'll also need a sturdy tripod to ensure maximum sharpness.
2. Focus on the foreground.
It isn't so much your camera settings that are important when taking a landscape photo: It's your artistic approach. I'm usually looking for compelling foreground features to add visual interest to my photos, which is why many landscape photographers, including myself, prefer wide-angle zoom lenses—a wider perspective makes it easier to include foreground objects. By including those foreground elements, you create a visual relationship with the background scenery, giving the viewer a sense of "being there."
3. Achieve a mix of symmetry and asymmetry.
I also like to call this a pleasing mix of balance and energy. By that, I mean I like to give the basic structure of my composition a certain amount of order and balance, but I also try to add something asymmetrical to enhance visual interest. For example, with the sunrise photo shown at the top of this story, which I took in Torres del Paine National Park in Chile, the mountains and their reflection create symmetry, but the inclusion of the foreground created by the curving shoreline adds an element of asymmetry, making the image design more appealing.
4. Pay attention to your color palette.
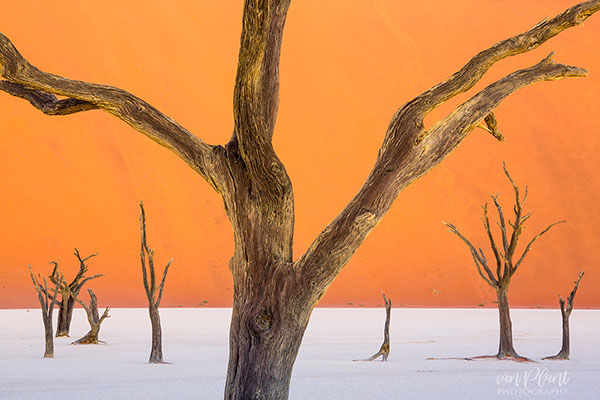
For centuries, artists have been using color opposites (also known as "complementary colors") to enhance the visual appeal of their compositions. I'm always scanning the scene for bold color contrasts to make my photos stand out, like my image above taken in Namibia's Namib-Naukluft National Park. I especially like images that have a warm/cool contrast. Shadows are also really important, as they can create texture and interesting compositional shapes. I juxtaposed the dead trees in my Namibia image against a tall sand dune in the background to create a study of pattern and color. The dunes there have a lot of iron oxide in them, lending the sand an orange hue.
5. Scout out the right light.
Side lighting and backlighting can prove very dramatic in landscape photos. I typically prefer side lighting to reveal shapes and textures on the landscape, while backlighting works best when photographing translucent subjects, such as moss-covered trees in the rainforest or a field of wildflowers.
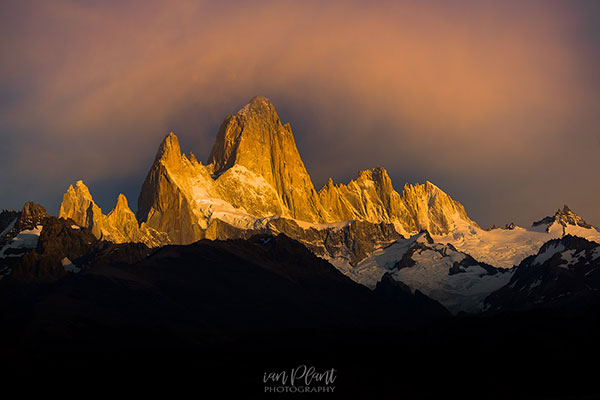
The light is usually best during the so-called "golden hours" around sunrise and sunset, when the sun is low (creating dramatic shadows) and the light is softer and more colorful than during the middle of the day. My image above of Mount Fitz Roy, in Argentina's Los Glaciares National Park, is a prime example of that: I took the picture at sunrise and zoomed in tight to capture the mountain surrounded by a halo of sunlit clouds.
I also like to make landscape photos during the darker twilight periods—even at night. I like to phrase it this way: I'm aiming to shoot on the "edge of light," waiting for the times when the light is angled, colorful, and at its most dramatic. I also like to get creative with a lot of contrast in my photos, in terms of color and luminosity.
6. Seek out dramatic skies.
Not every landscape photo needs a jaw-dropping sky, but they're definitely an important aspect in many of the best landscape images you'll see. To excel at this type of photography, you have to become pretty skilled at interpreting weather forecasts. Blue skies are great for tourists, for example, but usually not ideal for landscape photographers. I typically prefer partly to mostly cloudy skies around sunrise and sunset, and I make sure to be on location whenever those conditions are present, with my fingers crossed, hoping for amazing color and drama in the sky.
7. Get creative with how you display water in your images.
When working with moving water, I prefer to add some motion blur. If you have too much blur, you can lose all detail in the water, rendering it a featureless white mass, but just the right amount can reveal interesting compositional shapes. The "right" shutter speed depends on the volume of water, how fast it's moving, and your own personal artistic tastes. I often start off by using a half-second shutter speed, experimenting from there by going faster or slower until I get the look I want in the water.

For example, with the northern lights photo you see above, I used a long exposure as several large waves crashed into the cove beneath where I was standing. The successive waves during the long exposure blurred to create a curving shape that complemented the shape of the aurora overhead in the sky.
8. Don't expect a lot of sleep.
If you really want to excel at landscape photography, shut-eye won't be a top priority. I spend most of my time during the middle of the day scouting out potential locations and compositions, and then I'm on location for every sunrise and sunset, hoping to get the right color and skies to bring everything together. After that, I'm often shooting into the twilight and sometimes even at night. Sleep is overrated!


![]()
Get the Latest Photo Tips, News & Reviews from Shutterbug!
| Camera Reviews Other Reviews | Mobile Reviews Photography Reviews Columns | News | Features | How-To | Resources |
 © 2025 Shutterbug
AVTech Media Americas Inc., USA
All rights reserved