- REVIEWS
Camera Reviews 
More Reviews Mobile Reviews Photography Reviews - GALLERIES
- VIDEOS
- BUYER'S GUIDES
Graduated Neutral Density Filters: Are They Relevant In The Digital Age?
In these days of HDR, Lightroom, and Photoshop, is there still any point in carrying around Graduated Neutral Density (GND) filters? Often at photographic overlooks I hear photographers banging away with their cameras, shooting multiple exposures for future HDR images, while I nail the same scene in a single shot. More than once I have had one of these photographers scoff at me for using my “old school” GND filter, asking, “Ever heard of HDR?” While I am a firm believer in using all the tools available to me, including HDR, I feel that HDR is either unnecessary or won’t work in situations where multiple images are not possible, such as an action shot.

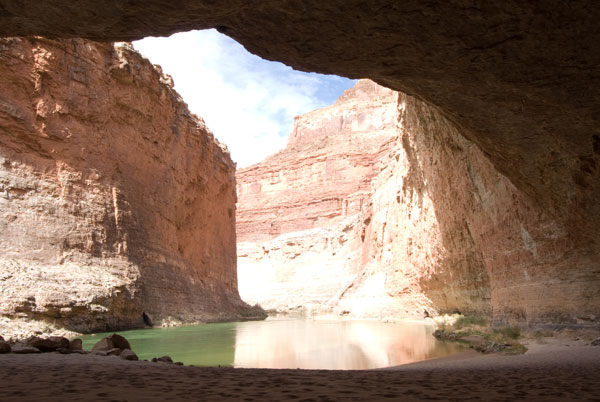
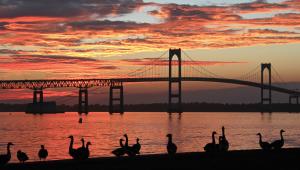
This image has a simple, clean horizon line that works well for a hard-edged GND filter. The filter was placed at an angle in front of the lens to match the angle of the diagonal horizon line. The correct placement of the filter was found by stopping the lens down and using the depth of field preview button.
All Photos © Josh Miller Photography
How They Work
A GND filter blends from dark on one edge to clear on the other. This allows photographers to blend exposures within a scene by placing the dark portion of the filter over a bright area while keeping the darker area unfiltered, which brings the different exposure values within a scene close enough together that they can be captured in a single image. The “graduated” or increasing density toward the dark edge creates a natural blend rather than a harsh cutoff. Most commonly these filters are rectangular and, depending on their quality, are made of plastic, glass, or durable optical resin. While GND filters are made in circular screw-in versions as well, the advantage of a rectangular filter is that the transition line between the light and dark side can be adjusted on the front of the camera in order to best fit the scene.

These before (above) and after (below) images show how a GND filter was placed across the horizon line to darken the clouds and bring in more detail and color. A circular polarizer was also used to cut some of the reflections in the water.


This image worked well with a soft-edged GND filter that held back the bright blue sky in order to balance the brightness with the foreground.

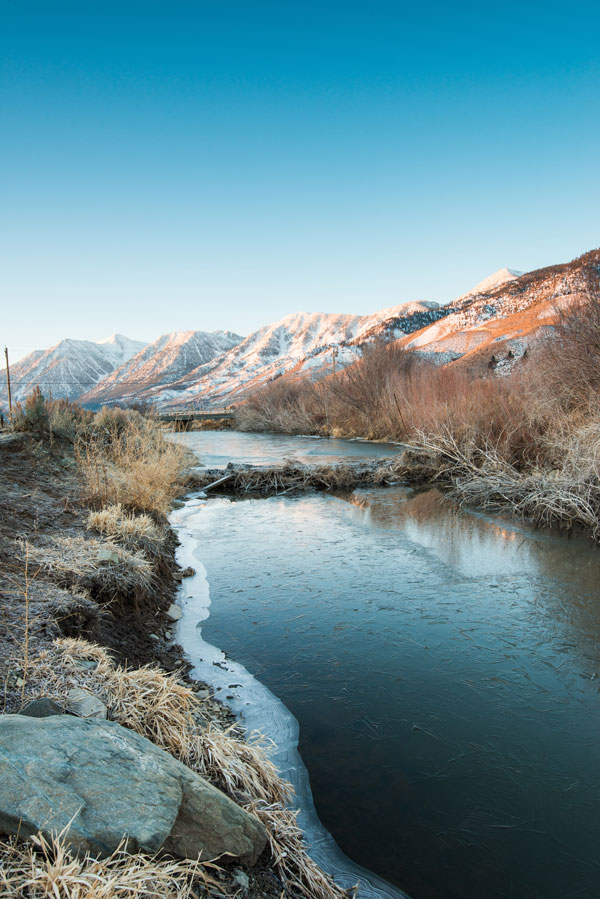
A GND filter worked perfectly for this scene because the hard transition line could be placed along the shore of the lake where the storm light changed to shade.
When I Use Them, And Don’t
Back in the dark days of slide film I often carried as many as five GND filters in different strengths. But today, with Lightroom, Photoshop, HDR, and other software tools, it’s easy enough to adjust the gradation within an image so I only carry the hard- and soft-edged versions of a high-quality three-stop GND filter. (I use Singh-Ray—see the offering list for other manufacturers.) I have found by using Lightroom I can get about two stops of exposure control via the adjustment brush and the GND tool. In the field, if the needed adjustment of a scene is within two stops I just shoot it and make the appropriate adjustments in post-processing. If the range is greater than two stops I’ll use a three-stop GND filter to get the scene closer to a balanced exposure and then finish it off in post-processing, where I have greater control. This combination of filters and software gives me five stops of exposure control, or in the rare case when I stack my filters, eight stops.
GND vs. HDR
In most situations my preferred tool is always a GND filter due to its simplicity and minimal processing time. When I am shooting action but want to darken the sky I’ll often use a GND filter, but still shoot fast shutter speeds in order to freeze motion. But in some situations, frankly, the areas of dark shadows and bright highlights are not placed in such a way that a filter will work. It is in these situations that I switch to shooting multiple exposures of the same image and use Photomatix Pro to create an HDR image. While HDR has opened up a new world of photographic possibilities, personally I still want my images to reflect reality.
HDR also has its limitations, especially with moving subjects, and almost always needs to be done using a tripod. If I am not sure which method will give me the best result I will shoot the scene using both methods. In fact, I might even use both and process different parts of the image using the different techniques.

A GND filter was necessary for this action image because not only was the kayaker floating down the fast-moving river but I was also shooting from a quickly moving raft. Because of the motion, there was no way to have multiple images line up in order to use HDR.

To create this winter image of El Capitan there was no way a GND filter would have worked to bring out the shadowed areas of the cliff hidden from the sun without darkening El Capitan. As a result, shooting from a tripod and then blending multiple exposures via HDR was the only way to hold detail in the snow, sky, and cliff.

Here is an example of a situation where a GND filter will not work because there is no clear transition zone between exposures. HDR was needed to bring the exposure range within a single image.
GND Filter Placement
The exact placement of the filter is dependent on where the bright and darker areas are within your scene. If there is very little sky you can adjust a rectangular GND filter to only darken the small sky portion of the image while leaving the remainder unfiltered. If most of the image is bright sky the filter can be adjusted lower in order to hold back the exposure over more of the image. While there are several ways to determine the correct placement of a GND filter, the best ways are to either use live view or stop your lens down and use the depth of field preview button. Then move the filter back and forth until you see the transition line and place it in the most appropriate location so it does not draw attention to its use. Using GND filters in this way allows you to rotate them to adjust for a crooked horizon.
The most common method for mounting filters to a lens is a square filter holder. This holder allows a rectangular filter to be slid up or down depending on where the transition line is to be placed. While most manufacturers make some type of screw-in filter holder, there are several more complicated box-style holders that double as a lens shade. Some companies also make holder systems that can be used on ultra-wide lenses with bubble fronts, such as the Nikon 14-24mm. Lastly, the lightest and simplest way is to just hand hold your filter in front of your lens. While P-sized filters are the most common there are a wide range of filters and holders on the market, so make sure you get the correct sized filters for your holder.


This series of images above shows how the GND filter can be used to selectively darken the sky while not affecting the foreground.


A GND Filter Sampler
Contact these manufacturers/distributors for more information on their offerings:
Formatt/Hitech: www.formatt.co.uk
HP Marketing Corp. (Heliopan): www.hpmarketingcorp.com
Kenko Tokina USA, Inc. (Hoya/Kenko): www.kenkotokinausa.com
Lee Filters: www.leefilters.com
OmegaBrandess (Cokin): www.omegabrandess.com
Schneider Optics (B+W): www.schneideroptics.com
Singh-Ray Filters: www.singh-ray.com
Tiffen: www.tiffen.com
To find out more about Josh Miller’s work or about his photo workshops, visit www.joshmillerphotography.com.
- Log in or register to post comments


![]()
Get the Latest Photo Tips, News & Reviews from Shutterbug!
| Camera Reviews Other Reviews | Mobile Reviews Photography Reviews Columns | News | Features | How-To | Resources |
 © 2025 Shutterbug
AVTech Media Americas Inc., USA
All rights reserved