- REVIEWS
Camera Reviews 
More Reviews Mobile Reviews Photography Reviews - GALLERIES
- VIDEOS
- BUYER'S GUIDES
Contrast And Perception
Tonality does not exist in a vacuum; the tones form a visual impression in terms of both their intrinsic value and their relationship to one another. The context in which they relate is called contrast, simply the difference and relationship between the light and dark values in the scene. Contrast determines the “look” of the image, and has a profound effect upon visual effects.
While you could read every section of this shot and see that the range of tones goes from black to white with many shades of gray in between, the reason that the tones make sense and create an image is in their relationship to one another (#1). The degrees of brightness also create a sense of space and shape and guide us in seeing “photographically.”

All Photos © George Schaub
We can quantify our description of contrast into general categories of high, medium and low. Photograph at the beach at noon on a cloudless day and you’ll be shooting in a high-contrast situation, given that you have subjects other than the beach itself within the frame; on an overcast day in the woods you’ll be working in low contrast, given that you do not include the sky in the frame; medium contrast might be found on an afternoon hike under a cloud-filled sky, given that you shoot with the sun over your shoulder and the light is falling on the subject. In other words, contrast is not determined only by the ambient lighting conditions. The reflectivity of the subjects, the direction of the light and your point of view (composition) may add or subtract from scene contrast.
Contrast is the key to abstraction and the photographer/printmaker ultimately decides what to show and what to obscure in every frame. That is done consciously through exposure and processing decisions, as it was in this photo of ice on a mud puddle (#2).

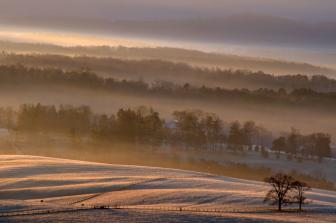
Low contrast often has to do with the ambient lighting conditions, as shown in this photo made on a riverbank in New England (#3). With photos like this you have lots of leeway in processing and can increase contrast or maintain the “flat” look makes all values accessible. The same goes for this shot made along the shores of Peggy’s Cove in Nova Scotia (#4). But here processing is used to raise contrast and introduce tone that did not exist in the scene; a gradient filter was used to fill the blank sky.


For example, if you are photographing at the beach under the noon sun, and the subject is a dark piece of driftwood surrounded by glaring sand, you will generally be encountering high contrast. However, if your subject is a bright piece of kelp on the sand, you may actually be shooting a medium or low contrast scene. Contrast can be subject dependent despite the overall lighting. So we can modify the definition of contrast by saying that it is the difference between the lightest and darkest parts of the scene in which you want detail or image information.
In scenes with a fairly high contrast you still have the power to interpret through raising or lowering contrast via exposure and processing. For the street shot (#5) I exposed for the street itself, which silhouetted the walker, but still maintained tone on the wall. In the floral (#6) I purposely raised contrast in processing to eliminate any detail in the far background. I even painted away some of the detail with a black-filled brush.


You have probably heard about dynamic range. It is simply the range of brightness values with image information (not just dark tone like a deep shadow) that you can capture with one exposure. HDR, or high-dynamic range photography entails making more than one exposure of one scene and then combining them to take advantage of each exposure’s capture capability.
In either case there are a few terms that define that information, including highlight, significant highlight, spectral highlight, significant shadow and deep shadow.
The highlight is the brightest part of the scene that records with texture (or image information). The highlight could be the sky, a cloud edge or a white clapboard building. In digital, making sure the highlight is within range—not overexposed—is important, although with Raw processing we can selectively reduce exposure if need be, within limits. In many cases HDR is done because of very bright highlights in the scene and it is important that one of your exposures takes that highlight into account by placing it well within the recording range of the sensor.
The significant highlight is the exposure that ensures that we will record that bright area with texture and tone. If we photograph a white building, or snow, we do not want that to be overexposed, or off the recording scale. The spectral highlight is the area where there is light interference, where light glints off a rushing stream or a piece of metal on a roof. This is a highlight that cannot be read without making every other part of the scene, even a scene with moderate contrast, quite underexposed. This area may read as “paper” white, that is, no texture, just bright light. As long as this does not dominate the scene, and appears as “glints” in the frame, it is no problem; indeed, it can help add some sparkle to an image.
The significant shadow area in this scene is the detail under the grain elevator (#7), in which you can see every strut of its construction. The shadow under the truck, or reading the tread in the tires, is not significant as it “reads” as a dark shadow and we do not need to see detail there. Thus, it can be ignored as part of the exposure calculation.

Super high contrast scenes cramp the ability to get full-toned images. Knowing that, think of the deep shadow as a compositional element and expose accordingly. Here the lighthouse goes deep black but the lamp house maintains a nice glow while the background stays a “pleasing” middle gray, kind of a three-toned shot (#8).

Keep in mind that exposure and contrast, and the range of brightness you record, are all linked. If you underexpose, or not expose with enough light, detail, or image information in the darker parts of the scene it will record as dark tone only with no detail, like a very dark shadow. Conversely, if you overexpose, or expose with too much light, the brighter parts of the scene will “burn up”, and often lose the ability to contain tone and will look “paper white.”
Careful exposure of bright scenes with lots of white areas will avoid overexposure, where the white areas go “paper white” and create difficulty in retaining or regaining texture in that bright white area. In fact, this scene more often than not creates underexposure problems in terms of darker areas than the bright white. Here’s a clapboard house that’s been overexposed (#9) and one that is exposed just right to retain the bright white character with texture (#10). There’s a 1.5 stop difference between the two. Exposure techniques for these tough situations are covered later in this volume.


You can judge the contrast of a scene by taking exposure readings in different areas of the scene, although soon enough you’ll gain an instinct for contrast and how it might affect your work. For example, if you squint without sunglasses you’ll probably have to pay close attention to exposure readings.
A “spectral” highlight is one that will print “paper white.” It is a highlight with no texture or tone. Although you want to avoid this for large swaths of the image, it’s presence in small areas, such as in the splashes of a stream or strands of hair in a portrait, can add a certain sparkle to an image. You can even process to bring out that sparkle in images where the highlights are under control (more on that later). Here the waterfall has some spectral highlights as it hits off this rock (#11).

Say the readings you take around light and dark areas of a scene, with the shutter speed held at 1/125 second, are f/22 for the brighter areas and f/2.8 for the darker areas. The meter is reading the light reflected from the subject, and the f-numbers are relative indications of the brightness values. This is a 6-stop range (f/2.8-4-5.6-8-11-16-22), and is considered high contrast. If you expose the overall scene at f/22 the darker areas will record as simply dark tones with no detail and will lack textural or image information. If you expose for the darker areas (f/2.8) the brighter areas will be completely overexposed and you’ll be hard pressed to get a decent image despite your best processing efforts.
If you expose for the highlight when you shoot there’s a good chance that shadow areas will become underexposed and despite your best efforts and processing they will not have recoverable detail. Such was the case here (#12), so in processing I brought the brighter areas “down” (made them darker) in tone. Because this is an abstract I allowed the darker areas to lose detail; if image information in the darker areas was important I would have made different processing decisions. There are times when you turn what might be a “flaw” technically speaking into an interpretive stance that has more emotional and visual appeal.

Think of a low-contrast scene as one in which the difference between the brightest and darkest parts of the scene in which you want to record information is slight. On an overcast day there is little danger of poor exposure, as the camera meter will “read” the scene for you, and any automatic calculations that take place will place the recorded tones well within the recording range of the sensor. The wonder of digital is that if you wish you can introduce more contrast later, and turn what might have been a dull scene into a very dynamic, “snappy” contrast rendition, it’s quite simple.
The aim of most exposures is to gather as much tonal information as possible, given the lighting conditions, as was done in this scene (#13). Every important area in the scene is well exposed, with open shadows, controlled highlights and a small portion of deep shadows and bright highlights, which give the visual structure a strong “frame” in which to consider the subjects, volume and forms. Having this type of image as a foundation allows you to go many different directions in terms of processing variations, as we’ll see.

For those who have shot film, and especially for those who might have processed their own black and white film and made prints in the darkroom, you know that these are not new terms, but are borrowed from film days. Yet, with digital, they are still important to understand and appreciate, as they define the look of your image and help you determine how to expose and process for the best results.


![]()
Get the Latest Photo Tips, News & Reviews from Shutterbug!
| Camera Reviews Other Reviews | Mobile Reviews Photography Reviews Columns | News | Features | How-To | Resources |
 © 2025 Shutterbug
AVTech Media Americas Inc., USA
All rights reserved