- REVIEWS
Camera Reviews 
More Reviews Mobile Reviews Photography Reviews - GALLERIES
- VIDEOS
- BUYER'S GUIDES
Beautiful Natural Light Portraits with Backlight & a Reflector (VIDEO)

Environmental portraits are fun and easy to make, as long as you don't have to lug a bunch of lighting equipment into the field. Today you'll learn how to capture photos that will make you and your model proud, with natural backlighting that creates a unique effect.
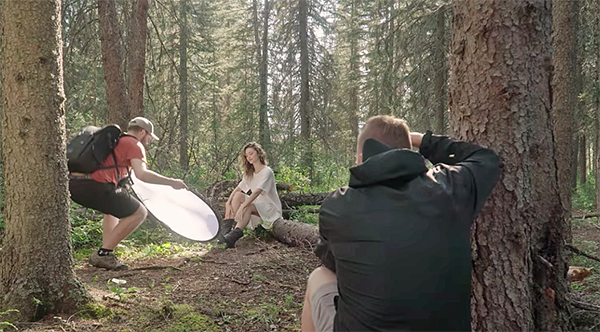
Nathan Elson is a Canadian commercial photographer who often posts behind-the-scenes tutorials to demonstrate his favorite techniques. In today's quick episode you'll watch him capture natural light portraits of a pretty model, with light streaming through the trees behind her that adds impact to the shot.
This is a simple and effective method that anyone can accomplish with whatever gear they own. The only accessory you'll need is a foldable/affordable reflector to bounce some light back onto the subject's face to lighten it up and fill in any objectionable shadows. And we meant it when we said "easy" because this straightforward technique takes barely three minutes to explain.
Elson notes that with this method it's important to quickly pose the model, determine focus, exposure, and composition because the position of the sun will move across the sky—changing how (and whether) the backlighting hits your model. As Elson says, at one moment everything may look perfect but "10 minutes later the backlighting may disappear if the sun moves behind a tree."
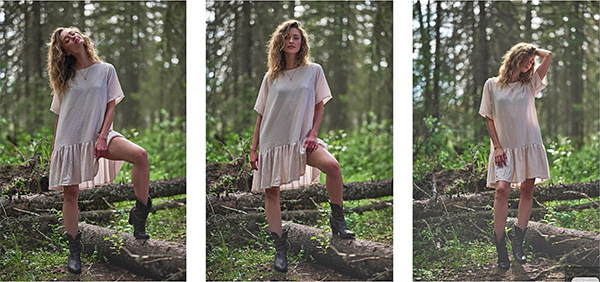
The reason for a reflector is this: if you expose for the model's face without fill light, the interesting background will become significantly overexposed. As Elson says, "the whole purpose of shooting in a location like this is to is to show off the location as much as the subject." In other words, properly balanced tones will make or break the shot.
Elson demonstrates how to arrive at a proper exposure, combining ambient illumination of the background with fill light from the reflector. As you'll see, it really helps to have an assistant hold and adjust the position of the reflector while you concentrate on directing the model and composing the image.
In fact, the position of the reflector is critically important for optimum results. So you'll likely find yourself directing the assistant as much as the model as he moves the secondary light source for optimum results. Elson provides some helpful advice here, explaining why poor results may occur when the reflector is too close, too distant, or too far off to one side relative to the subject.
After a few more tips Elson demonstrates the effectiveness of this approach will several nice images (with informative captions) to get you inspired. You can find much more helpful advice by visiting his YouTube channel.
As be sure to check out the tutorial we posted from another accomplished pro, explaining how a camera's light meter works so you can use it for perfectly exposed photos every time.
- Log in or register to post comments


![]()
Get the Latest Photo Tips, News & Reviews from Shutterbug!
| Camera Reviews Other Reviews | Mobile Reviews Photography Reviews Columns | News | Features | How-To | Resources |
 © 2024 Shutterbug
AVTech Media Americas Inc., USA
All rights reserved