- REVIEWS
Camera Reviews 
More Reviews Mobile Reviews Photography Reviews - GALLERIES
- VIDEOS
- BUYER'S GUIDES
2 Simple Ways to Make Luminosity Masks in Photoshop for PERFECT Exposures (VIDEO)
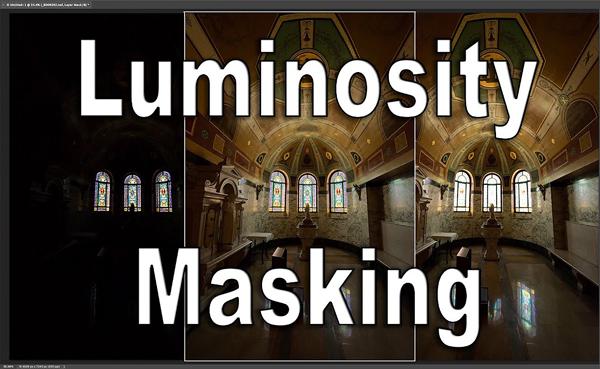
When shooting scenes with a wide range of tones, it can be difficult to balance exposures and details across highlights, midtones, and shadows. One way to do that, that’s recently fallen out of favor, involves High Dynamic Range (HDR) adjustments than often deliver unnatural results.
Fortunately there’s another technique that one of our trusted editing experts says “is better than HDR,” and that’s using Luminosity Masks to manually blend exposures. While this more precise approach isn’t particularly difficult, some photographers ignore it because it sounds rather complex. As you’ll see below, it’s not.

In this quick tutorial, image-editing expert Anthony Morganti actually presents two methods for getting the job done; one he says is “easy” and another he calls “super easy.” The challenge at hand is photographing a dimly lit interior in which the windows in the photo are totally blown out. And here’s where Photoshop’s Luminosity Masks come to the rescue.
The solution is to shoot two images—one exposed for the room itself, and another exposed for the windows. Once you’ve done that, it’s a simple matter to blend both images together for a perfect result using Luminosity Masks.

As mentioned above, Morganti demonstrates two simple techniques. So why not pick the “Super Easy” method rather than the “easy” one? Well, the answer is a slight difference in quality. Either way, there’s nothing to fear, and you’ll be able to make beautiful images of scenes you may have previously passed by. And it’s a helpful technique for both indoor and outdoor photography.
There’s much more to learn on Morganti’s YouTube channel. And take a look at another Photoshop tutorial we posted, explaining how to create a dramatic day-for-night effect.


![]()
Get the Latest Photo Tips, News & Reviews from Shutterbug!
| Camera Reviews Other Reviews | Mobile Reviews Photography Reviews Columns | News | Features | How-To | Resources |
 © 2025 Shutterbug
AVTech Media Americas Inc., USA
All rights reserved