- REVIEWS
Camera Reviews 
More Reviews Mobile Reviews Photography Reviews - GALLERIES
- VIDEOS
- BUYER'S GUIDES
Raw 101; A Revised Primer On All Things Raw
 The following is an excerpt from “Camera Raw 101: Better Photos with Photoshop, Elements, and Lightroom” by Jon Canfield. This is a revision of the popular introductory book on using Adobe Camera Raw and is updated to include all of the new Raw image-processing features in Photoshop CS4 and Elements 7. Because the Raw-processing features are identical in Photoshop CS4 and Lightroom 2, users of either program will find this book to be a great way to get started shooting and processing Raw images. Each control is explained in plain language with examples of its use.—Editor
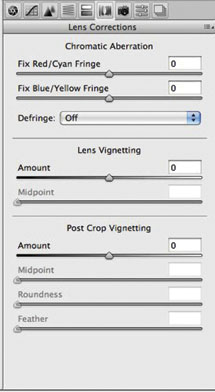
Chromatic aberration is that lovely color fringing, or colored halos, seen on some images, particularly in high-contrast areas of the image. (See Figure 6.1 for an example.) It’s more problematic with zoom lenses and is made worse by the sensitivity of digital sensors. Chromatic aberration occurs when all of the light wavelengths coming through the lens don’t align precisely at the same point, in this case the sensor in your camera.
 |
|
|
Camera Raw has two sliders located on the Lens tab (Figure 6.2) to help correct chromatic aberration. Chromatic Aberration R/C adjusts red/cyan fringing problems, while Chromatic Aberration B/Y adjusts blue/yellow fringing problems. Both controls work by adjusting the amount of red and blue compared to the amount of green.
 |
|
|
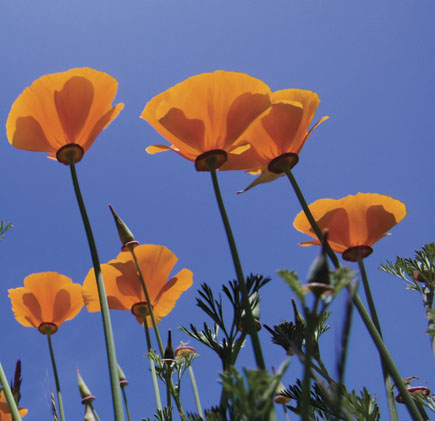
If you’re wondering why only the red and blue are adjusted, remember that photo sites have red, blue, and green filters. The Chromatic Aberration sliders work by adjusting the strength of the reds and blues or by adding or subtracting those colors. Enough with the theory—how about a real example? The image of California poppies (Figure 6.3) shows strong chromatic aberration along the edges of the flower petals.
 |
|
|
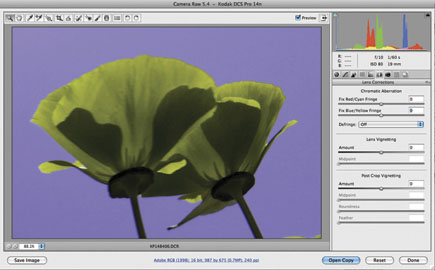
To start, open the image in Camera Raw and make any major adjustments, such as in exposure, shadows, contrast. To help with your adjustments, turn Sharpening off in the Detail tab. This will make it easier to tell what is actually chromatic aberration and what is an artifact of sharpening. By holding down the Alt/Option key while clicking each of the Chromatic Aberration sliders, you can hide the other color channel to make it easier to see where the problem areas are. In Figure 6.4, there is an obvious problem in the Blue channel while the red/cyan channel looks fine.
 |
|
|
 |
|
|
|
| |||||||||


![]()
Get the Latest Photo Tips, News & Reviews from Shutterbug!
| Camera Reviews Other Reviews | Mobile Reviews Photography Reviews Columns | News | Features | How-To | Resources |
 © 2025 Shutterbug
AVTech Media Americas Inc., USA
All rights reserved