- REVIEWS
Camera Reviews 
More Reviews Mobile Reviews Photography Reviews - GALLERIES
- VIDEOS
- BUYER'S GUIDES
Nikon Speedlight Handbook: Flash Techniques For Digital Photographers
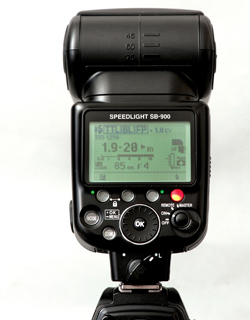
Flash Exposure Compensation
Flash exposure compensation (FEC) is valuable when working in any of the automatic flash modes (auto or TTL), where the flash or camera’s meter determines how much output the Speedlight should give. You can adjust your exposure compensation on the camera or directly on the flash.
As we discussed earlier (in the book), all meters try to expose the scene to a middle gray tone. While this is fine for a scene that contains a complete tonal range, you will run into exposure problems when using an automatic mode to photograph a scene or subject that is dominated by dark or light tones. To compensate for this, you can use the flash exposure compensation (FEC) to increase or decrease the flash output. The flash exposure compensation value for Nikon runs between –3 EV and +3 EV. This is 3 stops below and 3 stops above the metered flash output, for a 6-stop range.

All Photos © Stephanie Zettl

One of the important things to remember about the Nikon system is that exposure compensation on the camera body controls both the flash exposure and the ambient light. (See your camera manual on how to adjust exposure compensation on the camera body.) With flash as your main source of light, if you increase the exposure compensation on your flash by 2 stops (+2 EV) and reduce it by 2 stops on-camera (–2 EV), the settings will basically cancel each other out.

While it might seem counterintuitive at first, it is important to keep two guidelines in mind when using FEC:
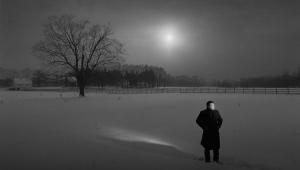
1. If your scene is composed of mostly light tones, like a bride in white or snow, increase (+) your FEC. (The camera will see the white tones and want to underexpose them to get a middle gray tone, so you’ll want more flash output to properly expose the photograph.)
2. If your scene is composed of mostly dark tones, like a man in a tuxedo in a dark room, decrease (–) your FEC. (The camera will see the dark tones and want to overexpose them to get a middle gray tone, so you’ll want less flash output to properly expose the photograph.)

There is no set standard of how much you will need to increase or decrease the FEC for a particular scene. There are many factors that will determine how much change is needed. These include:
1. The tone and reflectivity of your subject.
2. How much of your frame is filled by the subject.
3. The subject’s distance from the background.
4. The available light.
5. Backlighting. (You will generally need more exposure compensation in backlit circumstances.)
6. Composition (i.e., whether your subject is off-center or not).


Flash Exposure Compensation And Fill Flash
When you’re working outside and you want to add just a touch of fill flash to lift the shadows, flash exposure compensation is an excellent means to do so. You will generally lower your FEC to somewhere between –1 EV and –3 EV. But once again, the exact value depends on the available light circumstances and the tonality of your subject.
Flash Exposure Compensation And TTL-BL Mode
When working in TTL-BL mode, the flash takes into consideration the available light and adjusts the flash output so that it balances better with the available light. You may still want to reduce your FEC, but you will generally have to do it less when using TTL-BL for fill flash.

So why not shoot in TTL-BL all the time? As we can see from the photos, TTL-BL did a better job of balancing the ambient light with the light from the Speedlight. However, I have found that when bouncing my flash off a wall or ceiling to provide light, the photograph can be a bit underexposed and it is best to use the i-TTL mode.
About The Author
Stephanie Zettl is a photographer from St. Louis, Missouri, who specializes in photographing people. She got her start as a newspaper photographer and enjoyed photographing people and their relationship to the events around them. In 2003 she started her own business specializing in documentary styled wedding and portrait photography. Her husband, Peter, later joined her in the business as a photographer and business partner. Together they have developed it into one of the top wedding studios in St. Louis, winning many awards both locally and internationally.
Where To Buy
Amherst Media books can be purchased worldwide at photo retail stores and anywhere books are sold. They are available on Amazon, Barnes & Noble, and at the publisher’s website, www.AmherstMedia.com. Amherst Media books are available as eBooks in multiple formats as well.

More of Stephanie’s work can be found on her website at www.zettlphoto.com.


![]()
Get the Latest Photo Tips, News & Reviews from Shutterbug!
| Camera Reviews Other Reviews | Mobile Reviews Photography Reviews Columns | News | Features | How-To | Resources |
 © 2025 Shutterbug
AVTech Media Americas Inc., USA
All rights reserved