Infrared Simulation: Shoot “Normal”; Process Into IR

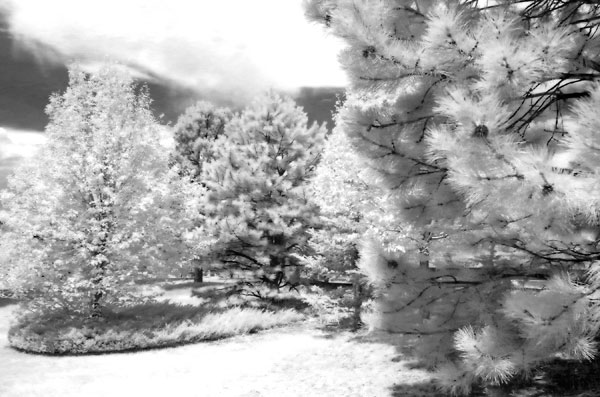
How good is digital infrared emulation? To test the concept I made a few shots of trees using a tripod-mounted Pentax K-30 camera that has a 52mm threaded front lens element. The first shot was made using Hoya’s (www.thkphoto.com) RM72 filter that, as I write this, costs less than $60 for the 52mm threaded mount. This image will serve as a reference because it is a “true” infrared look at the scene that was converted to black and white using Adobe Camera Raw, (www.adobe.com). The trees were then photographed as a straight color file that would later be converted into infrared using some of the software and techniques shown here. Having that reference image gives you a way of comparing real IR capture with ersatz infrared.
IR Options
Our reference image [1] was made on Daisy Hill using a Pentax K-30 with a Hoya RM72 filter and an exposure of 3 sec at f/11 at ISO 1600. This particular image was selected because it includes both deciduous (highly IR reflective) and non-deciduous (not as highly IR reflective) trees so the amount of the traditional IR effect will vary and enable you to evaluate the conversion methods that are presented and create the kind of effect you ultimately want to achieve. The magenta cast is the result of using the filter. The black and white version [2] is from the filtered shot using Adobe Camera Raw (ACR) conversion.

All Photos © Joe Farace

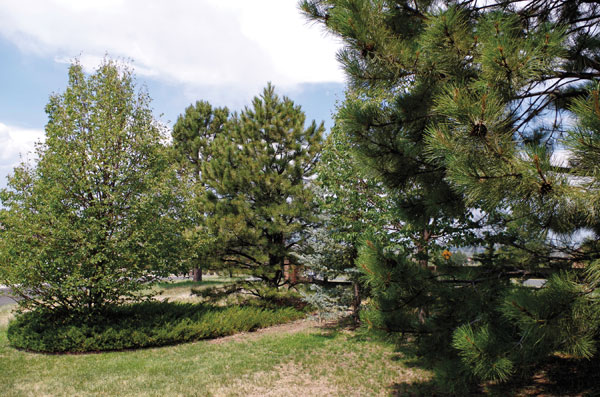
The group of trees [3] was photographed using the same camera set-up but without the Hoya RM72 filter and a Program mode exposure of 1/100 sec at f/8.2 at ISO 100. This is the shot that was used for all of the software conversions in this article.
Here is the Adobe Camera Raw dialog box, [4]. When you open the image it’s simply a matter of choosing the HSL dialog box and clicking on the grayscale conversion option, then adjusting the contrast (etc.) to your needs. This converts the file from an RGB to a grayscale file, but you can always convert it back later if you want to add tone.

Another method that can be used to convert a color image file into infrared is by using emulation software, such as Alien Skin Software’s Exposure 4, (www.alienskin.com). This software lets you simulate an IR image in either black and white or color. This Photoshop compatible plug-in offers 19 emulations of different Ilford, Kodak and Konica IR films—with and without grain—along with some of the company’s own proprietary simulations. If you prefer, Exposure 4 also works with Adobe Lightroom, [5].
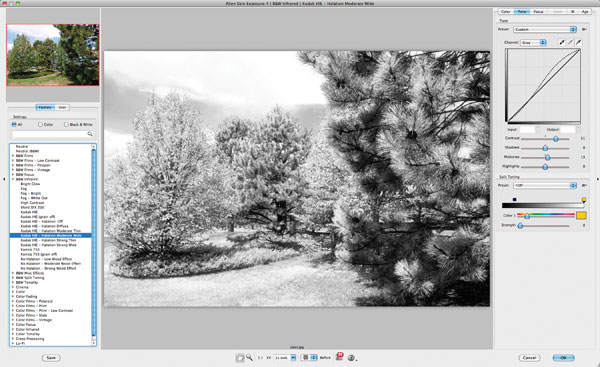
For this image [6] I used Exposure 4’s Kodak HIE film emulation with the “Halation Moderate Wide” option making extensive use of the plug-in’s tabs at the top of the dialog box that provide additional control by allowing you to manipulate sliders and curves. If you compare the screen shot with this final version, you’ll see that there are some darker areas (pine cones) on the tree at right and to give the final image more of an IR look, I used Photoshop’s Dodge tool with a big brush size, gradually reducing the size and opacity to produce a result that looks closer to the IR effect in the reference image.

Nik Color Efex Pro (www.niksoftware.com) has an Infrared Film filter that emulates both color and black and white IR effects. The plug-in [7] offers 4 basic presets—they’re labeled as “Method”—with additional control provided by sliders for Lighten Highlights, Brightness, Contrast, Shadows and Highlights that let you tweak the image further to meet your expectations.

Only some dodging was used to produce this version which used Nik Software’s Color Efex Pro’s Number 3 emulation plus adjustments using the plug-in’s sliders after applying the presets [8]. Some slight dodging was also used to create the final effect that is seen here.

Photoshop actions are another way to make faux IR images and one of the most comprehensive collections of IR actions I’ve found is Craig’s Actions Stylers—Infrared, (www.craigsactions.com). Most Photoshop actions are just “push a button and watch stuff happen” but while these particular actions are running Craig provides pop-up directions that let you make adjustments and fine tune the default settings. After finishing the action, I added just a touch of judicious dodging to create the final image, [9].
System Requirements
Alien Skin’s Exposure
Adobe Photoshop CS4 or later, Adobe Lightroom 2 or later and Adobe Photoshop Elements 9 or later.
Craig’s Actions
All Craig’s Actions Sets are compatible with Photoshop CS2 through CS5 on Windows XP or newer. On the Mac: Photoshop CS2 through CS5 on Mac OS X 10.1 or newer. Craig’s Actions do not work with Photoshop Elements and only with the full versions of Photoshop CS2 through CS5.
Nik Color Efex Pro
Windows XP, Windows Vista and Windows 7, AMD or Intel processor, 2GB RAM (4GB or more is recommended), Photoshop CS3 through CS6, Photoshop Elements 8 through 10, Lightroom 2.6 through 4, Apple Aperture 2.1.4 through 3.0 or later. Mac OS 10.5.8, 10.6.8 and 10.7 or later, Intel processor, 2GB RAM (4GB or more is recommended).
