- REVIEWS
Camera Reviews 
More Reviews Mobile Reviews Photography Reviews - GALLERIES
- VIDEOS
- BUYER'S GUIDES
Editor’s Review: Samsung Galaxy S4 Zoom: Connectivity to the Max

The Galaxy S4 Zoom is what you might call a “multi-personality” device. Phone, camera, Browser, game device, gateway to all the Android apps, GPS, mapper, email connector--it’s all of that and more.
I say “multiple” because while the initial face of the unit looks like half point and shoot camera/half phone, one pasted atop the other, there is a lot more going on under the hood. That includes all the current connections one could imagine and access to the entire Android set of apps,from camera functions to finding where you can get a decent latte in any city or state or country you might find yourself. One can listen to music; watchvideos; browse the Internet, get email, tap compatible phones (literally) to share content; and send and receive via any social media you could imagine.

Indeed, these functions seem to outweigh the camera functions, which as far as I can see serve the purpose of supplying user content to all of the above, thus creating what could be called a closed loop of reinforcing actions. The logic of the device is that pictures can be shared so why not make a unit that does both via all and every type of site? And while you’re at it throw the whole consumer electronics milieu into the bargain.
At every turn, users of this device (and its ilk) are enticed to filter their self-generated “content” through some IT billionaire’s brainchild, rather than, for example, making a “quaint” album of prints that will well outlast any sharing site for future generations to come (though of course there’s an app for that as well). Teens, tweens and just plain old kids are most apt to figure all this connectivity and tech detail out, and are the most programmed to consider it standard operating procedure.
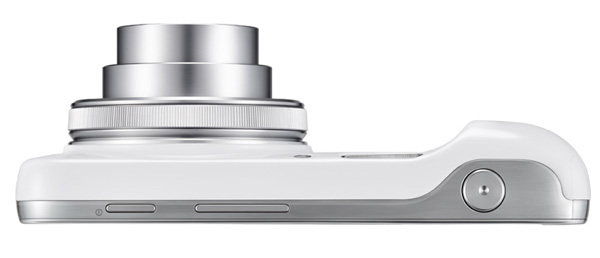
Luckily, I had a focus group of the above-mentioned target group to help me along the way, at least when it came to connectivity and apps and associated matter. The youngest, 11, to whom most things are immediately “stupid”, felt the device was too big and “weird.” In point of fact it’s not much bigger than your standard cameraphone (2.5” wide by 5” long by a touch over 1” thick measured from back to lens), which was pointed out by her older (teenage) sisters. The “weird” comment I think comes from the fusion of “camera” (or at least lens) front to phone back, something we have not seen before, and something she warmed up to after she played with it for a bit.

The complexity of buttons and dials facing digital camera users of late is nowhere in evidence. There’s an on/off small tab button, a volume control and a camera shutter button on top on the long side and a headphone jack on the bottom, plus a menu and “back” touchscreen control on the back along with a tab Home button. There’s a connectivity slot with a USB connector on the other end, which cleverly can be used for charging via computer or to plug into the small AC adapter as well. There’s also a slot for a tiny Micro SD card, although the 12+GB internal memory will do for most, and I always lose those tiny cards anyway. That’s it.
Putting the camera controls to the side for a minute, after start one is presented with many options for connection (including WiFi andBluetooth), apps, the inevitable Google Play Store, Samsung sites for storing and more, browser, phone and email, messaging calendar, et al, including some served ads for various services and products that sneak in once in a while.
This kind of digital personal assistant on overdrive is what seemed to captivate my focus group most, as they are iPhoners and had not yet been exposed to the wonder that is Android. They kept quite busy exploring all this and making the necessary connections and took some pictures from whichthey chose their new wallpaper (picture on the screen), sent some text messages, browsed movie reviews for that night and generally did whatever kids do with their “phone.”
All this worked seamlessly with their iPhones and the Galaxy soon became part of their electronic hookup. I guess what I am saying is that on all those counts the kids gave it high scores and their ability to maneuver through that electronic maze was impressive. I made the image below of two of my “focus group”, handed the S4 Zoom to Emma, on the left, and she explored the innards of the S4 Zoom, which she had never handled before, and messaged the picture to her iPhone to save it as her wallpaper. That took all of about two minutes. She then took some video and handed the device back to me.

The Camera Side
Feeling humbled, I repaired to more familiar ground and began giving the camera side a look-see. Startup from full OFF seems somewhat interminable (I timed it to about 20 seconds—time needed I guess to search for WiFi etc.), so don’t expect to grab it and start snapping away. Once on, the wait shortened considerably but requires that you swipe the screen to reveal the Camera icon, which you touch to open the camera controls. The lens then protrudes about half an inch. This is a 10X optical zoom that you—surprise--physically zoom by turning a knurled ring around the lens barrel, which does not extend the lens further away from the camera body than normal. Needless to say, 10X is extreme and after a few shots with it I strayed no more than 6X for future shots.

At default the unit shuts down to standby mode fairly quickly, requiring you to touch the top tab, swipe and touch the icon to get it up and running again, so you’ll probably want to change that in the settings.
Shooting Menu
The touchscreen settings menu is really quite attractive and fun. Everything you’d find in a new and modern point and shoot/enthusiast camera is in there, with manual, Program, artistic modes and sets, EV compensation, flash control, aperture control, macro, ISO settings and more. There’s also a “shoot and share” command for those images that just can’t wait. And you can “voice control” shutter release (as well as other functions), the choice for shutter release being “smile”, “cheese” and “capture and shoot.” No kidding.
While enticingly designed and silky smooth to operate, the lack of external controls means that switching between functions and image parameters means you have to take the camera from your viewing stance and change them via the bright and highly readable sAMOLED screen and delve back through the menu, something more spontaneous shooters might balk at. Speaking of the screen, I could easily read it in many different levels of brightness. Samsung literature tells us that this is a 4.3” screen, but keep in mind that TV folks measure screens on the diagonal; measured it’s 3.75” long by 2.25” wide.
Image Files
The sensor is a 16MP 1/2.3” BSI (back side illuminated) CMOS, which yielded 34.2MB JPEG files when opened. You can of course “send” those files to other similar devices, but I first sent them to my Mac via Bluetooth, and they opened in the same file size, with no transmission compression. When I opened Image Size in CS6 they show a 72ppi res, designed for web resolution, which I am sure is resized automatically when they are shipped to a similar device or Facebook etc. The opened size reads 4608 x 2592 pixels, which when resized to my usual 220ppi printing resolution can easily yield a 13 x 19” print. I printed out a quick 8x10 on standard glossy photo paper and the results were quite good.

I then wanted to download directly from the camera onto my computer and first had to set up a download path via an application available from the Samsung Support web site called Kies (http://www.samsung.com/us/support/SupportOwnersFAQPopup.do?faq_id=FAQ00052694&fm_seq=61273). This is quickly and easily done and once installed the multi-faceted software immediately recognized the camera, offered me various folders into which todownload of photos I took, stored them on the camera’s internal memory (12+GB, you can also use a Micro SD), and hastened the images into my selected folder on the desktop. All in all, a breeze. I prefer this method way over using Bluetooth for it’s efficiency and speed, especially because you can simply Select All and then edit easily enough using your usual Browser on a largerscreen.
Image Quality
As to picture quality itself, I first felt the camera struggled a bit with high contrast scenes, though learning more about the camera controls helped me gain better quality when using the various modes and EV compensation. In the fall scene below I chose the Landscape mode and felt it simply added too much richness and contrast to the scene, so use modes judiciously.

You can lock exposure via light pressure on the shutter release and the live view will guide you towards highlight control.

You can also alleviate any miscues in exposure via processing and the files seemed amenable to change. There is an auto ISO setup available, and shots made at ISO 800 were passable, and while better than most phonecams I’ve seen at that sensitivity it’s nowhere near what you’d get from today’s budget DSLRs. Interior shots overall fared quite well, and when contrast was moderate I was actually quite pleased with results, much more than any I had experienced on a “connected” device of this ilk before. The image below is a fairly severe crop of an ISO 800 shot made in a practice gym and while grainy, with an almost “film-like” mottling, it was pretty good overall.

As mentioned there are numerous modes available, from gimmicks to quite useable shortcuts. I worked with Macro mode for the photobelow, and the details are as crisp and clear as you could want.

In terms of working with the monitor and live view, I found them invaluable in tricky exposure situations. The interior of this greenhouse is a challenging exposure, with quite bright light above and open but dimmer light below, a condition that could give some “auto” cameras fits. All I did was raise the camera to make the brighter area dominant in the reading, moved the camera around a bit until I got the rendition of the brighter glass to where I wanted it, then locked exposure with light pressure on the shutter release, recomposed and released.

Instruction Guides
I do have to say that those without considerable smartphone experience may struggle with figuring this complex unit out, but give it time and trial and error and you should be OK. The unit I got for test came in standard configuration, I assume, and it only came with a Quickstart guide. The online instruction PDF I found was neither searchable nor indexed nor came with a table of contents. I did not request or get what is called in the trade as a “reviewer’s guide”, and I assume you wouldn’t get one either. The camera part is fairly intuitive for those with some photo experience, but find some kids for the rest.
In all, after a short two weeks of working with the Galaxy S4 Zoom, and with my admittedly limited experience with camera/smartphones, and given what’s out there now, I’d have to say that I was pleasantly surprised at the images the Galaxy 4S Zoom produced. Yes, all the connectivity options and apps vying for attention were dizzying, especially with all the setups and updates it offers, and that can be quite distracting until you sort it out. But given how I use my old iPhone now (email, browsing, weather, phone calls, messaging, directions and yes, even the occasional snapshot) the image quality, screen lucidity, and overall cleverness of how it comes together are what might sway me in the Galaxy’s direction when it’s time for the inevitable update. I just can’t imagine what the next generation might bring.
For full specs contact: www.samsung.com/us
Price: $529; at time of writing, price is considerably lower with various AT&T contracts


![]()
Get the Latest Photo Tips, News & Reviews from Shutterbug!
| Camera Reviews Other Reviews | Mobile Reviews Photography Reviews Columns | News | Features | How-To | Resources |
 © 2025 Shutterbug
AVTech Media Americas Inc., USA
All rights reserved