The Digital Darkroom
Making Custom Brushes In Photoshop Version 7.0
Knowing how to use a "brush" in Photoshop is critical to being able to do very much of anything in this great digital application. Photoshop ships with hundreds of different, ready-made, brushes. Each one of them can then be further customized to meet your exact needs. |
|
But, what some of you may not know is that you can make your own, special, brushes from scratch. Think of a brush as a rubber stamp. It has shape and you can make it bigger or smaller. But, it does not have color. Like using a rubber stamp, you can choose the color of "ink" that you are going to dip your brush into before you use it on your picture. A Photoshop brush can be used
by several different tools in Photoshop. For example, you can use a brush
with the Clone Stamp tool to perform cloning activity. Or, you can use
a brush with the Erasure tool to perform erasing activities. In this article
I am going to be talking about making a custom brush that will be used
mostly by the Brush tool which can be thought of as a regular "paintbrush"
that an artist might use when painting an oil canvas. Of course you can
also use the Brush tool with any of the standard brushes that come with
Photoshop. |
|
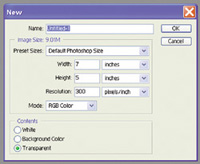
I first went to New and opened a new blank canvas. In this example, I set the size to 7x5" and the resolution to 300 ppi. Be sure to set the Contents to Transparent. Next, I selected the Text tool
and the color Black and then went to the top tool bar and selected Arial
Black and 36 pt. type size. |
|
That gave me the curve effect
that I wanted, but I also thought it would be nice to give the text a
little 3D effect. So, in order to add a drop shadow, I then went to Layer
to Layer Style to Drop Shadow and set the slider bars as shown. Notice
that since I am creating a sort of rubber stamp, I selected to add about
20 units of Noise with the slider bar near the bottom of the Layer Style
window. This would break up the smooth drop shadow and make it a bit grainy,
which would work a lot better than if I had left the drop shadow a smooth
tone value. |
- Log in or register to post comments
