- REVIEWS
Camera Reviews 
More Reviews Mobile Reviews Photography Reviews - GALLERIES
- VIDEOS
- BUYER'S GUIDES
Avoid Saturation & Use the VIBRANCE Tool Instead (VIDEO)

This tutorial is about a common image-killing editing error that you may be guilty of yourself, and demonstrates how easy it is to fix. It’s all about using the wrong Lightroom slider for certain simple tasks when there’s a better approach that’s just as easy to implement
German landscape pro Christian Mohrle is a very accomplished instructor, and he begins this Lightroom tutorial with a warning: “We’ve all raised saturation to ridiculous levels in an attempt to make colors POP. He notes further that while the resulting image may look good to you, “it’s a dead giveaway that the photo was editing by an amateur.” Ouch!
The good news is that in barely five minutes Mohrle shares a few preferred alternatives that will dramatically improve your results. This particular episode is far easier and less complex than most of those we’ve shared from Mohrle before. In fact it’s so straightforward you can start using yjis technique today.
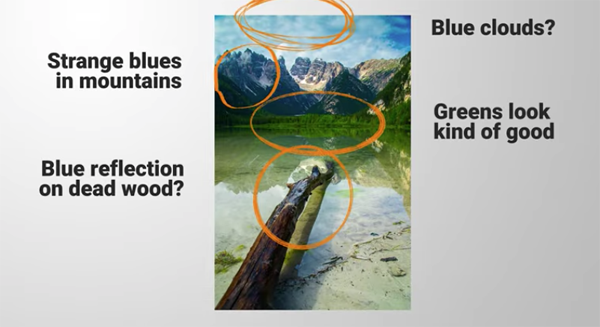
Mohrle says there’s nothing wrong with raising Lightroom’s Saturation slider to pump up colors if you do so in very subtle amounts. But you’ll also learn why the Vibrance slider provides far more control and sort of prevents you from taking a heavy-handed approach that can really ruin an otherwise promising shot.
At first glance the Saturation and Vibrance sliders appear to do the same thing, but there’s a very significant difference between the two: The Saturation slider adjusts the intensity of all colors in an image equally—and that’s usually not want you want. The Vibrance slider, on the other hand, avoids pumping up the most saturated colors, and only affects weaker tones.
As you’ll see, another benefit of the Vibrance tool is that it works wonders when editing skin tones in people pictures. Mohrle quickly demonstrates everything you need to know for making the transition from the Saturation to the Vibrance tool as appropriate. He also has a few other tricks up his sleeve pertaining to HSL settings and using masks to target specific areas/colors for optimum results.

After watching this video head over to Mohrle’s YouTube channel where there’s much more to learn about shooting and editing outdoor images.
And don’t miss another tutorial we posted, explaining a very effective Lightroom trick for “shaping light” in landscape photos.
- Log in or register to post comments


![]()
Get the Latest Photo Tips, News & Reviews from Shutterbug!
| Camera Reviews Other Reviews | Mobile Reviews Photography Reviews Columns | News | Features | How-To | Resources |
 © 2025 Shutterbug
AVTech Media Americas Inc., USA
All rights reserved