Auto FX Software’s Mystical Tint Tone And Color 2.0; Lots Of Filters For Enhancement And Drama
Whether you shoot people, products, or landscapes and nature, Mystical Tint Tone and Color 2.0 (MTTC 2.0) offers a cornucopia of 60 filters to add subtle to striking effects to enliven and enrich your photos. Enhancements range from color effects such as Antique Photo, Moon Glow, Sepia, and Saturate Colors to black-and-white conversion. For those who shoot young people and certain kinds of musicians, tonal effects include contemporary grunge must-haves such as Washed Out, High Key Blast, Grunge Textures, and Hard Posterize. At the other end of the spectrum you may need portrait skin smoothing; eye, hair, and lip enhancements; even reshaping and enlarging/reducing features. Sharpening, tinting, and lens filter effects (polarizer and graduated) join HDR (simulated High Dynamic Range from a single image) offerings to round out the filter categories along with color effects, tonal effects, smoothing, and portrait choices.
 |
In addition to the 22 new filters added since the previous version, the MTTC 2.0 interface has been revamped with larger and faster before/after previews, an improved rendering engine, brush palettes, new effect layers, easier Brush-On/Brush-Off tools, and instant effect presets. Version 2.0 contains over 300 effect layer preset looks and an unlimited number of effect combinations and settings. MTTC 2.0 works with both Windows (2000, XP, and Vista) and Mac (OS X, all versions), and ships with both plug-in and stand-alone versions. Compatible with plug-ins from Photoshop 7 through CS4, MTTC 2.0 costs $249 (an upgrade is available for $129).
Get Mystical
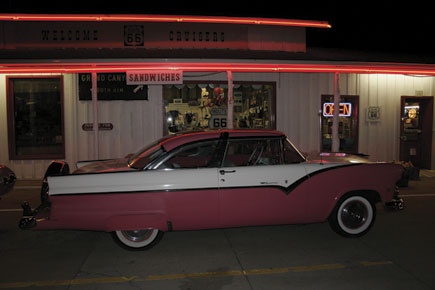
I began with a shot of a vintage Crown Victoria (#1) outside a colorful eatery in Williams, Arizona. Shot at night with a pop-up on-camera flash, the photo is somewhat underexposed.
 |
|
|
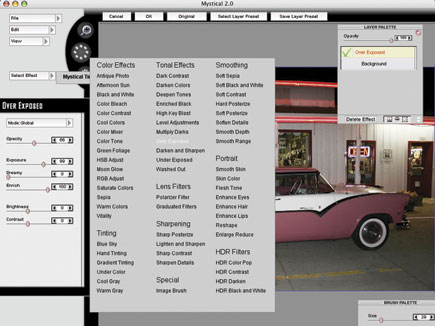
Since I’m using MTTC 2.0 as a plug-in under Photoshop CS4, I opened my photo in CS4 then chose Filter>Auto FX Software>Mystical 2.0. If you’re using the stand-alone application, launch the program and then go to the File>Open menu and select the photo you want to work on. Either way, your photo will then open in MTTC 2.0 as seen in #2. Click on the Select Effect box at the upper left, and Mystical will appear in an adjacent box to the right. Slide your cursor over this to open the large gray window menu of effects choices. To first lighten up my shot, I chose Over Exposed from the Tonal Effects category.
 |
|
|
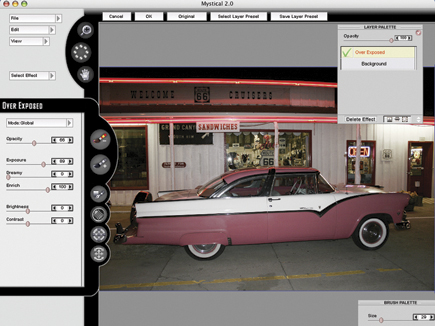
This brought up the Over Exposed panel, lower left (#3). Here, I cranked the Exposure slider up to 89—it can take several seconds for the effect to apply in the preview. Then I moved the Brush Palette down to the bottom right so it was out of my way. That left the Layer Palette at the upper right with the Over Exposed layer active, indicated by a green check mark. Well, the exposure is now a lot better, but this shot needs some electricity.
 |
|
|
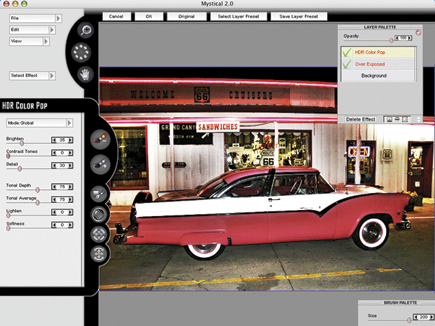
For higher voltage, I went back to the Select Effect box and chose HDR Color Pop (#4) from the HDR Filters category. Notice that this effect has been added as a new layer in the Layer Palette. Whoa, the first blast at the default settings was too much, so in the HDR panel I toned down the Contrast Tones slider to 0. Now that really gives this old Ford some gas in the final image (#5), even if the colors are totally transformed. It’s a gritty, high-contrast, supersaturated color look frequently seen today in films and ads for everything from colas to cars. As a nice bonus, the Auto FX programmer included a Softness slider at the bottom of the HDR panel. Slide this all the way to the right and you’ll send the image into a dreamy, soft-focus world.
 |
|
|
 |
|
|
The Layer Palette also gives you the option of quickly turning any effect on or off by clicking the check mark box to the left of the layer. Click on the green check mark, and it turns into a red X and that effect is no longer visible in the preview. To completely delete an effect, click on the box at the lower left of the Layer Palette.
Some observations: MTTC 2.0 has a nice big preview, but often takes 5-7 seconds for the effect of moving a slider to be rendered on a 10MB, 5x7.5”, 300dpi file. Once my tweaking was complete and I clicked OK at the top of the screen, it took over 30 seconds to apply the two effects and see the finished image in Photoshop.
Uncolor The Canyon
To try one of MTTC 2.0’s black-and-white conversion effects, I opened a view of the Grand Canyon with a bit of haze that I shot without a polarizer (#6). For maximum effect, I selected HDR Black and White (#7). In the HDR panel at lower left, the default green filter rendering was too bland, so I selected a red filter effect which showed more contrast. Next, I pushed the Darken slider up to 24, then slid the Tonal Depth slider to 41.
 |
|
|
 |
|
|
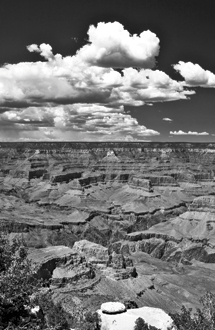
That gave me the punchy but detailed black-and-white rendering seen in #8, quite a nice conversion, even though it took a full 45 seconds to process. I did find that compared to the preview window version, the final effect viewed in Photoshop was about 10-15 percent darker in the mid tones, so I adjusted in MTTC 2.0 to make the preview look a bit lighter than I really wanted.
 |
|
|
I should point out, too, that MTTC 2.0 does not offer the flexibility of Photoshop CS4’s black-and-white conversion, or those in Adobe Camera Raw (ACR) and Lightroom, where you have sliders for the intensity of individual colors, as opposed to the fixed six filters here. I did get more control in MTTC 2.0 by opening an RGB Adjust layer and then the black-and-white layer above it. While this does offer more control, there are only three color sliders in MTTC 2.0’s RGB Adjust as opposed to the six color sliders in Photoshop CS4’s black-and-white adjustment layer or the eight color sliders in the HSL/Grayscale tab of ACR.
