- REVIEWS
Camera Reviews 
More Reviews Mobile Reviews Photography Reviews - GALLERIES
- VIDEOS
- BUYER'S GUIDES
Winter Photo Tips
As winter arrives, so do incredible photo opportunities. Photography is photography, but here are some things you should consider about shooting in wintertime.
 1. Exposing Snow
Short-answer quiz: What color is snow? White, right? Well, in our mind's eye it is. In the real world, though, it can be white (in bright sun), gray or blue (in open shade), or even pink (if your red jacket reflects on it). Even sunlit snow is white in photos only if you expose it properly. Reflected-light exposure meters (which include those built into cameras) are calibrated to provide exposures that reproduce whatever you take the reading from as a medium tone in the resulting photograph. If you take a reading from a medium-toned object and expose accordingly, that object will appear medium-toned in the photograph. Brighter objects will send more light to the film or digital sensor, and thus appear brighter in the photo. Darker objects will send less light to the film or sensor, and thus will appear darker. If you take a reading from sunlit snow, the meter will "see" more light than it would from a medium-toned object, and thus will call for less exposure. The result is an underexposed image with medium-toned rather than white snow. The solution is to give increased exposure—1/2–11/2 stops more than a reflected-meter reading of sunlit snow indicates. (If the snow is in shade, and you want it to appear medium-toned, expose per the meter reading.) If you don't have an exposure meter, for scenic shots of snowy scenes in bright sunlight, use a shutter speed of 1/ISO at f/22 (a stop less exposure that the "Sunny 16" rule calls for in normal daylight): With ISO 100 film (or an ISO setting on a digital camera), use an exposure of 1/100 at f/22, or equivalent (i.e., 1/200 at f/16, 1/50 at f/32, etc.). Of course, it's always a good idea to bracket snow exposures. Take one shot at the metered exposure, then another with the lens opened 1/2 stop, another opened a full stop, and another opened 11/2 stops. This photo has several things going for it: human drama (the climber's obviously precarious endeavor on the snowy and aptly named Devil's Backbone), dramatic lighting, and perfect exposure. Photo by Ron Leach
 2. Natural Fill
One advantage of snow's brightness is that it provides a natural source of fill light for portraits. Here, the subject and photographer were both in a snow cave, and the ambient light provided beautiful fill illumination, while the camera's built-in flash unit added life to the subject's eyes. You can take advantage of snow's reflective qualities to soften harsh shadows in portraits, and record detail throughout the image. Photo by Ron Leach
 3. Winter Sunrises and Sunsets
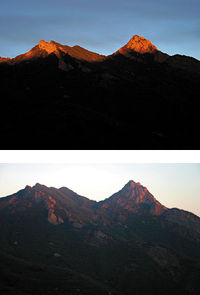
Sunrise and sunset fans love winter, because the the sun rises later and sets earlier, so you don't have to be an early bird or a night owl to get the shot. But another factor comes into play, too. At different times of year, the sun rises and sets at a slightly different point on the horizon. And this can make a big difference in the "look" of a sunrise or sunset scene. For example, at the site where these photos were shot, the winter sun rises over a gap in the eastern hills, thus first illuminating just the tops of these peaks to the west. In summer, the sun rises over the top of one of the hills, so by the time it clears the hilltop, it's high enough to illuminate pretty much the whole western hillside. Which rendition you prefer is up to you; the point is to be aware of such differences, so you can put them to work for you. The top photo was made on January 4, the bottom photo on September 1 of the same year, both just as the sun cleared the eastern terrain. Photo by Mike Stensvold
 4. Clearing Storms
Winter storms can be miserable. But eventually they clear up. And as they do so, they present wonderful photo opportunities. Ansel Adams made some of his most dramatic images during clearing storms, but you needn't camp out in the wilderness to get great shots. Scout out potential shooting locations in your neck of the woods (these images were shot from readily accessible local foothills in the Los Angeles area) that provide great vantage points, and when a storm arrives, check the forecast to see when it's expected to clear. As with all scenic photography, the lighting is most dramatic first thing in the morning and in the late afternoon—fortunately for photographers, this is also when storms tend to clear up. Photo by Mike Stensvold
 5. Caring for Yourself and Your Gear
While winter doesn't always mean snow, in the northern hemisphere it does mean colder weather. Cold weather affects your camera gear as well as you. For your protection, dress warmly in layers, so you can add or remove layers as needed. And wear a hat or cap—much heat is lost through the head. For your gear, keep the camera, lens(es), film and digital memory cards under your jacket or in an insulated camera bag until ready to shoot, and return them quickly when done shooting. Keep spare batteries in a warm pocket. Cold weather saps battery power (lithium types do better than most under cold conditions, but even they exhaust more quickly when it's very cold), so take spares and keep them warm. If you'll be out in the field, check the weather forecast before heading out, and take water and snacks. Keep your film in its protective wrapping until you're ready to use it. On returning indoors, let the camera naturally reach room temperature (placing it in a tight airtight plastic bag helps) before trying to take pictures. And let film warm to room temperature before removing it from its packaging. (Condensation is a problem when moving the camera or film from a cold environment to a warm one, but not when moving from warm to cold.) One more tip: Don't accidentally breathe on your viewfinder's eyepiece as you bring the camera up to your eye for a shot—the eyepiece will fog, making it impossible to compose your shot until you wipe it off. Photo by Ron Leach


![]()
Get the Latest Photo Tips, News & Reviews from Shutterbug!
| Camera Reviews Other Reviews | Mobile Reviews Photography Reviews Columns | News | Features | How-To | Resources |
 © 2025 Shutterbug
AVTech Media Americas Inc., USA
All rights reserved